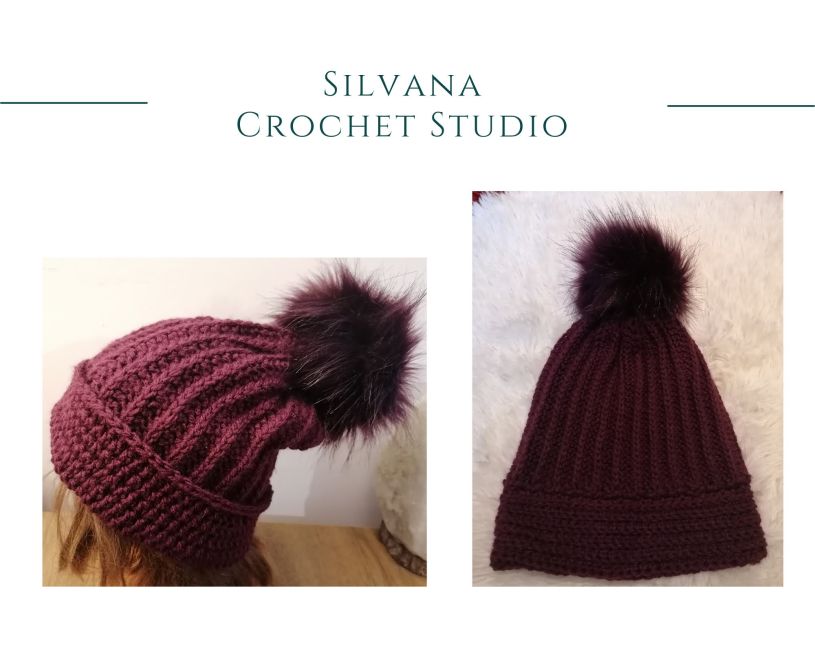

If you’re looking for an easy, beginner-friendly pattern that doesn’t take a lot of thought, yet turns out classy and elegant, the easy , free pattern of Mirela Crochet Beanie is perfect for you! It has great texturing all over that runs in vertical direction just like in knitting, but this version is for crocheters. Did I mention this hat pattern doesn’t take a lot of concentration? Just what we need during this often hectic time of year! The instructions come in 3 sizes to fit toddlers, kids, and women.
This royal prune is becoming more of a popular color that echo the urban-folk trends, but any neutral or natural color will retain the elegance factor of this hat. Or, if you prefer, crochet this beanie pattern in a white hue to make it a winter statement piece! Because the design of this slouch crochet beanie is so clean and uncluttered it fits in almost anywhere. It can be worn every day, and look just as “in place” when attending special events.
This crochet beanie pattern primarily uses 2 stitches: the single crochet and half double crochet. These create the knitted stitch in the body of the beanie. The band is made of half double crochet worked in the 3rd loop.These stitches are very easy to learn, and this crochet beanie pattern gives you plenty of practice!
And don’t forget, crochet beanies make great gifts for the whole family! I love making this style of crochet beanie for everyone on my holiday gift-giving list.
This modern crochet beanie- works up as a flat rectangular shape. To finish the hat, you’ll stitch together the long sides and gather the opening to form a closed tube.
So, if you can crochet back and forth in rows, you can make this simple, free crochet beanie pattern!
The body of the crochet beanie is made with a half-double crochet stitch. Making the hdc through the third loop only makes a stretchy crochet ribbing that’s perfect for hats.
Crochet Hat Size Chart
Wondering what size crochet beanie to make? To correctly size a crochet beanie, you’ll want to make a beanie that’s just a bit smaller than your head size. This way, when the hat stretches, it will fit your head perfectly.
To find your perfect size, use a tape measure to measure the widest part of your head. This will give you your head circumference measurement. Then, subtract about 2″ from this to get the finished hat size measurement. Since this stitch pattern is so stretchy, I find that 2″ of negative ease gives me a nice snug fit.
Size Chart for Crochet Beanies

To make a well-fitting slouchy beanie, crochet as many chains as you need to reach the appropriate hat length measurement, then add to this measurement the brim brim 3″.
And then, crochet as many rows as you need to reach the appropriate hat circumference measurement.
Beanie Crochet Pattern
Skill Level: Beginner/Easy
Finished Size: Newborn through Adult – See Chart (above) for more sizes.
This crochet beanie patttern is for an Adult Medium, or a hat length of 12″ and a circumference of 20″.
Gauge: 16 sts and 12 rows per 4″. Check your gauge, and factor this into your size calculation.e
Materials:
4 medium Worsted yarn – Caron Burgundy Yarn. . Feel free to substitute any other yarn you love. Keep in mind that you will need to make a gauge swatch, and possibly go up or down a hook size depending on your yarn choice.
- crochet Hook: H (5mm)
- yarn needle
- scrissors
- ruler or tape measure
Stitches and Abbreviations
- st/sts – stitch/stitches
- ch – chain
- sc – single crochet
- hdc – half double crochet
Special Stitches
There aren’t any special stitches in this hat pattern. But, you should know that almost all stitches will be made in the Third Loops Only.
Pattern Notes
- This crochet beanie free pattern is written in US terminology.
- The beanie is worked flat, back and forth in rows.
- Then, the finished flat piece is seamed to create a tube.
- After that, one end is gathered to create the hat shape.

Pattern Instructions
Here’s how to crochet the beanie for beginners.
First, take your measurements. I want a brimmed hat with a finished length of 12″ and a circumference of 20″.
Chain 35.
Row 1: Starting in the second chain from the hook, work 1hdc in the next ch stitches to the end of the round. Chain 2 and turn the work. (34 hdc)
It is probably a good time to measure the hat before proceeding. The row should be around 12 inches across. If the work is smaller than this, then go back and add more chain stitches until you have the desired length. If the work is bigger, then go back and take out some chains until you get to the desired length.
Row 2: For this round, you will work camel stitch, which means you will work half double crochet stitches again, but working into the third loop.
Normally, you would insert your hook through the V at the top of the stitch from the previous round. For camel stitch, look for the angled stitch below the V. You can see this third loop in the photos below.
Yarn over and insert your hook in the third loop.
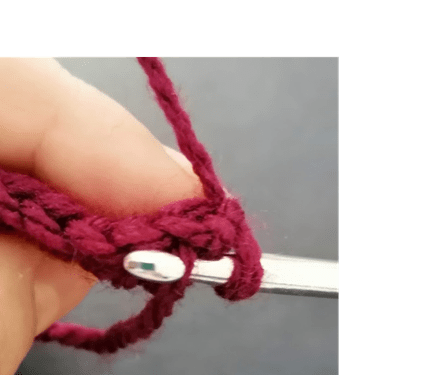

Finish the half double crochet by wrapping the yarn over once more and then draw the yarn through all three loops on the hook.
Continue working camel stitches in the same way, working one stitch into the third loop on each half double crochet from the previous round, then ch 2 and turn the work.
When you look at the opposite side of your work, you should start to see the Vs pushing over and forming the look of this stitch.
Row 3: repeat row 2 until you have a total of 50 rows oruntil the crochet piece measures 20″ along the long edge.
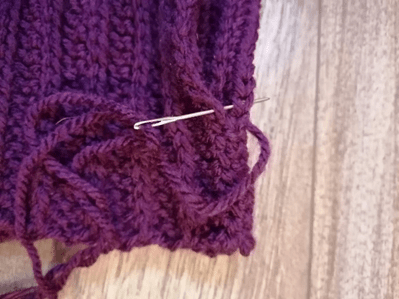
Leave a long tail for sewing, then cut the yarn. With the tail end, match up the first and the last row, and sew the seam. Weave along the top of the hat to close the circle. Sew on a pompom. Fasten off and sew the end in.

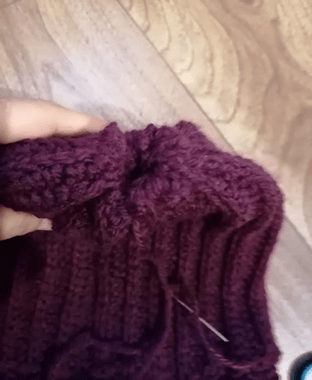
Gather the top of the hat.
Use the yarn tail and a darning needle to make long running stitches along the top edge of the hat. Pull the yarn tail to gather the top edge of the hat, and pull it closed. You can knot the yarn tail to secure it. Weave in the ends.
The Brim
The brim: Using 5mm (H) hook, crochet this next section along the side of the hat.
Round 1: with the wrong side of the hat facing you, ch 1, 2 sc in first hdc, sc in each of the next 2 hdc sts, *2 sc in next hdc, sc in next 2 hdc sts; repeat from * around, join with sl st to first sc.
Round 2: ch 2, hdc in the first st, continue working 1 hdc in each st to the end of the round, join with sl st to first hdc st.
Round 3: ch 2, word 1 hdc around in the tird loop only. Join with sl st to first hdc.
Round 4-7: repeat round 3
If it seems too big, or you want a smaller hat you are welcome to leave off some of the final rows, or to add some if you it bigger.
Explore More Crochet Patterns
If you love to crochet as much as I do, I think you’ll love these other free crochet patterns.
- Diamond Crochet Hat – free pattern
- Alpin Crochet Hat Pattern
- Serenity Crochet Hat Pattern
- Easy Beginner Crochet Hat Pattern
If you want to receive more free patterns directly in your email, subscribe bellow:
