
This cowl pattern is easy to make and works up really quickly – this can be done in one evening. One great thing about this crochet project is that it’s super quick. If you enjoy crocheting projects that are quick and easy, then this project is for you!
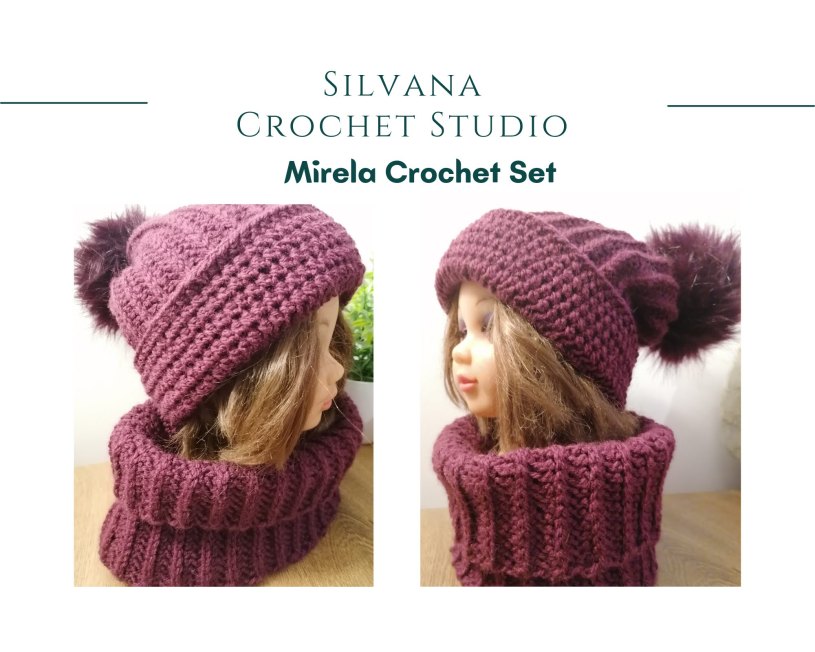
This elegant winter cowl pattern is part two of the Mirela Crochet Set. It easy to make and works up really quickly – this can be done in one evening. I loved so much the beanie I made with the same pattern, Mirela Crochet Beanie that I decided to make a cowl to match the pattern of the hat. This set looks so elegant and cozy in the same time! I love it!
The free crochet pattern can be made in different sizes, so you can customize this cowl to fit almost all your needs!
Did I tell you, that this set I made is made at my sister’s request who lives in Paris, France for more than 20 years. When I designed the pattern, I wanted it to look elegant, urban and cosy. An it dit!
You can follow me on Facebook, Pinterest or Ravelry for more beautiful patterns.

Before you begin making this project, I”ve got some tips from crochet.com that every crocheter should know:
Tips for crochet beginners
Keep your stitches relaxed and loose.
It’s totally natural to feel tense when you are learning something new. The more complicated the stitch you learn, the tighter you will tend to hold your hook. Fight that urge, take a deep breath, and keep your stitches relaxed and loose. The looser the stitches, the more easily you’ll be able to insert your hook, and the easier the process will be!
Practice, practice, practice.
Read the pattern you want to make beforehand. If you see it lists a stitch you haven’t tried before, grab your hook and yarn and practice a few of these before you start your project. By the time you reach that stitch in the pattern, you’ll feel totally comfortable executing the stitch with ease.
Most patterns recommend making a “gauge swatch”, which is usually a square swatch about 4” x 4”. Practice your new stitches while you are making the gauge swatch to perfect your technique, and also to make sure you are making the project to the correct size.
Try different tools.
If you’re just getting started, it might be worth investing in a few different hooks to try. If you’re struggling to catch the loop on your hook, you might need a hook with a deeper bowl or mouth. If inserting your hook into the stitch isn’t going well for you, you might need a hook with a pointier head. A different hook might make all the difference.
Try different Yarns.
Typically, a worsted weight yarn that is smooth and doesn’t tend to split is best for beginners. But everyone has a different preference. Feel free to try out different yarns, we have plenty for you to try!
Learn about gauge.
Avoid this common beginner mistake. Gauge matters! Gauge tells you how many stitches and how many rows of your stitch pattern should fit in a certain amount of inches. Every pattern should have this listed. If you want your finished project to match the photos you see or fit a certain size, you will need your gauge to match what is listed in the pattern. A lot of people skip this step, and sometimes end up with a hat large enough to make a chair cover. Learn about gauge early, it will pay off later!
To frog, or not to frog, you decide!
What’s frogging? It’s when you “rip-it” out (get it? Rip it, ribbit? Frog?) If you have a lot of attention to detail and you recognize a mistake a few rows back, it might be worth frogging it back and fixing the mistake (it will bug you forever). If it’s not a noticeable mistake, decide if you want to go back and fix it. Everyone has a different preference. Don’t feel guilty about your choice.
Don’t be too hard on yourself.
Mistakes happen. Even the most talented and detail-oriented crocheters make mistakes in their work. Nobody has a perfect first project (or first 10 projects). Don’t beat yourself up over mistakes. Be proud of learning something new and know that you’ll improve with time.
SKILL LEVEL: EASY
FINISHED SIZE: 7” tall, 24” circumference.
MATERIALS:
- Hook: 6 mm size
- Worsted weight size 4 Yarn – 1 skien, 100g/210 m Caron Burgundy Yarn.
- Yarn Needle & Scissors
ABBREVIATIONS:
st/sts – stitch/stitches
ch – chain
sc – single crochet
hdc – half double crochet
Special Stitches
This crochet cowl pattern primarily uses 2 stitches: the single crochet and half double crochet. These create the knitted stitch in the body of the cowl. The band is made of half double crochet worked in the 3rd loop (camel stitch). These stitches are very easy to learn, and this crochet cowl pattern gives you plenty of practice!
Making a half-double-crochet in the third loop isn’t as scary as it sounds. If you’re not familiar with crocheting this way see the photo below to help you know where to find the third loop. To crochet a half double crochet stitch, ormally, you would insert your hook through the V at the top of the stitch from the previous round. For camel stitch, look for the angled stitch below the V. You can see this third loop in the photos below.
Pattern Notes
This crochet cowl free pattern is written in US terminology.
The cowl is worked flat, back and forth in rows.
Then, the finished flat piece is seamed to create a tube.
Ch-2 at beginning of row does not count as a stitch.
Unlike the beanie I made with the same pattern, where I used a 5mm crochet hook, the matching cowl I worked it with a 6 mm crochet hook.
This cowl is worked sideways and will look like a scarf before you slip stitch the ends together.
Pattern Instructions
Here’s how to crochet this cowl for beginners for an women size. For children size crochet less chains in the beginning and less rows to reach the desired lenght. For larger sizes, add more chain stitches if necessary and more rows to reche the desire lenght. It is really easy to adjust the pattern as you need.
For my project I started with chaining 31 stitches.
Row 1: Starting in the second chain from the hook, work 1hdc in the next ch stitch and in every stitch to the end of the row. Chain 2 and turn the work. (30 hdc)
It is probably a good time to measure the cowl before proceeding. The row should be around 7 inches across. If the work is smaller than this, then go back and add more chain stitches until you have the desired length. If the work is bigger, then go back and take out some chains until you get to the desired length.

Row 2: For this round, you will work camel stitch, which means you will work half double crochet stitches again, but working into the third loop.
Normally, you would insert your hook through the V at the top of the stitch from the previous round. For camel stitch, look for the angled stitch below the V. You can see this third loop in the photos below.
Yarn over and insert your hook in the third loop.

Finish the half double crochet by wrapping the yarn over once more and then draw the yarn through all three loops on the hook.
Continue working camel stitches in the same way, working one stitch into the third loop on each half double crochet from the previous round, then ch 2 and turn the work.
When you look at the opposite side of your work, you should start to see the Vs pushing over and forming the look of this stitch.
Row 3: repeat row 2 until you have a total of 62 rows oruntil the crochet piece measures 24″ along the long edge.
Finish: Carefully slip stitch those two edges together. Fasten off and weave in ends.


Explore More Crochet Patterns
If you love to crochet as much as I do, I think you’ll love these other free crochet patterns.
Matching Beanie – Mirela Crochet Beanie
Easy and Cozy Crochet Slippers
You can follow me on Facebook, Pinterest or Ravelry for more beautiful patterns.
If you want to receive more free patterns directly in your email, subscribe bellow:
LEAVE A REPLY
Your email address will not be published.
PATTERN TERMS AND CONDITIONS:
You are welcome to share the link to this pattern, using one image of your choice, on your site, but please do not share the written patterns themselves, this includes my Ravelry downloads or translations of these patterns, or use additional images. You do not have permission to use my images by themselves to create pinnable graphics for Pinterest, however they may be included in a roundup pin if there are 4 or more other patterns.
This pattern was made to be used by individuals, and small business crocheters alike. Selling your finished pieces in boutiques, at farmer’s markets, craft shows, and other local events is encouraged! Please credit/link Silvana Crochet Studio when selling finished products online. The only thing I require is that this pattern not be used commercially to produce hundreds of thousands of copies.
