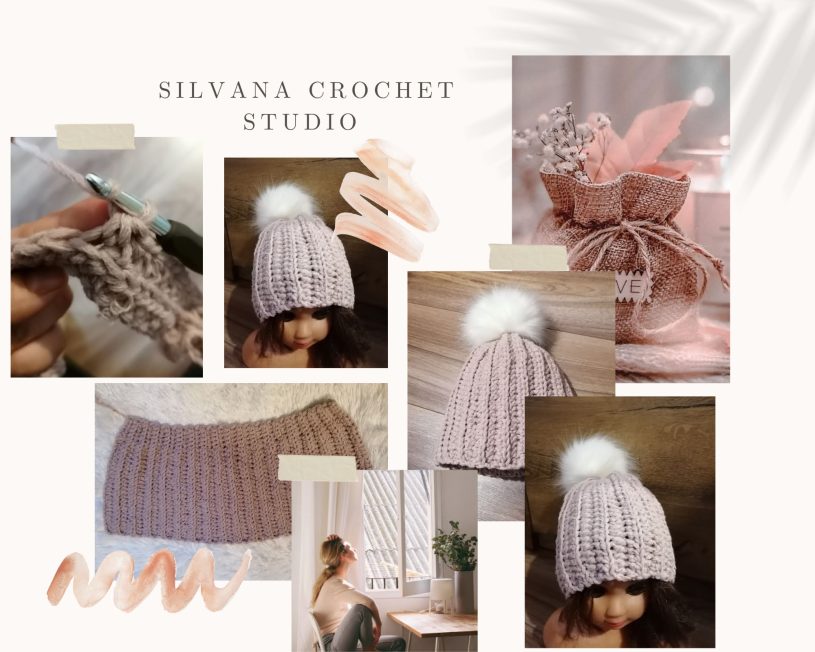

If you have been looking for a free, easy and fast crochet pattern, then you have come to the right place! I will show you below how to make this free pattern in six different sizes, so you’ll be able to crochet a hat for everyone you know.
The style of this free easy crochet hat pattern is perfectly versatile for men and women. Want a little more slouch? Add a few chains at the beginning. Want to make it pint-size for your favorite kiddo? Scroll on and find the size that fits him perfectly.
Because this beanie is so fast and simple, I think it would make a perfect crochet hat pattern for charity.
Tension and Sizing of this Easy and Free Crochet Hat Pattern
The hats are sized to fit Baby, Toddler, Child, Medium Adult, Large Adult.
Scroll on down to learn how to crochet a hat that fits everyoane and much more!
The initial chain of this will be the height of the hat pattern and the rows worked will be the width. You’ll be able to use the hat size chart below, so you know exactly the perfect size crochet hat to make.
Changing the size of a hat is as simple as changing the width of the hat as well as the height.
| Baby | Toddler | Child | Teen | Medium Adult | Large adult | |
| Circumference (in/cm) | 14-16 in 35-40 cm | 16-18 in 40-45 cm | 18-20 in 45-50 cm | 20-22 in 50-55 cm | 21-23 in 52-57cm | 22-24 in 55-60 cm |
| Height (in/cm) | 5-6 in 12-15 cm | 7-7.5 in 17-18 cm | 7.5-8 in 18 -20 cm | 8-8.5 in 20-21 cm | 8.5-9 in 21-22 cm | 9-9.5 in 22 -24 cm |
How to Measure the Hat Size
Measuring a crochet hat is easy and fast. You’ll need a soft tape measure , so you can get the circumference of the head. For example, if you are wanting to make a men’s crochet hat you would crochet your hat to a width of 22 to 24 inches with a 9 or 9.5 inch height more than likely, but measuring that person’s head will give you an exact measurement. The same thing goes any size of crochet hat you want to make from the chart.
The best bet is to always measure the circumference of the persons head you want to make the crochet hat or beanie for because their size may differ from the standard sizes on the chart. If it is not possible to measure, then you can go by the standard chart above when crocheting a hat or a beanie.
Below in the pattern you will be able to see the hat sizes I designed this hat in, so you’ll know exactly how many chains and rows to crochet to get the size you need.
Crochet Stitches for this free, easy and fast crochet hat
This beanie hat uses easy crochet stitches, so any level of crocheter could try to make this if they are feeling adventurous.
The best part (in my opinion) about this hat is that it only uses two simple crochet stitches! If you can work single corchet stitch and half double crochet, then you are good to go with crocheting this beautiful design.
Supplies:
Any bulky yarn (5)
6mm size crochet hook
Tapestry needle
Stitch markers or safety pins
Scrissors
Measuring tape
Fur pom pom or pom pom maker/small piece of cardboard
The Stitches
Learn more about each crochet stitch below, so you will be able to crochet this hat as soon as possible. They are easy stitches!
Single crochet stitch: is the shortest and the most basic of all stitches. You can learn how to crochet it HERE.
Half double crochet: Yarn over and insert the crochet hook into the stitch. Yarn over again and pull the yarn through the stitch. You should now have three loops on the hook. Yarn over one more time and pull the yarn through all three loops. That completes the first half double crochet stitch.
Gauge:
14 stitches = 4”
just over 7 rows = 4”
Abbreviations and Glossary (US Terms):
ch – chain
sc – single crochet
scblo – single crochet through the back loop only
hdc – half double crochet
hdcblo – half double crochet through the back loop only
st – stitch
sk – skip
rep – repeat
Check this Ad-Free instant PDF download that has all the sizes listed for your convenience.
Overall Pattern Notes:
- Follow along with gauge + hat size chart for a perfectly fitted crochet hat.
- The initial chain is the height of the hat.
- All sizes take less than 1 skein of yarn.
- Hat is worked back and forth in rows. These rows will become the vertical ribs on the beanie.
- The ch 2 at the beginning of each row doesn’t count as a stitch.
- To adjust this crochet hat pattern to fit a child, chain fewer stitches at the beginning and work fewer rows total
- After Row 1, the half double crochet stitches and single crochet stitches are worked only under the back loop of the stitch from the previous row. This is always the loop farthest away from you, regardless of which side of the crocheting is facing you.
Baby Size Easy Crochet Hat Pattern
- This easy, free and fast crochet hat pattern is worked flat, back and forth in rows.
- Then, the finished flat piece is seamed to create a tube.
- After that, the end side of sc is gathered to create the hat shape.

Foundation Row: Ch 18 plus ch2.
Row 1: 1 hdc in the third ch from the hook and each next 14 ch sts, 1 sc st in each ch to end of row. Chain 1 and turn. (14 hdc sts and 3 sc sts)
Starting row 2, the half double crochet stitches and single crochet stitches are worked only under the back loop of the stitch from the previous row. This is always the loop farthest away from you, regardless of which side of the crocheting is facing you. There is an exception for each row which ends in hdc sts, the last hdc st will be worked in both loops. Only the last one!
Row 2: Scblo in the first stitch from the hook and in the next 2 sts, hdcblo in each hdc to end of row, the last hdc st will be worked in both loops. Only the last one! Chain 2 and Turn. (3 blosc sts, 15 blohdc sts)
Row 3: 1 blohdc in each of the next 15 sts, 1 scblo st in each st to end of row. Chain 1 and turn. (15 blohdc sts and 3 blosc sts)
Measure work. Should be 5-6 inches. If small is smaller than this size add a few mor hdc st to reach the desired lenght (or start over and use a larger crochet hook). If work is larger, take out some hdc sts (or start over and use a smaller crochet hook).
Repeat rows 2 and 3 until you have a total of 26 rows or you reach the desired lenght.
Fasten off, leaving a 24” tail.
Rectangle dimensions should be approximately: 5” x 15″
For the best look, seam is worked only through the chain stitches and the loop of each hdc st that is closest to the seam.
Lay rectangle horizontally. Use stitch markers or safety pins to pin seam if desired.
Thread tapestry needle with tail from fastening off. Work from the top of hdc st into top of corresponding ch. Continue like this through the top of one hdc to the top of one ch . Repeat until end of seam.
Tie a simple sewing knot by inserting needle in crochet fabric to create a loop of yarn, then inserting needle through loop of yarn and pulling tight. This will prevent seam from puckering in next step. Do not trim yarn.
Using tapestry needle and strand of yarn leftover from previous seam, whip stitch around the top of the hat, working one whip stitch into each row. Tighten circle as much as possible and use tapestry needle to sew up any remaining opening in top of hat.
Toddler Size Easy Crochet Hat Pattern
- This easy, free and fast crochet hat pattern is worked flat, back and forth in rows.
- Then, the finished flat piece is seamed to create a tube.
- After that, the end side of sc is gathered to create the hat shape.
Foundation Row: Ch 25 plus ch2.
Row 1: 1 hdc in the third ch from the hook and each next 20 ch sts, 1 sc st in each ch to end of row. Chain 1 and turn. (21 hdc sts and 4 sc sts)
Starting row 2, the half double crochet stitches and single crochet stitches are worked only under the back loop of the stitch from the previous row. This is always the loop farthest away from you, regardless of which side of the crocheting is facing you. There is an exception for each row which ends in hdc sts, the last hdc st will be worked in both loops. Only the last one!
Row 2: Scblo in the first stitch from the hook and in the next 3 sts, hdcblo in each hdc to end of row, the last hdc st will be worked in both loops. Only the last one! Chain 2 and Turn. (4 blosc sts, 21 blohdc sts)
Row 3: 1 blohdc in each of the next 20 sts, 1 scblo st in each st to end of row. Chain 1 and turn. (21 blohdc sts and 4 blosc sts)
Measure work. Should be 7 -7.5inches. If small is smaller than this size add a few mor hdc st to reach the desired lenght (or start over and use a larger crochet hook). If work is larger, take out some hdc sts (or start over and use a smaller crochet hook).
Repeat rows 2 and 3 until you have a total of 30 rows or you reach the desired lenght.
Fasten off, leaving a 24” tail.
Rectangle dimensions should be approximately: 7” x 17″
For the best look, seam is worked only through the chain stitches and the loop of each hdc st that is closest to the seam.
Lay rectangle horizontally. Use stitch markers or safety pins to pin seam if desired.
Thread tapestry needle with tail from fastening off. Work from the top of hdc st into top of corresponding ch. Continue like this through the top of one hdc to the top of one ch . Repeat until end of seam.
Tie a simple sewing knot by inserting needle in crochet fabric to create a loop of yarn, then inserting needle through loop of yarn and pulling tight. This will prevent seam from puckering in next step. Do not trim yarn.
Using tapestry needle and strand of yarn leftover from previous seam, whip stitch around the top of the hat, working one whip stitch into each row. Tighten circle as much as possible and use tapestry needle to sew up any remaining opening in top of hat.
Child Size Easy Crochet Hat Pattern
- This easy, free and fast crochet hat pattern is worked flat, back and forth in rows.
- Then, the finished flat piece is seamed to create a tube.
- After that, the end side of sc is gathered to create the hat shape.
Foundation Row: Ch 28 plus ch2.
Row 1: 1 hdc in the third ch from the hook and each next 22 ch sts, 1 sc st in each ch to end of row. Chain 1 and turn. (23 hdc sts and 5 sc sts)
Starting row 2, the half double crochet stitches and single crochet stitches are worked only under the back loop of the stitch from the previous row. This is always the loop farthest away from you, regardless of which side of the crocheting is facing you. There is an exception for each row which ends in hdc sts, the last hdc st will be worked in both loops. Only the last one!
Row 2: Scblo in the first stitch from the hook and in the next 4 sts, hdcblo in each hdc to end of row, the last hdc st will be worked in both loops. Only the last one! Chain 2 and Turn. (5 blosc sts, 23 blohdc sts)
Row 3: 1 blohdc in each of the next 22 sts, 1 scblo st in each st to end of row. Chain 1 and turn. (23 blohdc sts and 5 blosc sts)
Measure work. Should be around 8 inches. If small is smaller than this size add a few mor hdc st to reach the desired lenght (or start over and use a larger crochet hook). If work is larger, take out some hdc sts (or start over and use a smaller crochet hook).
Repeat rows 2 and 3 until you have a total of 37 rows or you reach the desired lenght.
Fasten off, leaving a 24” tail.
Rectangle dimensions should be approximately: 8” x 19″
For the best look, seam is worked only through the chain stitches and the loop of each hdc st that is closest to the seam.
Lay rectangle horizontally. Use stitch markers or safety pins to pin seam if desired.
Thread tapestry needle with tail from fastening off. Work from the top of hdc st into top of corresponding ch. Continue like this through the top of one hdc to the top of one ch . Repeat until end of seam.
Tie a simple sewing knot by inserting needle in crochet fabric to create a loop of yarn, then inserting needle through loop of yarn and pulling tight. This will prevent seam from puckering in next step. Do not trim yarn.
Using tapestry needle and strand of yarn leftover from previous seam, whip stitch around the top of the hat, working one whip stitch into each row. Tighten circle as much as possible and use tapestry needle to sew up any remaining opening in top of hat.
Teen Size Easy Crochet Hat Pattern
- This easy, free and fast crochet hat pattern is worked flat, back and forth in rows.
- Then, the finished flat piece is seamed to create a tube.
- After that, the end side of sc is gathered to create the hat shape.
Foundation Row: Ch 30 plus ch2.
Row 1: 1 hdc in the third ch from the hook and each next 24 ch sts, 1 sc st in each ch to end of row. Chain 1 and turn. (25 hdc sts and 5 sc sts)
Starting row 2, the half double crochet stitches and single crochet stitches are worked only under the back loop of the stitch from the previous row. This is always the loop farthest away from you, regardless of which side of the crocheting is facing you. There is an exception for each row which ends in hdc sts, the last hdc st will be worked in both loops. Only the last one!
Row 2: Scblo in the first stitch from the hook and in the next 4 sts, hdcblo in each hdc to end of row, the last hdc st will be worked in both loops. Only the last one! Chain 2 and Turn. (5 blosc sts, 25 blohdc sts)
Row 3: 1 blohdc in each of the next 24 sts, 1 scblo st in each st to end of row. Chain 1 and turn. (25 blohdc sts and 5 blosc sts)
Measure work. Should be 8-8.5 inches. If small is smaller than this size add a few mor hdc st to reach the desired lenght (or start over and use a larger crochet hook). If work is larger, take out some hdc sts (or start over and use a smaller crochet hook).
Repeat rows 2 and 3 until you have a total of 38 rows or you reach the desired lenght.
Fasten off, leaving a 24” tail.
Rectangle dimensions should be approximately: 8” x 21″
For the best look, seam is worked only through the chain stitches and the loop of each hdc st that is closest to the seam.
Lay rectangle horizontally. Use stitch markers or safety pins to pin seam if desired.
Thread tapestry needle with tail from fastening off. Work from the top of hdc st into top of corresponding ch. Continue like this through the top of one hdc to the top of one ch . Repeat until end of seam.
Tie a simple sewing knot by inserting needle in crochet fabric to create a loop of yarn, then inserting needle through loop of yarn and pulling tight. This will prevent seam from puckering in next step. Do not trim yarn.
Using tapestry needle and strand of yarn leftover from previous seam, whip stitch around the top of the hat, working one whip stitch into each row. Tighten circle as much as possible and use tapestry needle to sew up any remaining opening in top of hat.
Mediul Adult Size Crochet Hat Pattern
- This free, easy and fast crochet hat pattern is worked flat, back and forth in rows.
- Then, the finished flat piece is seamed to create a tube.
- After that, the end side of sc is gathered to create the hat shape.
Foundation Row: Ch 32 plus ch2.
Row 1: 1 hdc in the third ch from the hook and each next 25 ch sts, 1 sc st in each ch to end of row. Chain 1 and turn. (26 hdc sts and 6 sc sts)
Starting row 2, the half double crochet stitches and single crochet stitches are worked only under the back loop of the stitch from the previous row. This is always the loop farthest away from you, regardless of which side of the crocheting is facing you. There is an exception for each row which ends in hdc sts, the last hdc st will be worked in both loops. Only the last one!
Row 2: Scblo in the first stitch from the hook and in the next 2 sts, hdcblo in each hdc to end of row, the last hdc st will be worked in both loops. Only the last one! Chain 2 and Turn. (6 blosc sts, 26 blohdc sts)
Row 3: 1 blohdc in each of the next 25 sts, 1 scblo st in each st to end of row. Chain 1 and turn. (26 blohdc sts and 6 blosc sts)
Measure work. Should be 8.5-9 inches. If small is smaller than this size add a few mor hdc st to reach the desired lenght (or start over and use a larger crochet hook). If work is larger, take out some hdc sts (or start over and use a smaller crochet hook).
Repeat rows 2 and 3 until you have a total of 40 rows or until you reach the desired lenght.
Fasten off, leaving a 24” tail.
Rectangle dimensions should be approximately: 8.5” x 22″
For the best look, seam is worked only through the chain stitches and the loop of each hdc st that is closest to the seam.
Lay rectangle horizontally. Use stitch markers or safety pins to pin seam if desired.
Thread tapestry needle with tail from fastening off. Work from the top of hdc st into top of corresponding ch. Continue like this through the top of one hdc to the top of one ch . Repeat until end of seam.
Tie a simple sewing knot by inserting needle in crochet fabric to create a loop of yarn, then inserting needle through loop of yarn and pulling tight. This will prevent seam from puckering in next step. Do not trim yarn.
Using tapestry needle and strand of yarn leftover from previous seam, whip stitch around the top of the hat, working one whip stitch into each row. Tighten circle as much as possible and use tapestry needle to sew up any remaining opening in top of hat.
Sew on a pom-pom.

Large Adult Size Crochet Hat Pattern
- This free and easy crochet hat patten is worked flat, back and forth in rows.
- Then, the finished flat piece is seamed to create a tube.
- After that, the end side of sc is gathered to create the hat shape.
Foundation Row: Ch 34 plus ch2.
Row 1: 1 hdc in the third ch from the hook and each next 27 ch sts, 1 sc st in each ch to end of row. Chain 1 and turn. (28 hdc sts and 6 sc sts)
Starting row 2, the half double crochet stitches and single crochet stitches are worked only under the back loop of the stitch from the previous row. This is always the loop farthest away from you, regardless of which side of the crocheting is facing you. There is an exception for each row which ends in hdc sts, the last hdc st will be worked in both loops. Only the last one!
Row 2: Scblo in the first stitch from the hook and in the next 5 sts, hdcblo in each hdc to end of row, the last hdc st will be worked in both loops. Only the last one! Chain 2 and Turn. (3 blosc sts, 28 blohdc sts)
Row 3: 1 blohdc in each of the next 27 sts, 1 scblo st in each st to end of row. Chain 1 and turn. (28 blohdc sts and 6 blosc sts)
Measure work. Should be 9-9.5 inches. If small is smaller than this size add a few mor hdc st to reach the desired lenght (or start over and use a larger crochet hook). If work is larger, take out some hdc sts (or start over and use a smaller crochet hook).
Repeat rows 2 and 3 until you have a total of 42 rows or you reach the desired lenght.
Fasten off, leaving a 24” tail.
Rectangle dimensions should be approximately: 9” x 24″
For the best look, seam is worked only through the chain stitches and the loop of each hdc st that is closest to the seam.
Lay rectangle horizontally. Use stitch markers or safety pins to pin seam if desired.
Thread tapestry needle with tail from fastening off. Work from the top of hdc st into top of corresponding ch. Continue like this through the top of one hdc to the top of one ch . Repeat until end of seam.
Tie a simple sewing knot by inserting needle in crochet fabric to create a loop of yarn, then inserting needle through loop of yarn and pulling tight. This will prevent seam from puckering in next step. Do not trim yarn.
Using tapestry needle and strand of yarn leftover from previous seam, whip stitch around the top of the hat, working one whip stitch into each row. Tighten circle as much as possible and use tapestry needle to sew up any remaining opening in top of hat.
Sew on a pom-pom.
Get a Ad-Free PDF instant download here.
Be sure to check out my other patterns on my blog and subscribe for all future projects, patterns and much more. As always, thanks for stopping by!

What’s Next?
Pin this post: Save this tutorial to your >>> Pinterest <<< boards so that you can come back to it later.
Leave a comment: We love to hear your feedback. Tell me in the comments below!
Share on Facebook: When you make this project, share it on social media and tag me.
Have questions? Join the Facebook Group! We created this group for you to share pictures, ask questions, and help each other out.
Don’t miss out new free crochet patterns, tutorials and other updates from my Crochet Studio. Subscribe for more patterns, projects and much more!
https://www.facebook.com/Crochet-Studio-109053121549752
