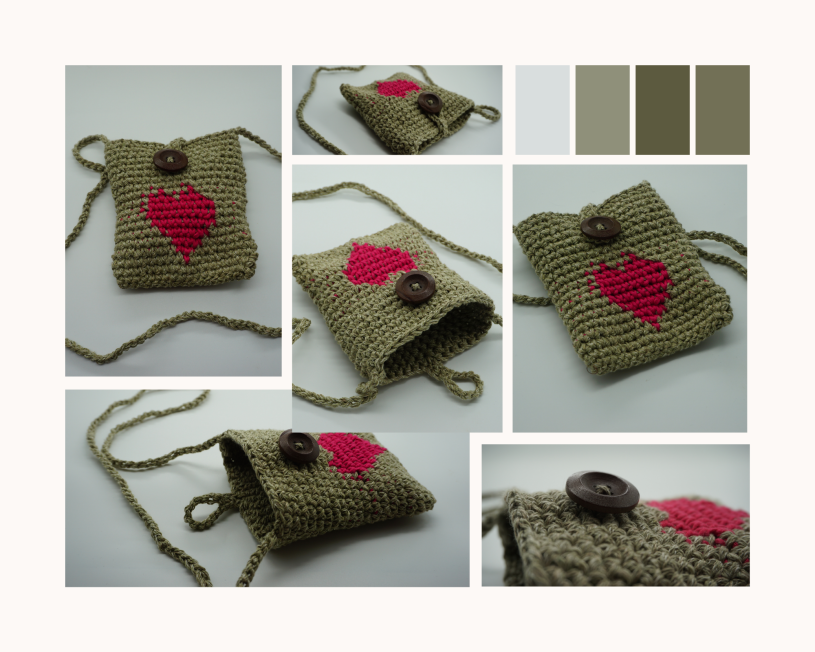
If you are looking for a cross body bag pattern to hold your phone, so you can be hands free and listen to music while doing chores or other things, well this pattern is for you.
This cross body crochet pattern is really several patterns in one – you can make it with the „heart” design or without; with a long strap to wear it as a necklace or cross body style, or even with a short strap to wear it as a wristlet; or leave off the strap altogether and call it a phone case.
PREFER A PDF?
This pattern is also available as an ad-free, printable PDF here! And if you love PDFs, you might want to check out my Raverly Page or my Etsy Store.
Notes
- This cross body crochet bag pattern is worked in American Standard Terms.
- Beginning chain does NOT count as a stitch in stitch counts.
- Contrasting Colour (CC) yarn is carried behind each round to strengthen bag (Base Colour (BC) yarn is carried behind round when CC yarn is in use).
- SWITCHING COLOURS: Use colour needed for next stitch to complete
current stitch.
- I designed cross body bag to fit both Android and iPhone (and probably most smartphones, but you’ll have to check yours as you go), it’s easy to adapt it to the size of your particular device, without doing too much reworking. You could even modify it to be used as a cover for a tablet or iPad cover! For the extra security I added a closure with a lovely wooden button.
- The main stitch used in this cross body bag pattern is the Single Crochet Cross Stitch, which is an easy and fun variation of the single crochet stitch. The only catch is that it is worked in a round.
- The single crochet cross stitch is a fairly dense stitch. This means that the resulting fabric may be quite stiff but also have a solid texture.
Materials needed to make this Crochet Cross Body Bag
Hook: H (5.00mm) size
Yarn: About 100 yards of Finesse Cotton Silk DK (two strands of any Light weight (3) yarn, or one strand of yarn in Medium weight (4).
Scrissors
Measuring tape
Tapestry needle
You’ll also need: 1 button, plus tools to attach it.
Difficulty: Easy
Finished Size: 4″ wide x 6″ tall
Gauge: 14 sts/13 row=4 inches
Looking for the pattern for a cross body bag? Keep scrolling down!
Abbreviations
ch-chain
st(s) – stitch(es)
sl st – slip stitch
sc – single crochet
scc – single crochet cross stitich
BC – base colour
CC – contrast colour (used for the heart)
How to crochet this cross body bag
Bag is worked from the bottom up, in the round and bottom is seamed together at end.
As I mentioned earlier this project is worked in rounds in this pattern. This means that at the end of each round you will join with a slip stitch into the first stitch.
Stiches used in the cross body bag pattern: slip knot, chain stitch (ch st), slip stitch (sl st), single crochet (sc st), single crochet cross stitch (scc st).
Slip Knot
Slide the knot up the hook and tighten gently.
Chain (ch):
With the hook through the slip knot, yarn over hook (yoh) and pull the yarn through the loop to make a new chain (ch). Chain stitch (ch st) made.
Forming a Ring
Chain (ch) as many stitches as indicated, insert the hook in the 1st ch, yarn over hook (yoh) and pull through the 1st ch and the ch on the hook
Single Crochet (sc)
Insert the hook into the 2nd chain (ch) from the hook, yarn over hook (yoh) and draw the yarn through the work only.
Yoh again and draw through both loops on the hook. Single crochet (sc) made. Repeat as indicated.
Single crochet cross stitch
As mentioned above, this stitch is a single crochet stitch with a slight variation. So, working in the same stitch as joining, insert your hook.
Next, instead of placing your yarn over your hook as you would for a regular single crochet stitch, you are going to yarn under. So, for the single crochet cross stitch, pace your hook over your yarn and draw your loop through.
Pattern for the Crochet Cross Body Bag
Chain 35, slip stith last chain to first chain to form a a ring. (35 ch)
Round 1: Using BC (Base Colour)
Ch1, insert the hook into the same stitch where you worked your chain and do a single crochet stitch. Continue working one single crochet stitch around. At the end of the round, join with a slip stitch to the firs sc st. (35 sc sts)
Round 2: Using BC (Base Colour)
ch 1, scc st in the same st where you worked your ch, (remember to to yarn under the hook), continue working 1 scc st in each st around. Join with a slip stitch to the firs sc st. (35 scc sts)
Round 3: Using BC (Base Colour)
ch 1, scc st in the same st where you worked your ch, continue working 1 scc st in each st around. Join with a slip stitch to the firs sc st. (35 scc sts)
Round 4: Using BC (Base Colour)
ch 1, scc st in the same st where you worked your ch, continue working 1 scc st in each st around. Join with a slip stitch to the firs sc st. (35 scc sts)
Round 5:
Using BC – ch 1, scc in the next eight sts, (35
Using CC – scc st in the next st,
Using BC – scc sts in the remaining stitches in round.
Join to top of the beginning st with a sl st.
Round 6:
BC – ch 1, scc st s in the next 7 sts,
CC – scc st in the next 3 sts,
BC – scc sts in the remaining stitches in round.
Join to top of the beginning st with a sl st.
Round 7:
Using BC – ch 1, scc in the next 6 sts,
Using CC – scc st in the next 5 sts,
Using BC – scc sts in the remaining stitches in round.
Using Join to top of the beginning st with a sl st.
Round 8:
Using BC – ch 1, scc in the next 5 sts,
Using CC – scc st in the next 7 sts,
Using BC – scc sts in the remaining stitches in round.
Using Join to top of the beginning st with a sl st.
Round 9:
Using BC – ch 1, scc in the next 4 sts,
Using CC – scc st in the next 9 sts,
Using BC – scc sts in the remaining stitches in round.
Using Join to top of the beginning st with a sl st.
Round 10:
Using BC – ch 1, scc in the next 3 sts,
Using CC – scc st in the next 11 sts,
Using BC – scc sts in the remaining stitches in round.
Using Join to top of the beginning st with a sl st.
Round 11:
Using BC – ch 1, scc in the next 3 sts,
Using CC – scc st in the next 11 sts,
Using BC – scc sts in the remaining stitches in round.
Using Join to top of the beginning st with a sl st.
Round 12:
Using BC – ch 1, scc in the next 3 sts,
Using CC – scc st in the next 11 sts,
Using BC – scc sts in the remaining stitches in round.
Using Join to top of the beginning st with a sl st.
Round 13:
Using BC – ch 1, scc in the next 3 sts,
Using CC – scc st in the next 5 sts,
Using BC – scc next st
Using CC- scc next 5 stitches
Using BC – scc sts in the remaining stitches in round.
Using Join to top of the beginning st with a sl st.
Round 14:
Using BC – ch 1, scc in the next 4 sts,
Using CC – scc st in the next 3 sts,
Using BC – scc next 3 sts
Using CC- scc next 3 stitches
Using BC – scc sts in the remaining stitches in round.
Using Join to top of the beginning st with a sl st.
Round: 15
Using BC ch 1, scc sts around,
Join to top of beginning st with sl st.
Rounds 16 to 21 (or until you reach the desired size): repeat round 15.
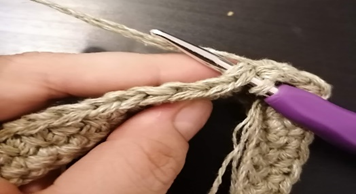
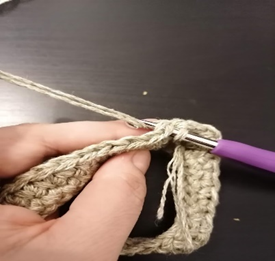
Round 22 (last round):
Using BC ch 1, scc 26 sts, ch 15, insert the hook in the 3rd ch from the beginning and work one sc st (see photo bellow), continue working in each of the next two sts 1 sc st, then 1 sc st in the same st where we started our chains, scc sts in the remaining stitches in round.
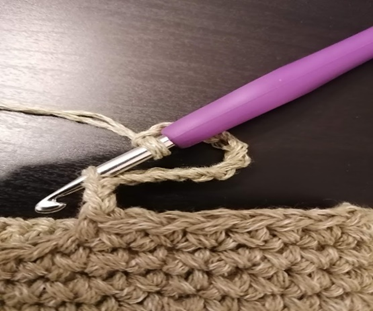
Join to top of the beginning st with a sl st.
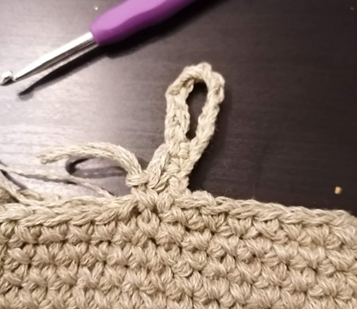
Don’t cut the yarn off, continue to work 150 chain stitches (or until you reach the desired length) with a 6 mm size crochet hook to make the crossbody long strap. Sl st to the other side of the bag. Fasten off and weave the ends in.
Turn bag inside out and lay flat.
Beginning at the side seam (where you joined your rounds)
slip stitch the bottom of the bag together.
Sew button, centered on the front side
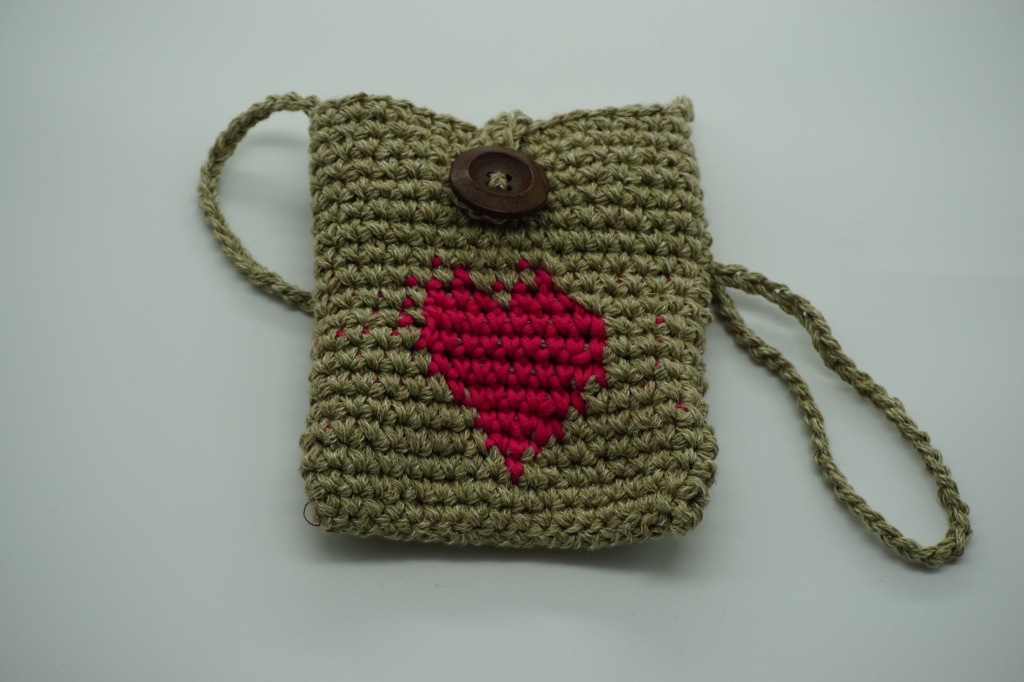
Congratulations! A new cross body crochet bag is now finished!
If you enjoyed this crochet cross body bag pattern or found it useful, why not share a link to this post with your friends?
>>>PIN IT FOR LATER<<<
Want more gorgeous crochet patterns? Subscribe below and you will be the first to find out my new patterns release.
You can also follow me on Facebook and Pinterest.
PATTERN TERMS AND CONDITIONS:
You are welcome to share the link to this pattern, using one image of your choice, on your site, but please do not share the written patterns themselves, this includes my Ravelry downloads or translations of these patterns, or use additional images. You do not have permission to use my images by themselves to create pinnable graphics for Pinterest.
This pattern was made for personal use, and small business crocheters alike. Mass production is not allowed. Selling your finished pieces in boutiques, markets, craft shows, and local events is encouraged! Please credit/link Silvana Crochet Studio when selling finished products online.
