
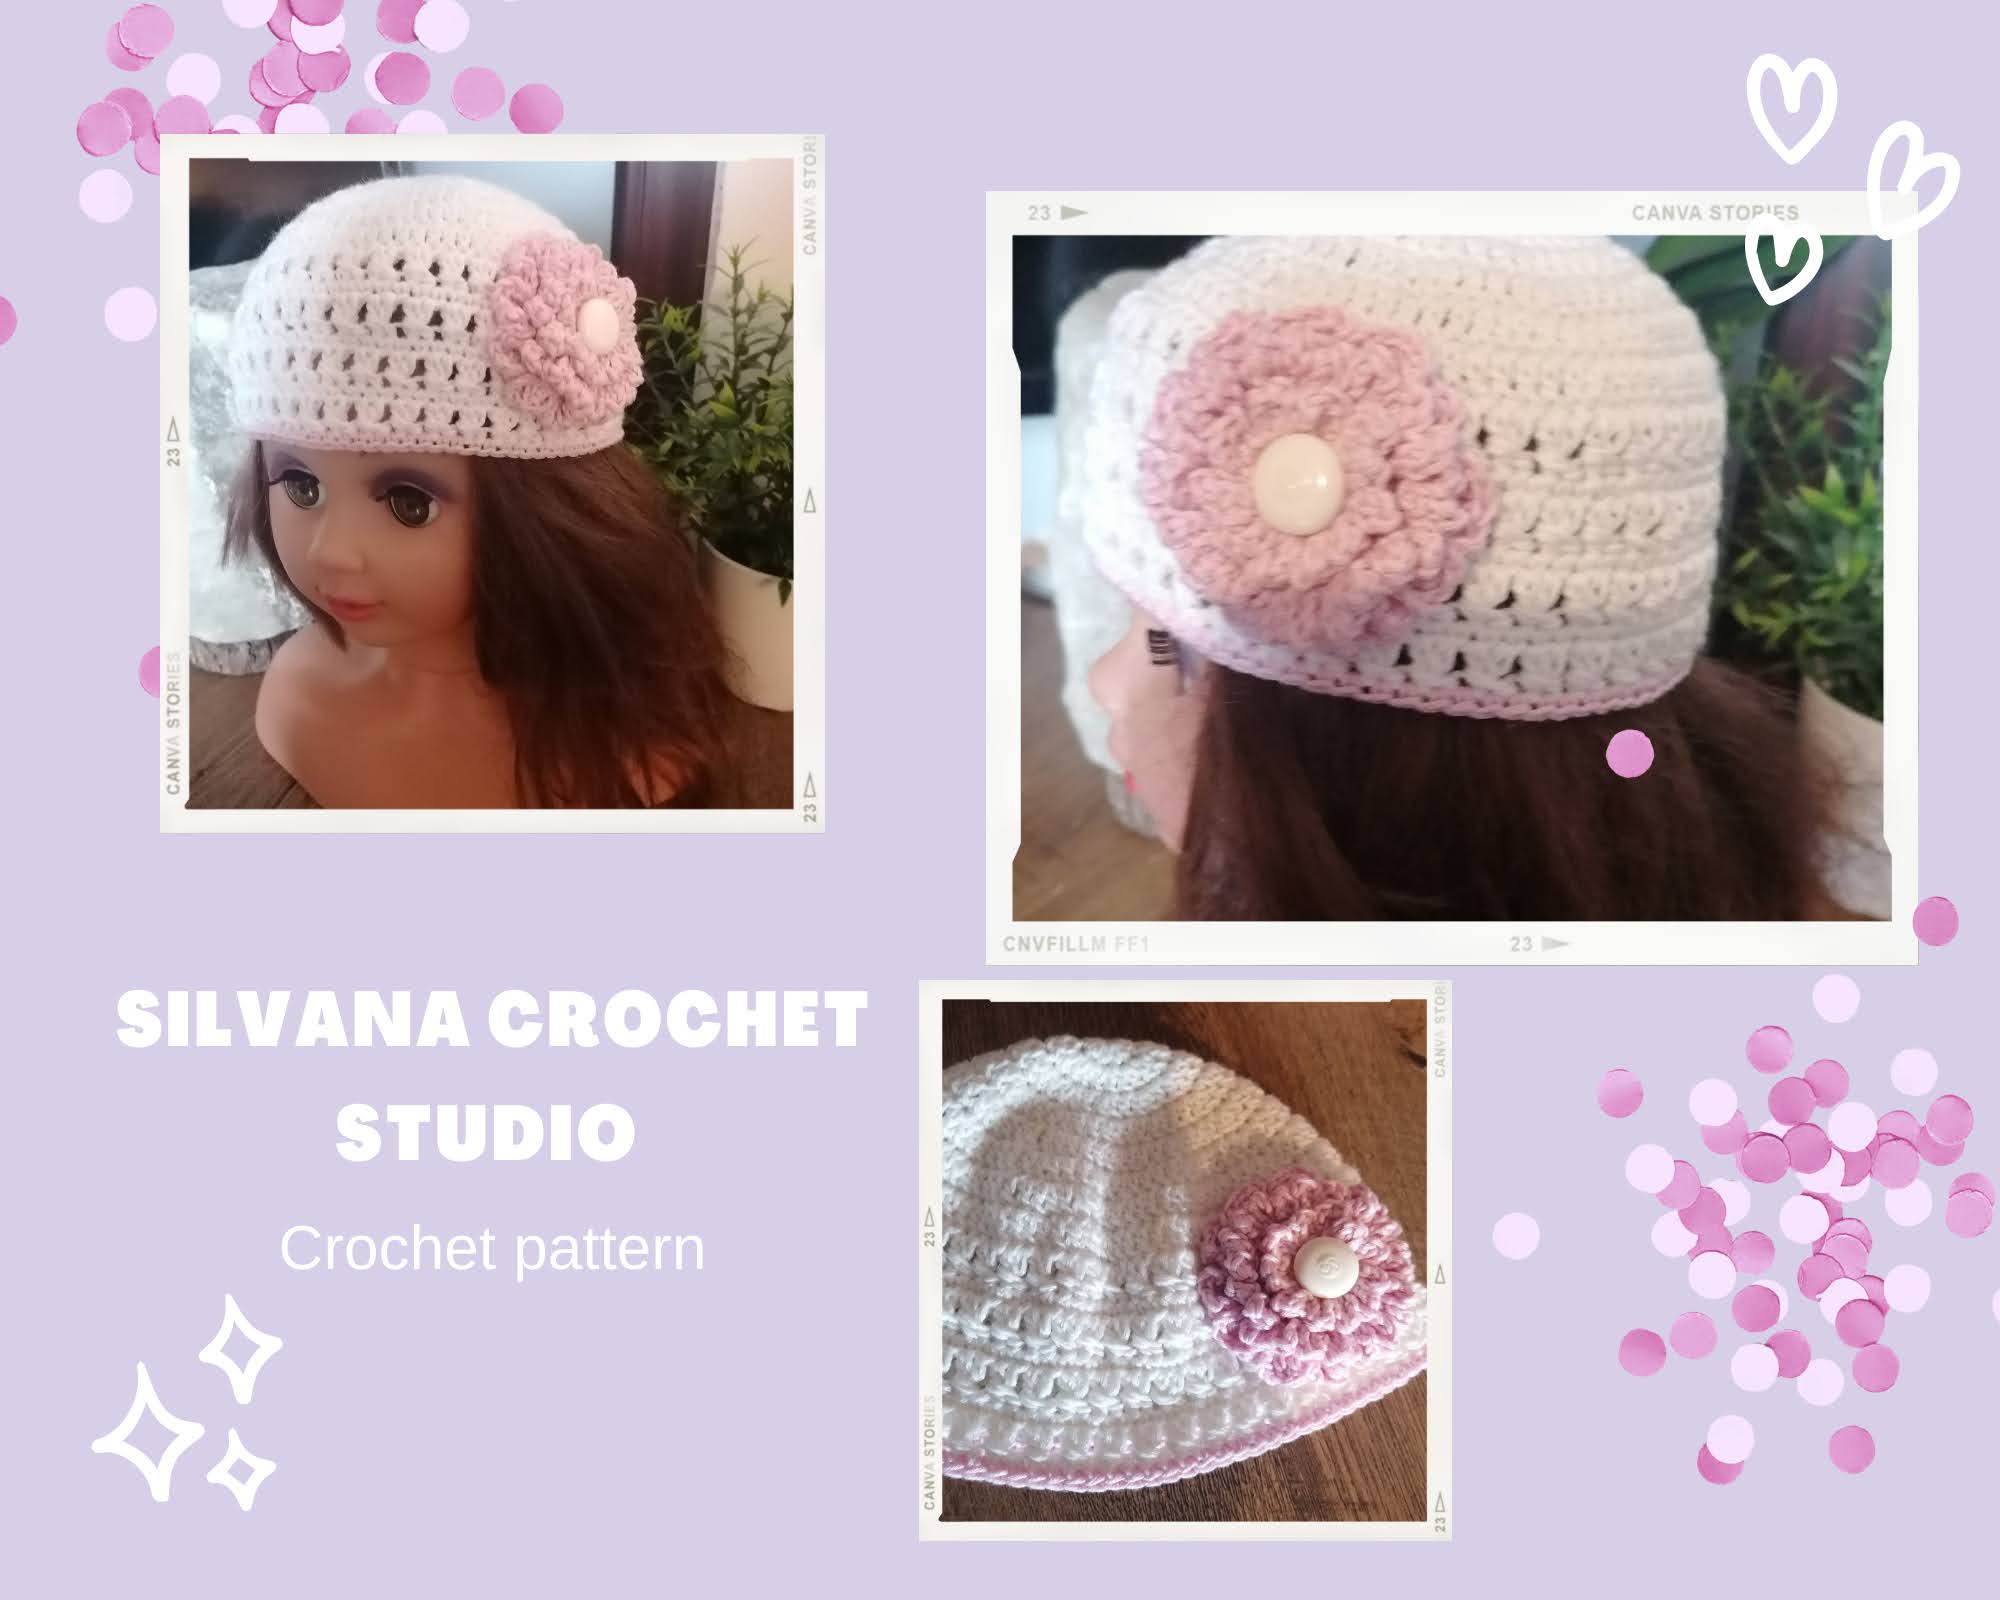
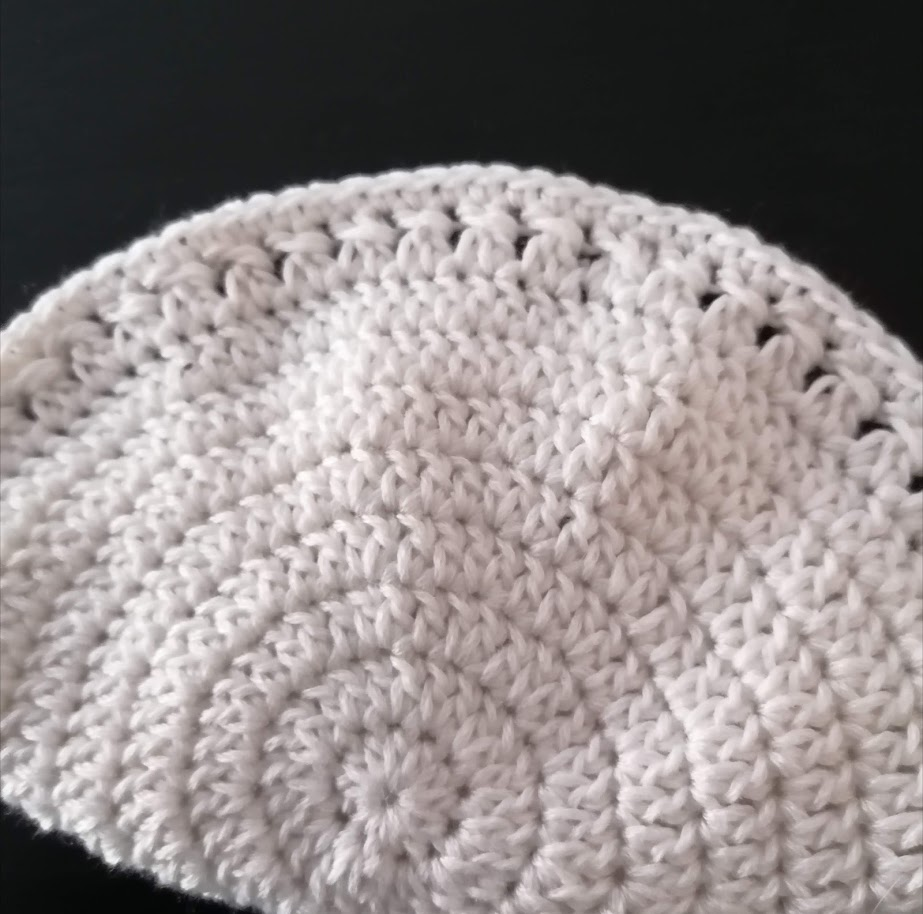
Do you ever need a quick birthday gift and don’t know what to make? This cute crochet beanie hat is something you can make! It will save you a lot of money and worries.
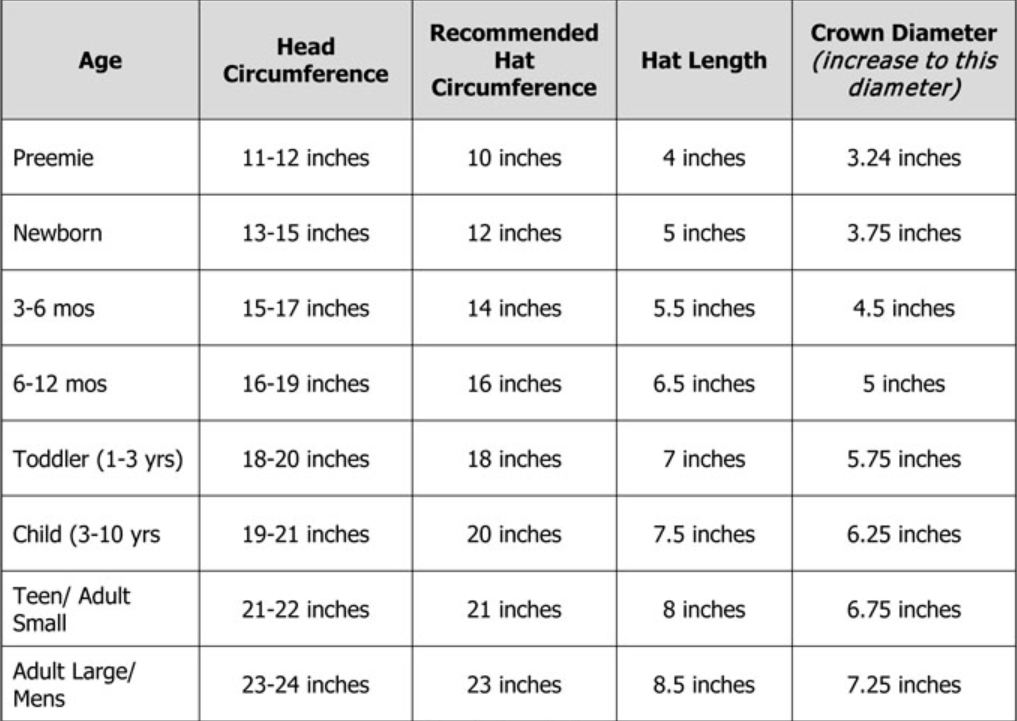
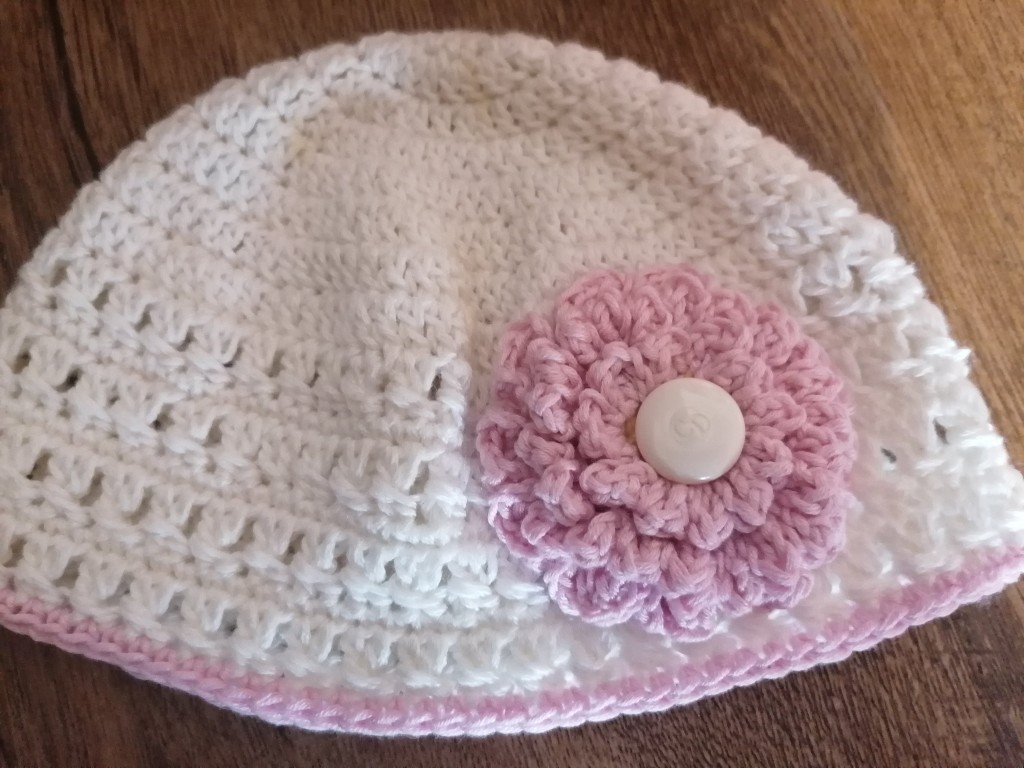
Flowers make a cute accessory to add to any girls hat. This pattern includes also the flower tutorial. This easy hat pattern starts at the top and is crocheted in the round. Change the color for the band, or leave it the same! Your flower can be any color and you can arrange it in any way you like.
This simple Crochet Flower Beanie Hat pattern is super simple to make and crochets up extremely quick. These beanie hats can be crocheted in any given size or color. You will want to make them either for yourself or as presents.
I designed this simple cute beanie pattern with basic stitches and simple techniques, so it’s very beginner-friendly. In my opinion, it’s the perfect crochet hat pattern for quick projects.
This easy-to-understand, beginners-friendly crochet beanie hat pattern is available for free in my post below and includes all published sizes, from baby to adult large.
How to crochet this beanie hat with flower.
Flowers make a cute accessory to add to any girls hat. This pattern includes flower tutorial. This easy hat pattern starts at the top and is crocheted in the round. Change the color for the band, or leave it the same! Your flowers can be any color and you can arrange them in any way you like.
I have included some additional instructions at the bottom of the post for sewing your flowers down just in case you are new to this. Add as many or as few flowers as you like!
>>>PIN IT FOR LATER<<<
This basic crochet beanie hat is constructed with an easy stitch pattern that works up quickly. I’ll show you how to make it a large range of sizes, from Newborn to Adult.
Difficulty:
Easy
Click here to purcaise an ad-free print optimized PDF(multiple sizes included).
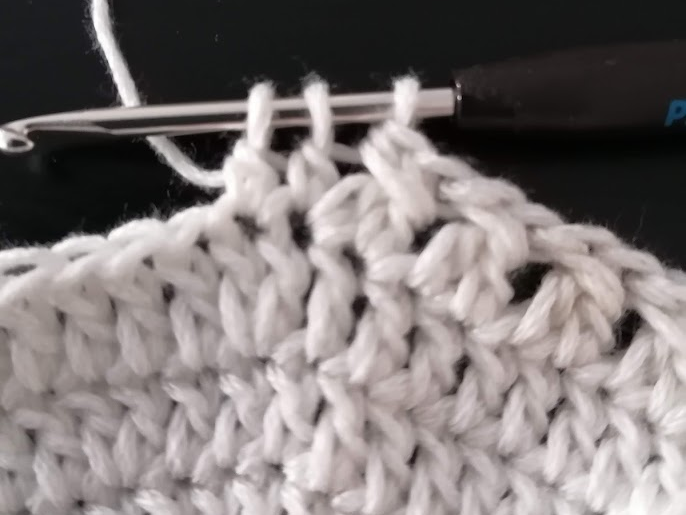
Crochet beanie/hat size chart
Crocheting a hat or a beanie for the first time can sound hard. There are so many sizes, and dimensions you need to worry about, that it may sound easier to give up and create a blanket instead.
It’s actually pretty easy to crochet a perfectly sized hat with just knowing a few key tips while using our sizing table below.
Taking Crochet Beanie/Hat Measurements
The first step in correctly creating a crochet hat or beanie is determining which size you need to make. There are two ways to do this:
- Measure the head. To do this, take the tape measure and wrap it around the person’s head at the forehead level. Take this measurement and find it in the “Head Circumference” column of the table below. This will tell you the “Size” of the hat you need to make.
- Estimate it based on age. If you don’t have your recipient next to you, or this is for a gift, then you’ll need to make an estimate. The table below lists average sizes for specific age groups. If you are making a hat for someone slightly smaller or larger than their peers, then you may want to go up or down to the next size.
Average Crochet Hat/Beanie Size Chart
This crochet hat sizing guide lists the average crochet hat sizes based on eleven different age groups. It is important to note that these measurements are the commonly used average sizes. If you are making a hat for someone who has a size head that little smaller or larger than their peers of the same age, then you will likely need to adjust the crochet hat size up or down appropriately.
Hat Circumference
The beanie, hat circumference measurement is usually around 1-2 inches (2.5-5 cm) smaller than the head circumference. This is the case, so the hat fits snugly over the head.
Crown Diameter
The crown diameter is how wide the very top of the hat should be. To use this dimension, measure your starting circle across and use the chart to determine when to stop increasing your circle’s diameter.
Hat Height
The hat height is typically measured from the top of the crown to the bottom of the person’s ear. If you expect to wear your hat to the top of the ear (as opposed to the bottom), then you will need to subtract an inch (2.5 cm) off the estimated height. If you’d like to be able to have a folded brim, then add an extra inch (2.5 cm) to the height of the hat.
Notes
You’ll love how quick and easy this simple crochet beanie hat is to make. No complicated stitch pattern here! Just simple chains, single crochet, and double crochet.
- The pattern is written in US terms.
- This Simple Crochet Beanie Hat Pattern is worked in rounds, from the top-down.
- You can substitute any yarn and hook for this stitch pattern – just remember when you substitute if your gauge is different, the finished size of your project will also be different.
- The initial ch 2 does not count as a stitch.
- The first st of each round is worked in the same st as you sl st to join
- Length of hat is to the base of the mid-ear length.
- Sl st to join does not count as a stitch.
Finished Size
See the specific sizes listed in the pattern instructions.
Gauge
18 sts/10 rows of dc sts (the crown) =4″
18 sts/14 rows ( of alternating dc and sc sts)=4″
Materials
yarn: Stahl Wolle Mama Mia 100% Baumwolle mercerized cotton, 50 g/120m
3mm crochet hook
tapestry needle
measuring tape
scrissors
one button
Crochet Terms
- SC = Single Crochet
- DC = Double Crochet
- ST = Stitch
- SL ST = Slip Stitch
- TC = Triple Crochet
- CH = Chain
- FLO = Front Loop Only
- BLO = Back Loop Only
Special Stitches
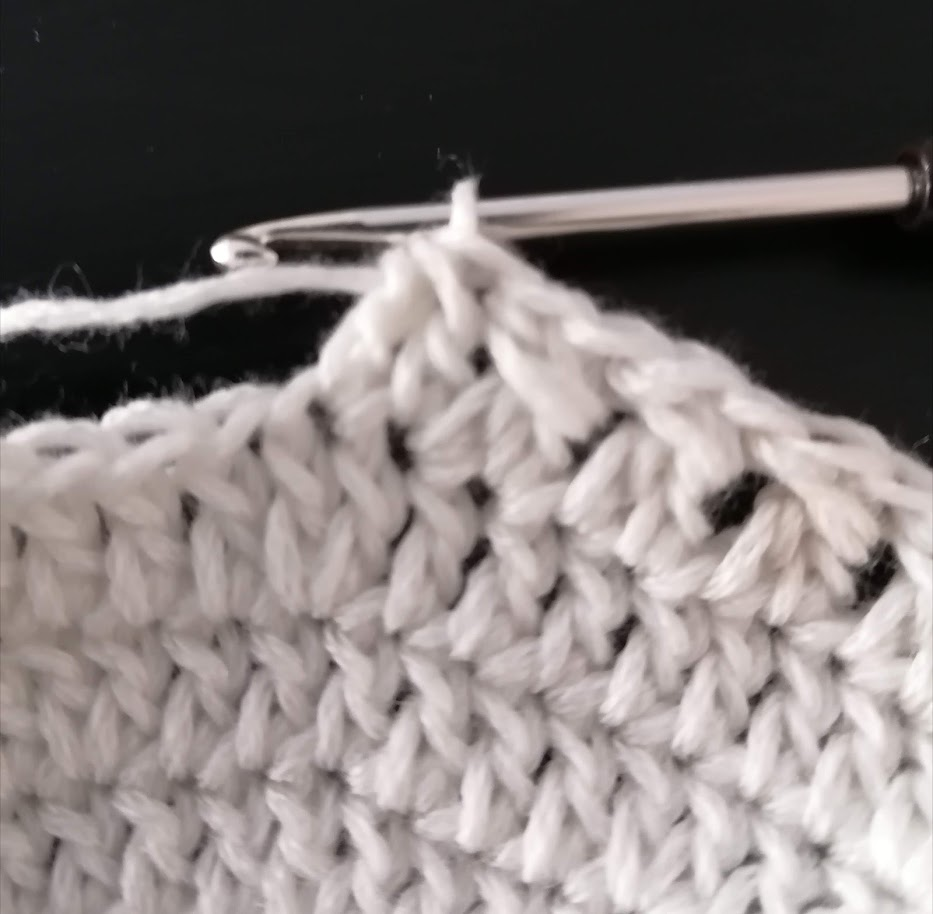
The special stitch for is hat pattern is a double crochet decrease stitch followed by a double crochet stitch worked around the previous double crochet decrease stitch (See photos down the post). If yuou dont know how to work a double crochet decreased stitch, here is the way you do it:
Yarn over the hook (yo). Insert your hook into the next stitch.
Yarn over. Draw the yarn through the stitch.
Yarn over. Draw the yarn through the first 2 loops on your hook. (Two loops remain on the hook.)
Yarn over the hook (yo). Insert your hook into the next stitch.
Yarn over. Draw the yarn through the stitch.
Yarn over. Draw the yarn through the first 2 loops on your hook.You should have 3 loops remaining on your hook.
Yarn over. Draw the yarn through all 3 loops on your hook. (1 complete double crochet stitch decrease.)
You should also know that the pattern for the flower will use some stitches in the Front Loops Only and Back Loops Only . You will see this abbreviated in the pattern as FLO and BLO.
Crochet Beanie Hat Pattern for 0-3 months
Start by making a magic ring.
R1: ch 2; 12 dc in the magic ring; sl st to the 1st dc of the round to join [12]
R2: ch 2, 2 dc in each st around, sl st to the 1st dc of the round to join [24]
R3: ch 2, (2 dc in the firts st, 1 dc in the next st), repeat around, sl st to the 1st dc of the round to join [36]
R4: ch 2, (2 dc in the first st, 1 dc in the next 2 sts), repeat around, sl st to the 1st dc of the round to join [48]
R5: ch 2, (2 dc in the first st, 1 dc in the next 3 sts), repeat around, sl st to the 1st dc of the round to join [60]
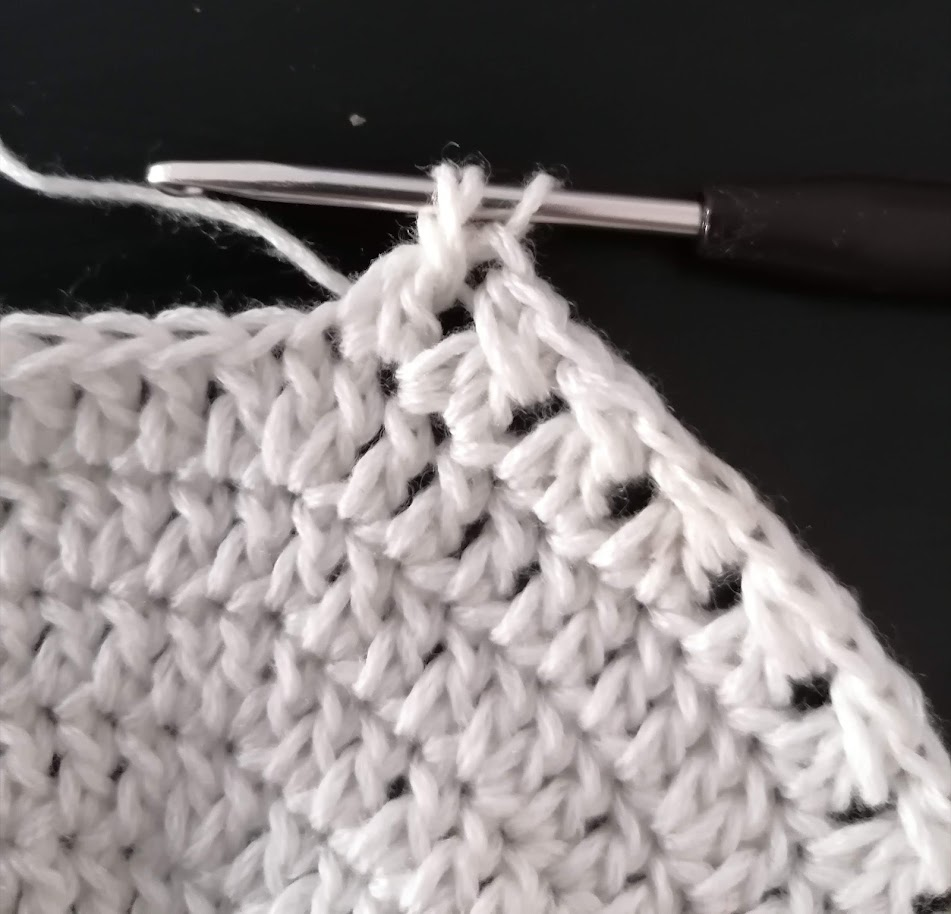
R6: ch 2, then work a double-crochet decreased stitch by starting the first double crochet like you would for a normal double crochet stitch:
Yarn over the hook (yo). Insert your hook into the next stitch.
Yarn over. Draw the yarn through the stitch.
Yarn over. Draw the yarn through the first 2 loops on your hook. (Two loops remain on the hook.)
Yarn over the hook (yo). Insert your hook into the next stitch.
Yarn over. Draw the yarn through the stitch.
Yarn over. Draw the yarn through the first 2 loops on your hook.You should have 3 loops remaining on your hook.
Yarn over. Draw the yarn through all 3 loops on your hook. (1 complete double crochet stitch decrease.)
Yarn over, and work a double crochet stitch around the decreased stitch you’ve just made (See photos bellow). Continue working one dc decrease, and one dc around the decreased stitch to the end of the round. Join with a sl st to the first st of the round. [60 sts]
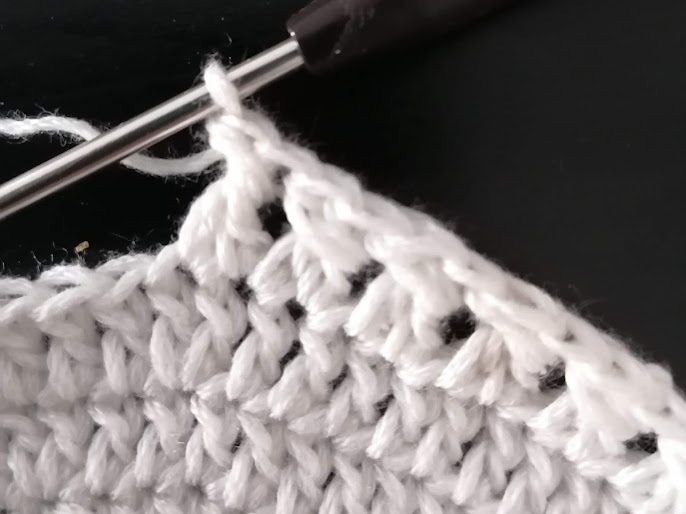
R 7: ch 1, work 1 sc in the same st and 1 sc st in each st around. Join round with a sl st to the first st of the round. [60 sts]
For the rows 8 to 13 repeat R6 and R7, or until you reach the desired lenght. Work the last sc st round with a differnt yarn color, the same color you`ll use for the flower.
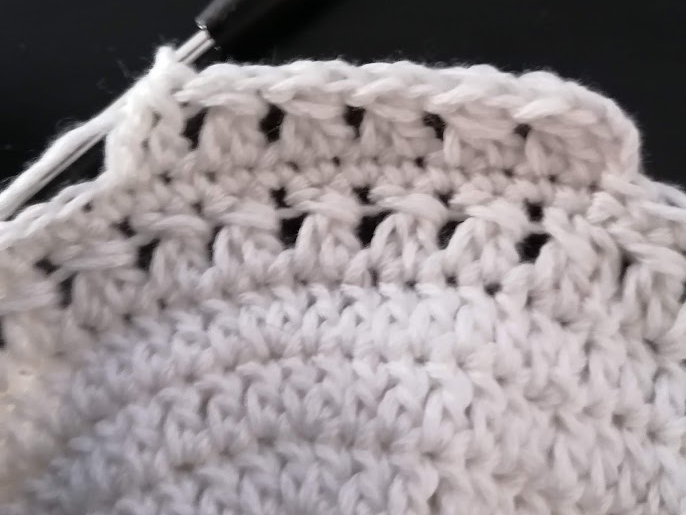
Finish off with an invisible join and weave in ends.
Crochet Flower for the Beanie Hat
Skill Level: Easy/intermediate
The Crochet Flower Pattern
Hook: 3mm or size appropriate for the yarn you choose
Yarn: The yarn you choose doesn’t matter, as long as your hook is a good match for it.
Difficulty: Easy
Gauge: Unimportant
Round 1: ch 1, work 10 sc sts in the ring, sl st to the first st of the round.
Round 2: this round is worked in FLO. Chain 2, in same St, 2dc sts, ch2, sl st. This is your first petal. (sl st to next st, in same st, ch 2, 2 dc, ch2, sl st to same st) around. sl st to base of 1st ch2. Join with a sl st to the first back loop of the round.(10 petals)
Round 3: this round is worked in the BLO of the same single crochet stitches round , loop on the back that that was left during the first round of petals): chain 2, 2dc sts in same st, 2 dc in each st around. Join with a sl st to first dc st,
Round 4: this round is worked in FLO. Chain 2, in same St, 2dc sts, ch2, sl st (sl st to next st, in same st, ch 2, 2 dc, ch2, sl st to same st) around, sl st to base of 1st ch2. Join with a sl st to the first back loop of the round.(20 petals)
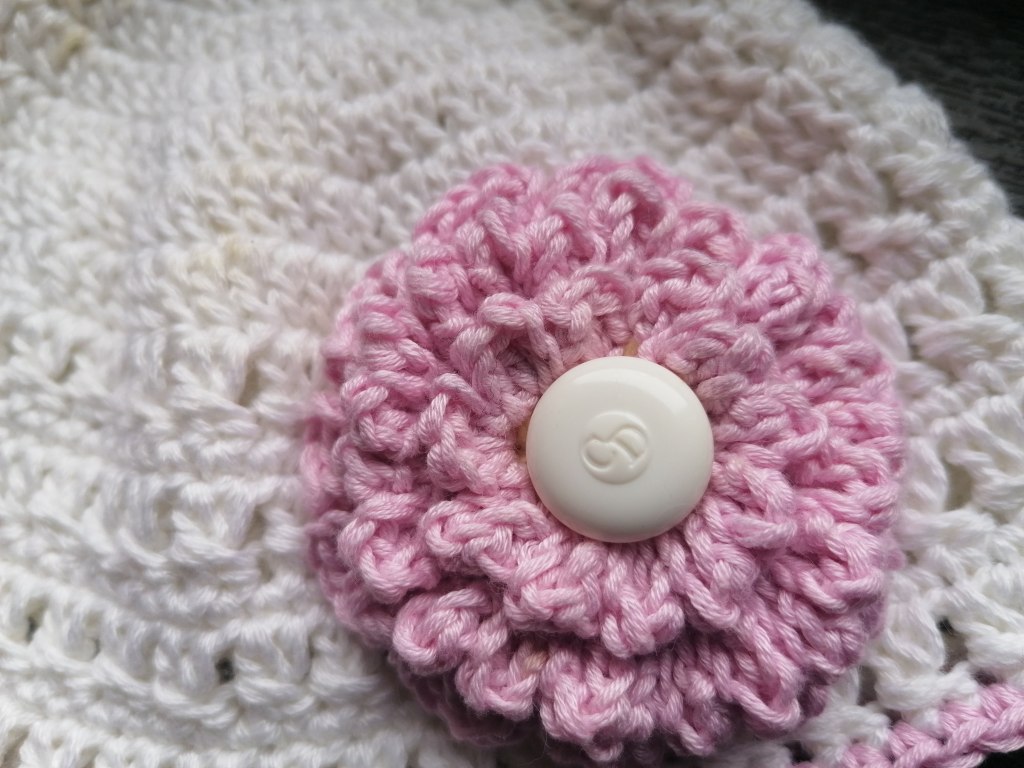
Round 5: this round is worked in the BLO of the previous round. Chain 3, 2 tc sts in the same st, 2 tc sts in the next st, ch 3, sl st in the same st (This is the first petal of this round). *Sl st to the next st, ch 3, 2 tc in the same st, 2 tc in the next st ch 3, sl st in the same st, repeat from * around. Finish off, leaving a 15 inches long yarn to use it for attaching the flower to the beanie.
Finishing
- Attach button to center of flower with yarn.
- Weave ends into the hat with a yarn needle.
- Attach flower to hat with a yarn needle.
Silvana Crochet Studio
Crochet Beanie Hat Pattern for 3-6 months
Start by making a magic ring.
R1: ch 2; 12 dc in the magic ring; sl st to the 1st dc of the round to join [12]
R2: ch 2, 2 dc in each st around, sl st to the 1st dc of the round to join [24]
R3: ch 2, (2 dc in the firts st, 1 dc in the next st), repeat around, sl st to the 1st dc of the round to join [36]
R4: ch 2, (2 dc in the first st, 1 dc in the next 2 sts), repeat around, sl st to the 1st dc of the round to join [48]
R5: ch 2, (2 dc in the first st, 1 dc in the next 3 sts), repeat around, sl st to the 1st dc of the round to join [60]
R6: ch 2, then work a double-crochet decreased stitch by starting the first double crochet like you would for a normal double crochet stitch:
Yarn over the hook (yo). Insert your hook into the next stitch.
Yarn over. Draw the yarn through the stitch.
Yarn over. Draw the yarn through the first 2 loops on your hook. (Two loops remain on the hook.)
Yarn over the hook (yo). Insert your hook into the next stitch.
Yarn over. Draw the yarn through the stitch.
Yarn over. Draw the yarn through the first 2 loops on your hook.You should have 3 loops remaining on your hook.
Yarn over. Draw the yarn through all 3 loops on your hook. (1 complete double crochet stitch decrease.)
Yarn over, and work a double crochet stitch around the decreased stitch you’ve just made (See photos above). Continue working one dc decrease, and one dc around the decreased stitch to the end of the round. Join with a sl st to the first st of the round. [60 sts]
R 7: ch 1, work 1 sc in the same st and 1 sc st in each st around. Join round with a sl st to the first st of the round. [60 sts]
For the rows 8 to 15 repeat R6 and R7, or until you reach the desired lenght. Work the last sc st round with a differnt yarn color, the same color you`ll use for the flower.
Finish off and weave in the ends.
Crochet Beanie Hat Pattern for 6-12 months
Start by making a magic ring.
R1: ch 2; 12 dc in the magic ring; sl st to the 1st dc of the round to join [12]
R2: ch 2, 2 dc in each st around, sl st to the 1st dc of the round to join [24]
R3: ch 2, (2 dc in the first st, 1 dc in the next st), repeat around,sl st to the 1st dc of the round to join [36]
R4: ch 2, (2 dc in the first st, 1 dc in the next 2 sts), repeat around, sl st to the 1st dc of the round to join [48]
R5: ch 2, (2 dc in the first st, 1 dc in the next 3 sts), repeat around, sl st to the 1st dc of the round to join [60]
R6: ch 2, (2 dc in the first st, 1 dc in the next 4 sts), repeat around,sl st to the 1st dc of the round to join [72]
R7: ch 2, then work a double-crochet decreased stitch by starting the first double crochet like you would for a normal double crochet stitch:
Yarn over the hook (yo). Insert your hook into the next stitch.
Yarn over. Draw the yarn through the stitch.
Yarn over. Draw the yarn through the first 2 loops on your hook. (Two loops remain on the hook.)
Yarn over the hook (yo). Insert your hook into the next stitch.
Yarn over. Draw the yarn through the stitch.
Yarn over. Draw the yarn through the first 2 loops on your hook.You should have 3 loops remaining on your hook.
Yarn over. Draw the yarn through all 3 loops on your hook. (1 complete double crochet stitch decrease.)
Yarn over, and work a double crochet stitch around the decreased stitch you’ve just made (See photos bellow). Continue working one dc decrease, and one dc around the decreased stitch to the end of the round. Join with a sl st to the first st of the round. [72 sts]
R 8: ch 1, work 1 sc in the same st and 1 sc st in each st around. Join round with a sl st to the first st of the round. [72 sts]
For the rows 9 to 18 repeat R7 and R8, or until you reach the desired lenght. Work the last sc st round with a differnt yarn color, the same color you`ll use for the flower.
Finish off with an invisible join and weave
The Crochet Flower Pattern
Hook: 3mm or size appropriate for the yarn you choose
Yarn: The yarn you choose doesn’t matter, as long as your hook is a good match for it.
Difficulty: Easy
Gauge: Unimportant
Round 1: ch 1, work 10 sc sts in the ring, sl st to the first st of the round.
Round 2: this round is worked in FLO. Chain 2, in same St, 2dc sts, ch2, sl st. This is your first petal. (sl st to next st, in same st, ch 2, 2 dc, ch2, sl st to same st) around. sl st to base of 1st ch2. Join with a sl st to the first back loop of the round.(10 petals)
Round 3: this round is worked in the BLO of the same single crochet stitches round , loop on the back that that was left during the first round of petals): chain 2, 2dc sts in same st, 2 dc in each st around. Join with a sl st to first dc st,
Round 4: this round is worked in FLO. Chain 2, in same St, 2dc sts, ch2, sl st (sl st to next st, in same st, ch 2, 2 dc, ch2, sl st to same st) around, sl st to base of 1st ch2. Join with a sl st to the first back loop of the round.(20 petals)
Round 5: this round is worked in the BLO of the previous round. Chain 3, 2 tc sts in the same st, 2 tc sts in the next st, ch 3, sl st in the same st (This is the first petal of this round). *Sl st to the next st, ch 3, 2 tc in the same st, 2 tc in the next st ch 3, sl st in the same st, repeat from * around. Finish off, leaving a 15 inches long yarn to use it for attaching the flower to the beanie.
Finishing
- Attach button to center of flower with yarn.
- Weave ends into the hat with a yarn needle.
- Attach flower to hat with a yarn needle.


Silvana Crochet Studio
Crochet Beanie Hat Pattern for 12-24 months
Start by making a magic ring.
R1: ch 2; 12 dc in the magic ring; sl st to the 1st dc of the round to join [12]
R2: ch 2, 2 dc in each st around, sl st to the 1st dc of the round to join [24]
R3: ch 2, (2 dc in the first st, 1 dc in the next st), repeat around, sl st to the 1st dc of the round to join [36]
R4: ch 2, (2 dc in the first st, 1 dc in the next 2 sts), repeat around,sl st to the 1st dc of the round to join [48]
R5: ch 2, (2 dc in the first st, 1 dc in the next 3 sts), repeat around, sl st to the 1st dc of the round to join [60]
R6: ch 2, (2 dc in the first st, 1 dc in the next 4 sts), repeat around, sl st to the 1st dc of the round to join [72]
R7: ch 2, (2 dc in the first st, 1 dc in the next 5 sts), repeat around,sl st to the 1st dc of the round to join [84]
R8: ch 2, then work a double-crochet decreased stitch by starting the first double crochet like you would for a normal double crochet stitch:
Yarn over the hook (yo). Insert your hook into the next stitch.
Yarn over. Draw the yarn through the stitch.
Yarn over. Draw the yarn through the first 2 loops on your hook. (Two loops remain on the hook.)
Yarn over the hook (yo). Insert your hook into the next stitch.
Yarn over. Draw the yarn through the stitch.
Yarn over. Draw the yarn through the first 2 loops on your hook.You should have 3 loops remaining on your hook.
Yarn over. Draw the yarn through all 3 loops on your hook. (1 complete double crochet stitch decrease.)
Yarn over, and work a double crochet stitch around the decreased stitch you’ve just made (See photos bellow). Continue working one dc decrease, and one dc around the decreased stitch to the end of the round. Join with a sl st to the first st of the round. [84 sts]
R 9: ch 1, work 1 sc in the same st and 1 sc st in each st around. Join round with a sl st to the first st of the round. [84 sts]
For the rows 10 to 19 repeat R8 and R9, or until you reach the desired lenght. Work the last sc st round with a differnt yarn color, the same color you`ll use for the flower.
Finish off with an invisible join and weave in ends.
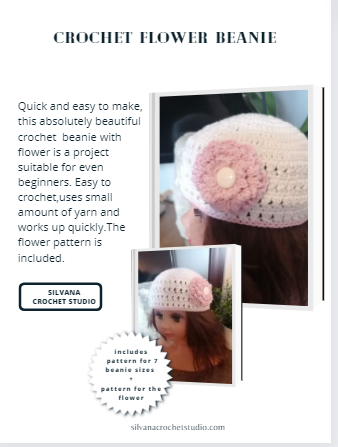
Crochet Flower Beanie Hat
The Crochet Flower Pattern Steps
Hook: 3mm or size appropriate for the yarn you choose
Yarn: The yarn you choose doesn’t matter, as long as your hook is a good match for it.
Difficulty: Easy
Gauge: Unimportant
Round 1: ch 1, work 10 sc sts in the ring, sl st to the first st of the round.
Round 2: this round is worked in FLO. Chain 2, in same St, 2dc sts, ch2, sl st. This is your first petal. (sl st to next st, in same st, ch 2, 2 dc, ch2, sl st to same st) around. sl st to base of 1st ch2. Join with a sl st to the first back loop of the round.(10 petals)
Round 3: this round is worked in the BLO of the same single crochet stitches round , loop on the back that that was left during the first round of petals): chain 2, 2dc sts in same st, 2 dc in each st around. Join with a sl st to first dc st,
Round 4: this round is worked in FLO. Chain 2, in same St, 2dc sts, ch2, sl st (sl st to next st, in same st, ch 2, 2 dc, ch2, sl st to same st) around, sl st to base of 1st ch2. Join with a sl st to the first back loop of the round.(20 petals)
Round 5: this round is worked in the BLO of the previous round. Chain 3, 2 tc sts in the same st, 2 tc sts in the next st, ch 3, sl st in the same st (This is the first petal of this round). *Sl st to the next st, ch 3, 2 tc in the same st, 2 tc in the next st ch 3, sl st in the same st, repeat from * around. Finish off, leaving a 15 inches long yarn to use it for attaching the flower to the beanie.
Finishing
- Attach button to center of flower with yarn.
- Weave ends into the hat with a yarn needle.
- Attach flower to hat with a yarn needle.
Crochet Beanie Hat Pattern for toddlers
Start by making a magic ring.
R1: ch 2; 12 dc in the magic ring; sl st to the 1st dc of the round to join [12]
R2: ch 2, 2 dc in each st around, sl st to the 1st dc of the round to join [24]
R3: ch 2, (2 dc in the first st, 1 dc in the next st), sl st to the 1st dc of the round to join [36]
R4: ch 2, (2 dc in the first st, 1 dc in the next 2 sts), sl st to the 1st dc of the round to join [48]
R5: ch 2, (2 dc in the first st, 1 dc in the next 3 sts), sl st to the 1st dc of the round to join [60]
R6: ch 2, (2 dc in the first st, 1 dc in the next 4sts), sl st to the 1st dc of the round to join [72]
R7: ch 2, (2 dc in the first st, 1 dc in the next 5 sts), sl st to the 1st dc of the round to join [84]
R8: ch 2, then work a double-crochet decreased stitch by starting the first double crochet like you would for a normal double crochet stitch:
Yarn over the hook (yo). Insert your hook into the next stitch.
Yarn over. Draw the yarn through the stitch.
Yarn over. Draw the yarn through the first 2 loops on your hook. (Two loops remain on the hook.)
Yarn over the hook (yo). Insert your hook into the next stitch.
Yarn over. Draw the yarn through the stitch.
Yarn over. Draw the yarn through the first 2 loops on your hook.You should have 3 loops remaining on your hook.
Yarn over. Draw the yarn through all 3 loops on your hook. (1 complete double crochet stitch decrease.)
Yarn over, and work a double crochet stitch around the decreased stitch you’ve just made (See photos bellow). Continue working one dc decrease, and one dc around the decreased stitch to the end of the round. Join with a sl st to the first st of the round. [84 sts]
R 9: ch 1, work 1 sc in the same st and 1 sc st in each st around. Join round with a sl st to the first st of the round. [84 sts]
For the rows 10 to 21 repeat R8 and R9, or until you reach the desired lenght. Work the last sc st round with a differnt yarn color, the same color you`ll use for the flower.
Finish off with an invisible join and weave in ends.
Skill Level: Easy/intermediate
The Crochet Flower Pattern
Hook: 3mm or size appropriate for the yarn you choose
Yarn: The yarn you choose doesn’t matter, as long as your hook is a good match for it.
Difficulty: Easy
Gauge: Unimportant
Round 1: ch 1, work 10 sc sts in the ring, sl st to the first st of the round.
Round 2: this round is worked in FLO. Chain 2, in same St, 2dc sts, ch2, sl st. This is your first petal. (sl st to next st, in same st, ch 2, 2 dc, ch2, sl st to same st) around. sl st to base of 1st ch2. Join with a sl st to the first back loop of the round.(10 petals)
Round 3: this round is worked in the BLO of the same single crochet stitches round , loop on the back that that was left during the first round of petals): chain 2, 2dc sts in same st, 2 dc in each st around. Join with a sl st to first dc st.
Round 4: this round is worked in FLO. Chain 2, in same St, 2dc sts, ch2, sl st (sl st to next st, in same st, ch 2, 2 dc, ch2, sl st to same st) around, sl st to base of 1st ch2. Join with a sl st to the first back loop of the round.(20 petals)
Round 5: this round is worked in the BLO of the previous round. Chain 3, 2 tc sts in the same st, 2 tc sts in the next st, ch 3, sl st in the same st (This is the first petal of this round). *Sl st to the next st, ch 3, 2 tc in the same st, 2 tc in the next st ch 3, sl st in the same st, repeat from * around. Finish off, leaving a 15 inches long yarn to use it for attaching the flower to the beanie.
Finishing
- Attach button to center of flower with yarn.
- Weave ends into the hat with a yarn needle.
- Attach flower to hat with a yarn needle.
Crochet Beanie Hat Pattern for child 3-10 years
Start by making a magic ring.
R1: ch 2; 12 dc in the magic ring; sl st to the 1st dc of the round to join [12]
R2: ch 2, 2 dc in each st around, sl st to the 1st dc of the round to join [24]
R3: ch 2, (2 dc in the first st, 1 dc in the next st), sl st to the 1st dc of the round to join [36]
R4: ch 2, (2 dc in the first st, 1 dc in the next 2 sts), sl st to the 1st dc of the round to join [48]
R5: ch 2, (2 dc in the first st, 1 dc in the next 3 sts), sl st to the 1st dc of the round to join [60]
R6: ch 2, (2 dc in the first st, 1 dc in the next 4sts), sl st to the 1st dc of the round to join [72]
R7: ch 2, (2 dc in the first st, 1 dc in the next 5 sts), sl st to the 1st dc of the round to join [84]
R8: ch 2, (2 dc in the first st, 1 dc in the next 6 sts), sl st to the 1st dc of the round to join [96]
R9: ch 2, then work a double-crochet decreased stitch by starting the first double crochet like you would for a normal double crochet stitch:
Yarn over the hook (yo). Insert your hook into the next stitch.
Yarn over. Draw the yarn through the stitch.
Yarn over. Draw the yarn through the first 2 loops on your hook. (Two loops remain on the hook.)
Yarn over the hook (yo). Insert your hook into the next stitch.
Yarn over. Draw the yarn through the stitch.
Yarn over. Draw the yarn through the first 2 loops on your hook.You should have 3 loops remaining on your hook.
Yarn over. Draw the yarn through all 3 loops on your hook. (1 complete double crochet stitch decrease.)
Yarn over, and work a double crochet stitch around the decreased stitch you’ve just made (See photos bellow). Continue working one dc decrease, and one dc around the decreased stitch to the end of the round. Join with a sl st to the first st of the round. [96 sts]
R 10: ch 1, work 1 sc in the same st and 1 sc st in each st around. Join round with a sl st to the first st of the round. [96 sts]
For the rows 11 to 22 repeat R9 and R10, or until you reach the desired lenght. Work the last sc st round with a differnt yarn color, the same color you`ll use for the flower.
Finish off with an invisible join and weave in ends.
Crochet Flower Beanie Hat
Skill Level: Easy/intermediate
Hook: 3mm or size appropriate for the yarn you choose
Yarn: The yarn you choose doesn’t matter, as long as your hook is a good match for it.
Difficulty: Easy
Gauge: Unimportant
Round 1: ch 1, work 10 sc sts in the ring, sl st to the first st of the round.
Round 2: this round is worked in FLO. Chain 2, in same St, 2dc sts, ch2, sl st. This is your first petal. (sl st to next st, in same st, ch 2, 2 dc, ch2, sl st to same st) around. sl st to base of 1st ch2. Join with a sl st to the first back loop of the round.(10 petals)
Round 3: this round is worked in the BLO of the same single crochet stitches round , loop on the back that that was left during the first round of petals): chain 2, 2dc sts in same st, 2 dc in each st around. Join with a sl st to first dc st,
Round 4: this round is worked in FLO. Chain 2, in same St, 2dc sts, ch2, sl st (sl st to next st, in same st, ch 2, 2 dc, ch2, sl st to same st) around, sl st to base of 1st ch2. Join with a sl st to the first back loop of the round.(20 petals)
Round 5: this round is worked in the BLO of the previous round. Chain 3, 2 tc sts in the same st, 2 tc sts in the next st, ch 3, sl st in the same st (This is the first petal of this round). *Sl st to the next st, ch 3, 2 tc in the same st, 2 tc in the next st ch 3, sl st in the same st, repeat from * around. Finish off, leaving a 15 inches long yarn to use it for attaching the flower to the beanie.
Finishing
- Attach button to center of flower with yarn.
- Weave ends into the hat with a yarn needle.
- Attach flower to hat with a yarn needle.

Silvana Crochet Studio
Click here to purcaise an ad-free print optimized PDF(multiple sizes included).
Crochet Beanie Hat Pattern for teens
Start by making a magic ring.
R1: ch 2; 12 dc in the magic ring; sl st to the 1st dc of the round to join [12]
R2: ch 2, 2 dc in each st around, sl st to the 1st dc of the round to join [24]
R3: ch 2, (2 dc in the first st, 1 dc in the next st), sl st to the 1st dc of the round to join [36]
R4: ch 2, (2 dc in the first st, 1 dc in the next 2 sts), sl st to the 1st dc of the round to join [48]
R5: ch 2, (2 dc in the first st, 1 dc in the next 3 sts), sl st to the 1st dc of the round to join [60]
R6: ch 2, (2 dc in the first st, 1 dc in the next 4 sts), sl st to the 1st dc of the round to join [72]
R7: ch 2, (2 dc in the first st, 1 dc in the next 5 sts), sl st to the 1st dc of the round to join [84]
R8: ch 2, (2 dc in the first st, 1 dc in the next 6 sts), sl st to the 1st dc of the round to join [96]
R9: ch 2, (2 dc in the first st, 1 dc in the next 7 sts), sl st to the 1st dc of the round to join [108]
R10: ch 2, then work a double-crochet decreased stitch by starting the first double crochet like you would for a normal double crochet stitch:
Yarn over the hook (yo). Insert your hook into the next stitch.
Yarn over. Draw the yarn through the stitch.
Yarn over. Draw the yarn through the first 2 loops on your hook. (Two loops remain on the hook.)
Yarn over the hook (yo). Insert your hook into the next stitch.
Yarn over. Draw the yarn through the stitch.
Yarn over. Draw the yarn through the first 2 loops on your hook.You should have 3 loops remaining on your hook.
Yarn over. Draw the yarn through all 3 loops on your hook. (1 complete double crochet stitch decrease.)
Yarn over, and work a double crochet stitch around the decreased stitch you’ve just made (See photos bellow). Continue working one dc decrease, and one dc around the decreased stitch to the end of the round. Join with a sl st to the first st of the round. [108 sts]
R 11: ch 1, work 1 sc in the same st and 1 sc st in each st around. Join round with a sl st to the first st of the round. [108 sts]
For the rows 12 to 25 repeat R10 and R11, or until you reach the desired lenght. Work the last sc st round with a differnt yarn color, the same color you`ll use for the flower.
Finish off with an invisible join and weave in ends.
Crochet Flower Beanie Hat
Skill Level: Easy/intermediate
The Crochet Flower Pattern
Hook: 3mm or size appropriate for the yarn you choose
Yarn: The yarn you choose doesn’t matter, as long as your hook is a good match for it.
Difficulty: Easy
Gauge: Unimportant
Round 1: ch 1, work 10 sc sts in the ring, sl st to the first st of the round.
Round 2: this round is worked in FLO. Chain 2, in same St, 2dc sts, ch2, sl st. This is your first petal. (sl st to next st, in same st, ch 2, 2 dc, ch2, sl st to same st) around. sl st to base of 1st ch2. Join with a sl st to the first back loop of the round.(10 petals)
Round 3: this round is worked in the BLO of the same single crochet stitches round , loop on the back that that was left during the first round of petals): chain 2, 2dc sts in same st, 2 dc in each st around. Join with a sl st to first dc st,
Round 4: this round is worked in FLO. Chain 2, in same St, 2dc sts, ch2, sl st (sl st to next st, in same st, ch 2, 2 dc, ch2, sl st to same st) around, sl st to base of 1st ch2. Join with a sl st to the first back loop of the round.(20 petals)
Round 5: this round is worked in the BLO of the previous round. Chain 3, 2 tc sts in the same st, 2 tc sts in the next st, ch 3, sl st in the same st (This is the first petal of this round). *Sl st to the next st, ch 3, 2 tc in the same st, 2 tc in the next st ch 3, sl st in the same st, repeat from * around. Finish off, leaving a 15 inches long yarn to use it for attaching the flower to the beanie.
Finishing
- Attach button to center of flower with yarn.
- Weave ends into the hat with a yarn needle.
- Attach flower to hat with a yarn needle.
Silvana Crochet Studio
Crochet Beanie Pattern for women
Start by making a magic ring.
R1: ch 2; 12 dc in the magic ring; sl st to the 1st dc of the round to join [12]
R2: ch 2, 2 dc in each st around, sl st to the 1st dc of the round to join [24]
R3: ch 2, (2 dc in the first st, 1 dc in the next st), sl st to the 1st dc of the round to join [36]
R4: ch 2, (2 dc in the first st, 1 dc in the next 2 sts), sl st to the 1st dc of the round to join [48]
R5: ch 2, (2 dc in the first st, 1 dc in the next 3 sts), sl st to the 1st dc of the round to join [60]
R6: ch 2, (2 dc in the first st, 1 dc in the next 4 sts), sl st to the 1st dc of the round to join [72]
R7: ch 2, (2 dc in the first st, 1 dc in the next 5 sts), sl st to the 1st dc of the round to join [84]
R8: ch 2, (2 dc in the first st, 1 dc in the next 6 sts), sl st to the 1st dc of the round to join [96]
R9: ch 2, (2 dc in the first st, 1 dc in the next 7 sts), sl st to the 1st dc of the round to join [108]
R10: ch 2, (2 dc in the first st, 1 dc in the next 8 sts), sl st to the 1st dc of the round to join [120]
R11: ch 2, then work a double-crochet decreased stitch by starting the first double crochet like you would for a normal double crochet stitch:
Yarn over the hook (yo). Insert your hook into the next stitch.
Yarn over. Draw the yarn through the stitch.
Yarn over. Draw the yarn through the first 2 loops on your hook. (Two loops remain on the hook.)
Yarn over the hook (yo). Insert your hook into the next stitch.
Yarn over. Draw the yarn through the stitch.
Yarn over. Draw the yarn through the first 2 loops on your hook.You should have 3 loops remaining on your hook.
Yarn over. Draw the yarn through all 3 loops on your hook. (1 complete double crochet stitch decrease.)
Yarn over, and work a double crochet stitch around the decreased stitch you’ve just made (See photos bellow). Continue working one dc decrease, and one dc around the decreased stitch to the end of the round. Join with a sl st to the first st of the round. [120 sts]
R 12: ch 1, work 1 sc in the same st and 1 sc st in each st around. Join round with a sl st to the first st of the round. [120 sts]
For the rows 12 to 25 repeat R11 and R12, or until you reach the desired lenght. Work the last sc st round with a differnt yarn color, the same color you`ll use for the flower.
Finish off with an invisible join and weave in ends.
Simple Crochet Beanie Hat
The Crochet Flower Pattern
Hook: 3mm or size appropriate for the yarn you choose
Yarn: The yarn you choose doesn’t matter, as long as your hook is a good match for it.
Difficulty: Easy
Gauge: Unimportant
Round 1: ch 1, work 10 sc sts in the ring, sl st to the first st of the round.
Round 2: this round is worked in FLO. Chain 2, in same St, 2dc sts, ch2, sl st. This is your first petal. (sl st to next st, in same st, ch 2, 2 dc, ch2, sl st to same st) around. sl st to base of 1st ch2. Join with a sl st to the first back loop of the round.(10 petals)
Round 3: this round is worked in the BLO of the same single crochet stitches round , loop on the back that that was left during the first round of petals): chain 2, 2dc sts in same st, 2 dc in each st around. Join with a sl st to first dc st.
Round 4: this round is worked in FLO. Chain 2, in same St, 2dc sts, ch2, sl st (sl st to next st, in same st, ch 2, 2 dc, ch2, sl st to same st) around, sl st to base of 1st ch2. Join with a sl st to the first back loop of the round.(20petals)
Round 5: this round is worked in the BLO of the previous round. Chain 3, 2 tc sts in the same st, 2 tc sts in the next st, ch 3, sl st in the same st (This is the first petal of this round). *Sl st to the next st, ch 3, 2 tc in the same st, 2 tc in the next st ch 3, sl st in the same st, repeat from * around. Finish off, leaving a 15 inches long yarn to use it for attaching the flower to the beanie.
Finishing
- Attach button to center of flower with yarn.
- Weave ends into the hat with a yarn needle.
- Attach flower to hat with a yarn needle.
Click here to purcaise an ad-free print optimized PDF(multiple sizes included).

Silvana Crochet Studio
Want more gorgeous crochet patterns, and a little encouragement for your day? Sign up for my newest free patterns bellow:
>>> PIN IT FOR LATER<<<
Pattern’s terms and conditions
This pattern was made to be used by individuals, and small business crocheters. Selling your finished pieces is encouraged. Please credit/link Silvana Crochet Studio when selling finished products online.
This pattern is forbidden to be used commercially to produce hundreds of thousands of copies.
