
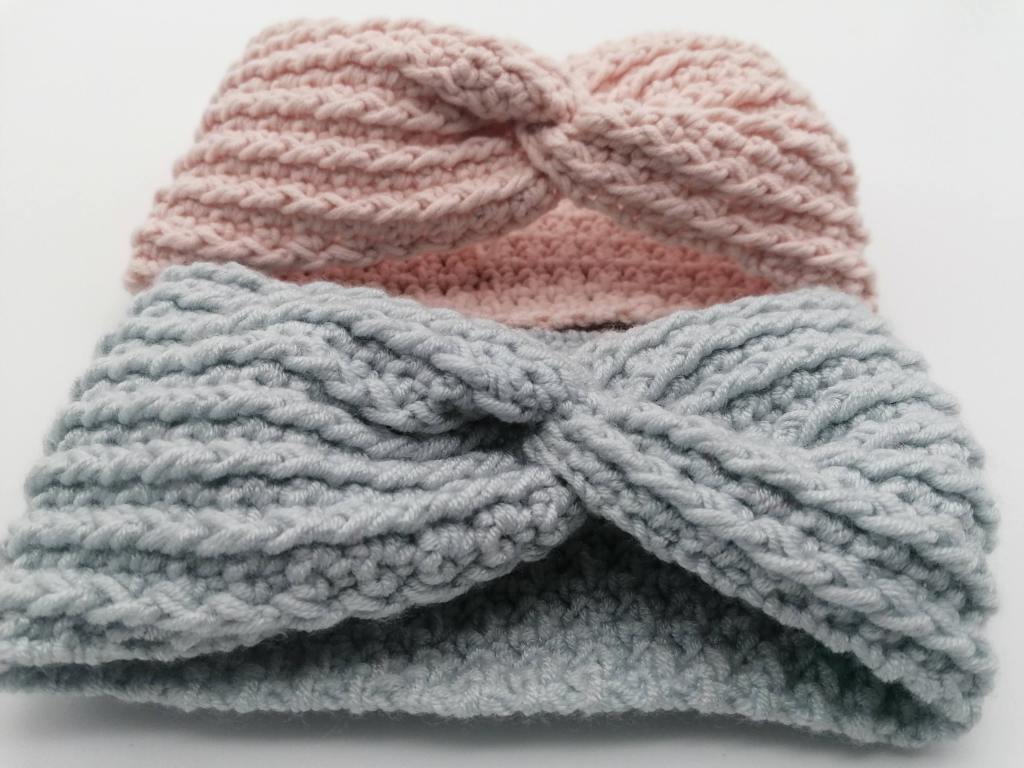
Keep your ears snuggly all season with this adorable crochet ear warmers and headband! This ear warmer is really the perfect cold-weather accessory because it is so versatile. You can wear it with your hair up or down, inside or outdoors.
>>> PIN IT FOR LATER <<<
Beginners will find this easy crochet headband patterns to be a great way to start a fun new DIY hobby, while crochet veterans can use it as a quick project to use up stash yarn. Plus headbands make great homemade, handcrafted gifts for teachers, co-workers, neighbors and anyone else on your list! No one will know you worked up these cute, cozy stocking stuffers in about an hour! What’s not to love?
In this post you will find:
How to Crochet Twisted Head Band
Headband Crochet Sizing Tips
Notes about the pattern
Abbreviations
Materials for this crochet headband pattern
Get the PDF Pattern
Special Crochet Stitches
Pattern for Baby 0-3 months /14-15″(36 -38 cm)
Crochet Pattern for Baby 3-6 months /15-17″(38-43 cm)
Crochet Pattern for Baby 6-12 months /17-18″(43-46 cm)
Crochet Pattern for Toddler /18-20″(46-51 cm)
Crochet Pattern for Child size 19-20.5” (48 -52cm)
Crochet Pattern for Teen size (or sm. adult) 20.5-22” (52 -56cm)
Pattern for Adult Size M /21.5-22.5“(53 -56 cm)
Crochet Pattern for Adult Size L 23-24” (58 -61cm)
How Do You Crochet A Twisted Headband
Have you avoided these crocheting twisted headband ear warmers because you assumed they were hard? That twist looks like it takes fancy crochet work or hard seaming, doesn’t it?
It looks WAY more complicated than it actually is.
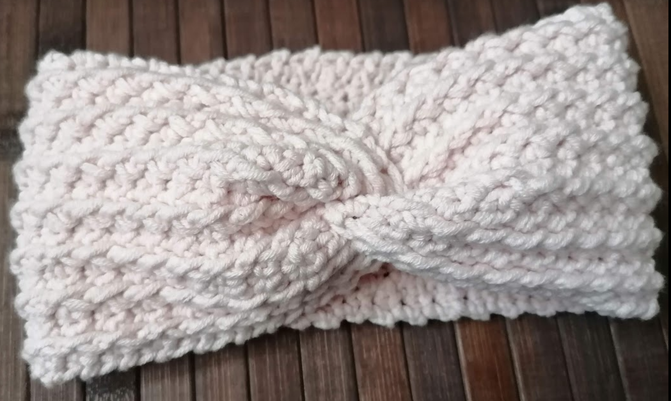
To make this simple twist, you’ll first crochet a rectangle (you can do that!), and then fold it and sew to secure the ends together. The way you fold the ends together is what creates the twist. There are lots of pictures below to guide you through the process so you’ll find this even easier than it sounds.
If you’re making your crochet ear warmer or headband as a gift, be sure to pay attention to the size.
What size do I need for my Twist Headband Ear Warmer?
Luckily headband sizing doesn’t have to be complicated and I have prepared a headband pattern bellow for each size for you that makes it so simple!
If you like easy to print patterns, the ad-free PDF of this crochet pattern with a photo tutorial, can be purchased in the following places:
Etsy
Ravelry.
Headband Crochet Sizing Tips
There are a few important tips you can follow to make sure your headband fits and crochets up perfectly, so you make a great project every time!
#1. Follow Gauge
The crocheted ear warmer is a great first project to try when you are beginning to learn how to work in the round. However, I would recommend using the correct gauge, or stitches per inch, for the proper fit. This is a critical step for this project. If this ear warmer is crocheted too loosely, it will be too big.
Additionally, if the ear warmer it is crocheted too tightly, it will be too small. You can learn more about gauge here, if you would like a refresher or are new to crochet.
#2. Measure, Measure, Measure
As for the width, that can be adjusted by adding or subtracting rows too, so you can get the perfect fit. For example, when you are crocheting a baby headband you will more than likely not want it to be 4 inches wide, so you could subtract rows until you get the width you prefer.
I recommend a width of 2 inches for a baby headband, and these should only be worn for photos and under proper supervision. If you follow these tips, you’ll on your way to making cute crochet baby headbands!
If you intend to make crochet headbands for adults or an adult size, you will need to measure the circcumference of their head first, since the size can vary so much from person to person. This way, you will ensure the crochet headband size fits the person it is intended for.
#3. Use The Correct Yarn Weight
I also suggest using the suggested five bulky weight yarn to make this headband design. If you attempt to make this headband with different weight yarn, then it will turn out different regarding size and coziness.
Learn more about the yarn I used for this crochet headband project below.
NOTES
This headband is basically easy! It’s worked back and forth in rows to make a long strip across head. The advantage of crocheting your headband across the width is that you can try it on to get a really accurate length.
In the end of the post you will find a photo tutorial of this pattern. Make sure you scroll down and follow it. It will help you step by step with your work.
The best way to ensure a good fit is to measure the recipient’s head circumference with a tape measure. Measure exactly where the headband will go around the head. If you are making a gift, and can’t measure the recipient’s head, I prepared a rough guide to head sizes.
Make a foundation chain, the width you require for the headband size. The number of stitches will depend on what type of yarn you are using. I made this sample 4 inches (10cm) in width.
You can also easily adjust the sizing by working more or less chain stitches or more or less rows! To adjust the width, add more or less foundation chain stitches to row! To adjust the length, repeat rows 4-5 as many times as necessary to reach your desired length.
If a different weight brand of yarn or gauge isn’t followed, then the headband will not turn out the same size as written.
Written in standard US terms
Abbreviations:
yo: yarn over
ch(s): chain(s)
sc(s): single crochet(s)
dc(s): double crochet(s)
fpdc(s): front post double crochet
st(s): stitch(es)
Materials for this crochet headband pattern:
· Baby Best by Alize yarn 262 yards (240 meters)/ 100 grams (3.53 ounces)DK
90% Acrylic, 10% Rayon from Bamboo
240 meters / 100 grams
scrissors
4 mm crochet hook
tapestry needle
Usually, a headband for an adult will be about 3½ to 4 inches (9-10cm) deep, for a child 2 to 3 inches (5-7.5cm) deep and for a baby headband, about 1 inch (2.5cm) deep. Of course, this is totally adaptable to your personal taste. You can simply stitch it as wide or as narrow as you prefer!
If you like easy to print patterns, the ad-free PDF of this crochet pattern with a photo tutorial, can be purchased in the following places:
Etsy
Ravelry.
HOW TO MAKE the FRONT POST double CROCHET STITCH
FPDC : To work a front post double crochet, start off just as you would any other double crochet, by yarning over. Then insert the hook under the post of the next stitch, starting in the front. So basically, you dig in and sort of scoop up the post with your crochet hook. Wrap the yarn around, just like you normally would for a double crochet. And pull the yarn through. Now you have 3 loops on the hook. Finish off the double crochet as you normally would by yarning over and pulling through 2 loops. Then yarn over again and pulling through the remaining 2 loops. his is what a front post double crochet looks like when complete. It really is just a double crochet that is worked around the post.
We are using the POST of two rows below to create these stitches for our pattern.
To make a front post stitch, you’ll insert your hook from the front to back and work around the post of the stitch two rows bellow. Complete the double crochet stitch as normal.
Pattern for Adult Size M /21.5-22.5“(53 -56 cm)
Ch 19, turn
Row 1: dc in 3rd ch from hook, dc in each each chain stitch around. Chain 1 and turn. (17 dc)
Row 2: sc into each stitch from the previous row. Chain 1 and turn (17 sc)
Row 3: Place a regular single crochet in the first stitch, (this helps to make sure that the edges stay nice and straight) then make a fpdc around the post of the dc stitch two rows below, [regular sc in the next st, fpdc two in the dc st two rows bellow]. Repeat this pattern to the end of the row, ending with a regular sc stitch in the last stitch of the row. Chain 1 and turn. (9 sc, 8 fpdc)
Row 4: Sc in the first stitch from the hook and in each stitch around. Chain 1 and turn (17 sc)
Row 5: Place a regular single crochet in the first stitch, fpdc around the fpdc st two rows below, [regular sc in the next st, fpdc two in the dc st two rows bellow]. Repeat this pattern to the end of the row, ending with a regular sc stitch in the last stitch of the row. Chain 1 and turn. (9 sc, 8 fpdc).
Rows 6 – 108 repeat rows 4-5, or until you reach the desired length.
Pattern for Baby 0-3 months /14-15″(36 -38 cm)
Ch 10, turn
Row 1: dc in 3rd ch from hook, dc in each each chain stitch around. Chain 1 and turn.
Row 2: sc into each stitch from the previous row. Chain 1 and turn.
Row 3: Place a regular single crochet in the first stitch, (this helps to make sure that the edges stay nice and straight) then make a fpdc around the post of the dc stitch two rows below, [regular sc in the next st, fpdc two in the dc st two rows bellow]. Repeat this pattern to the end of the row, ending with a regular sc stitch in the last stitch of the row. Chain 1 and turn.
Row 4: Sc in the first stitch from the hook and in each stitch around. Chain 1 and turn
Row 5: Place a regular single crochet in the first stitch, fpdc around the fpdc st two rows below, [regular sc in the next st, fpdc two in the dc st two rows bellow]. Repeat this pattern to the end of the row, ending with a regular sc stitch in the last stitch of the row. Chain 1 and turn.
Rows 6 – 70 repeat rows 4-5, or until you reach the desired length.
Crochet Pattern for Baby 3-6 months /15-17″(38-43 cm)
Ch 10, turn
Row 1: dc in 3rd ch from hook, dc in each each chain stitch around. Chain 1 and turn.
Row 2: sc into each stitch from the previous row. Chain 1 and turn.
Row 3: Place a regular single crochet in the first stitch, (this helps to make sure that the edges stay nice and straight) then make a fpdc around the post of the dc stitch two rows below, [regular sc in the next st, fpdc two in the dc st two rows bellow]. Repeat this pattern to the end of the row, ending with a regular sc stitch in the last stitch of the row. Chain 1 and turn.
Row 4: Sc in the first stitch from the hook and in each stitch around. Chain 1 and turn
Row 5: Place a regular single crochet in the first stitch, fpdc around the fpdc st two rows below, [regular sc in the next st, fpdc two in the dc st two rows bellow]. Repeat this pattern to the end of the row, ending with a regular sc stitch in the last stitch of the row. Chain 1 and turn.
Rows 6 – 76 repeat rows 4-5, or until you reach the desired length.
Crochet Pattern for Baby 6-12 months /17-18″(43-46 cm)
Ch 10, turn
Row 1: dc in 3rd ch from hook, dc in each each chain stitch around. Chain 1 and turn.
Row 2: sc into each stitch from the previous row. Chain 1 and turn.
Row 3: Place a regular single crochet in the first stitch, (this helps to make sure that the edges stay nice and straight) then make a fpdc around the post of the dc stitch two rows below, [regular sc in the next st, fpdc two in the dc st two rows bellow]. Repeat this pattern to the end of the row, ending with a regular sc stitch in the last stitch of the row. Chain 1 and turn.
Row 4: Sc in the first stitch from the hook and in each stitch around. Chain 1 and turn
Row 5: Place a regular single crochet in the first stitch, fpdc around the fpdc st two rows below, [regular sc in the next st, fpdc two in the dc st two rows bellow]. Repeat this pattern to the end of the row, ending with a regular sc stitch in the last stitch of the row. Chain 1 and turn.
Rows 6 – 80: repeat rows 4-5, or until you reach the desired length.
Don’t Like Ads???
GET THE AD-FREE PDF VERSION. THIS INCLU FOR A SMALL FEE. THIS INCLUDES EXTRA HIGH QUALITY, STEP BY STEP, PHOTOGRAPHS THROUGHOUT AND IN-DEPTH TUTORIAL. CLICK HERE TO GET THE PDF VERSION: Ravelry or Etsy
Crochet Pattern for Toddler /18-20″(46-51 cm)
Ch 12, turn
Row 1: dc in 3rd ch from hook, dc in each each chain stitch around. Chain 1 and turn.
Row 2: sc into each stitch from the previous row. Chain 1 and turn.
Row 3: Place a regular single crochet in the first stitch, (this helps to make sure that the edges stay nice and straight) then make a fpdc around the post of the dc stitch two rows below, [regular sc in the next st, fpdc two in the dc st two rows bellow]. Repeat this pattern to the end of the row, ending with a regular sc stitch in the last stitch of the row. Chain 1 and turn.
Row 4: Sc in the first stitch from the hook and in each stitch around. Chain 1 and turn
Row 5: Place a regular single crochet in the first stitch, fpdc around the fpdc st two rows below, [regular sc in the next st, fpdc two in the dc st two rows bellow]. Repeat this pattern to the end of the row, ending with a regular sc stitch in the last stitch of the row. Chain 1 and turn.
Rows 6 – 90: repeat rows 4-5, or until you reach the desired length.
Crochet Pattern for Child size 19-20.5” (48 -52cm)
Ch 14, turn
Row 1: dc in 3rd ch from hook, dc in each each chain stitch around. Chain 1 and turn.
Row 2: sc into each stitch from the previous row. Chain 1 and turn.
Row 3: Place a regular single crochet in the first stitch, (this helps to make sure that the edges stay nice and straight) then make a fpdc around the post of the dc stitch two rows below, [regular sc in the next st, fpdc two in the dc st two rows bellow]. Repeat this pattern to the end of the row, ending with a regular sc stitch in the last stitch of the row. Chain 1 and turn.
Row 4: Sc in the first stitch from the hook and in each stitch around. Chain 1 and turn
Row 5: Place a regular single crochet in the first stitch, fpdc around the fpdc st two rows below, [regular sc in the next st, fpdc two in the dc st two rows bellow]. Repeat this pattern to the end of the row, ending with a regular sc stitch in the last stitch of the row. Chain 1 and turn.
Rows 6 – 96: repeat rows 4-5, or until you reach the desired length.
Crochet Pattern for Teen size (or sm. adult) 20.5-22” (52 -56cm)
Ch 20, turn.
Row 1: dc in 3rd ch from hook, dc in each each chain stitch around. Chain 1 and turn.
Row 2: sc into each stitch from the previous row. Chain 1 and turn.
Row 3: Place a regular single crochet in the first stitch, (this helps to make sure that the edges stay nice and straight) then make a fpdc around the post of the dc stitch two rows below, [regular sc in the next st, fpdc two in the dc st two rows bellow]. Repeat this pattern to the end of the row, ending with a regular sc stitch in the last stitch of the row. Chain 1 and turn.
Row 4: Sc in the first stitch from the hook and in each stitch around. Chain 1 and turn
Row 5: Place a regular single crochet in the first stitch, fpdc around the fpdc st two rows below, [regular sc in the next st, fpdc two in the dc st two rows bellow]. Repeat this pattern to the end of the row, ending with a regular sc stitch in the last stitch of the row. Chain 1 and turn.
Rows 6 – 104: repeat rows 4-5, or until you reach the desired length.
Crochet Pattern for Adult Size M 21.5-22.5“(53 -56 cm)
Ch 20, turn.
Row 1: dc in 3rd ch from hook, dc in each each chain stitch around. Chain 1 and turn.
Row 2: sc into each stitch from the previous row. Chain 1 and turn.
Row 3: Place a regular single crochet in the first stitch, (this helps to make sure that the edges stay nice and straight) then make a fpdc around the post of the dc stitch two rows below, [regular sc in the next st, fpdc two in the dc st two rows bellow]. Repeat this pattern to the end of the row, ending with a regular sc stitch in the last stitch of the row. Chain 1 and turn.
Row 4: Sc in the first stitch from the hook and in each stitch around. Chain 1 and turn
Row 5: Place a regular single crochet in the first stitch, fpdc around the fpdc st two rows below, [regular sc in the next st, fpdc two in the dc st two rows bellow]. Repeat this pattern to the end of the row, ending with a regular sc stitch in the last stitch of the row. Chain 1 and turn.
Rows 6 – 108: repeat rows 4-5, or until you reach the desired length.
Crochet Pattern for Adult Size L 23-24” (58 -61cm)
Ch 20, turn.
Row 1: dc in 3rd ch from hook, dc in each each chain stitch around. Chain 1 and turn.
Row 2: sc into each stitch from the previous row. Chain 1 and turn.
Row 3: Place a regular single crochet in the first stitch, (this helps to make sure that the edges stay nice and straight) then make a fpdc around the post of the dc stitch two rows below, [regular sc in the next st, fpdc two in the dc st two rows bellow]. Repeat this pattern to the end of the row, ending with a regular sc stitch in the last stitch of the row. Chain 1 and turn.
Row 4: Sc in the first stitch from the hook and in each stitch around. Chain 1 and turn.
Row 5: Place a regular single crochet in the first stitch, fpdc around the fpdc st two rows below, [regular sc in the next st, fpdc two in the dc st two rows bellow]. Repeat this pattern to the end of the row, ending with a regular sc stitch in the last stitch of the row. Chain 1 and turn.
Rows 6 – 116: repeat rows 4-5, or until you reach the desired length.
Finishing
Lay the headband horizontally with the “right side” facing up. Fold the headband in half lengthwise, right sides together.
Hold each of the two short folded sides, one in each hand. Bring the two short, folded sides up to meet one another.
Insert one folded side into the other, overlapping the folded halves. See the photo below. Think of the two ends and two interlocking “C” shapes.
To Seam:
You should have 4 layers to stitch through. With a tapestry needle and the yarn tail, sew the edges together. The seam will be hidden inside the twist.
If you like easy to print patterns, the ad-free PDF of this crochet pattern with a photo tutorial, can be purchased in the following places:
Etsy
Ravelry.
I hope you enjoyed my crochet beanie pattern. If you have any comments on today’s tutorial, please feel free to leave me a comment below. I’d love to hear from you! If you’ve tried this pattern, feel free to share your finished projects on my Facebook Page!
Be sure to check out my other patterns on my blog and subscribe for all future projects, patterns and much more. As always, thanks for stopping by!

What’s Next?
Pin this post: Save this tutorial to your >>> Pinterest <<< boards so that you can come back to it later.
Leave a comment: We love to hear your feedback. Tell me in the comments below!
Share on Facebook: When you make this project, share it on social media and tag me.
Have questions? Join the Facebook Group! We created this group for you to share pictures, ask questions, and help each other out.
For More Free Crochet Patterns You’ll Love, don’t forget to subscribe bellow:
>>> PIN IT FOR LATER <<<
| Age and head sizes | Foundation chains stitches | Rows |
| Baby 0-3 mths 14-15” (36-38 cm) | 7+3 (10) | 70 rows |
| Baby 3-6 mths 15-17” (38-43 cm) | 7+3 (10) | 76 |
| Baby 6-12 mths 17-18” (43-46cm) | 7+3 (10) | 80 |
| Toddler 18-20“ (46-51 cm) | 9+3 (12) | 90 |
| Child 19-20.5” (48 -52cm) | 11+3 (14) | 96 |
| Teen (or sm. adult) 20.5-22” (52 -56cm) | 17+3 (20) | 104 |
| Adult Size M 21.5-22.5“(53 -56 cm) | 17+3 (20) | 108 |
| Adult Size L 23-24” (58 -61cm) | 17+3 (20) | 116 |
