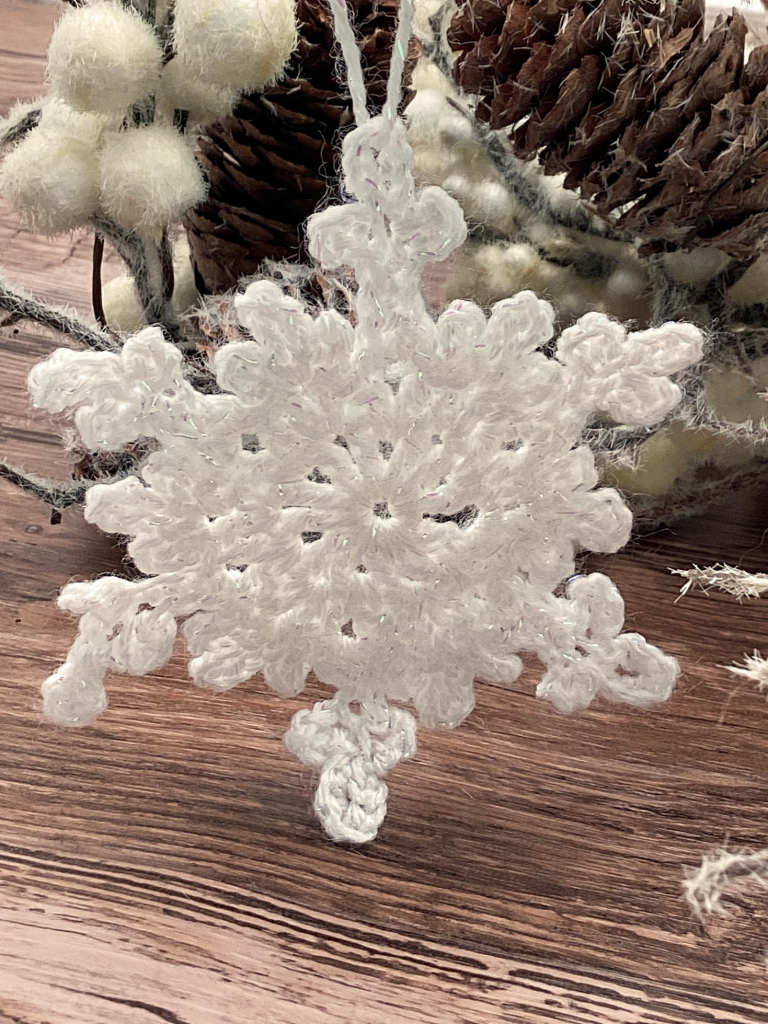
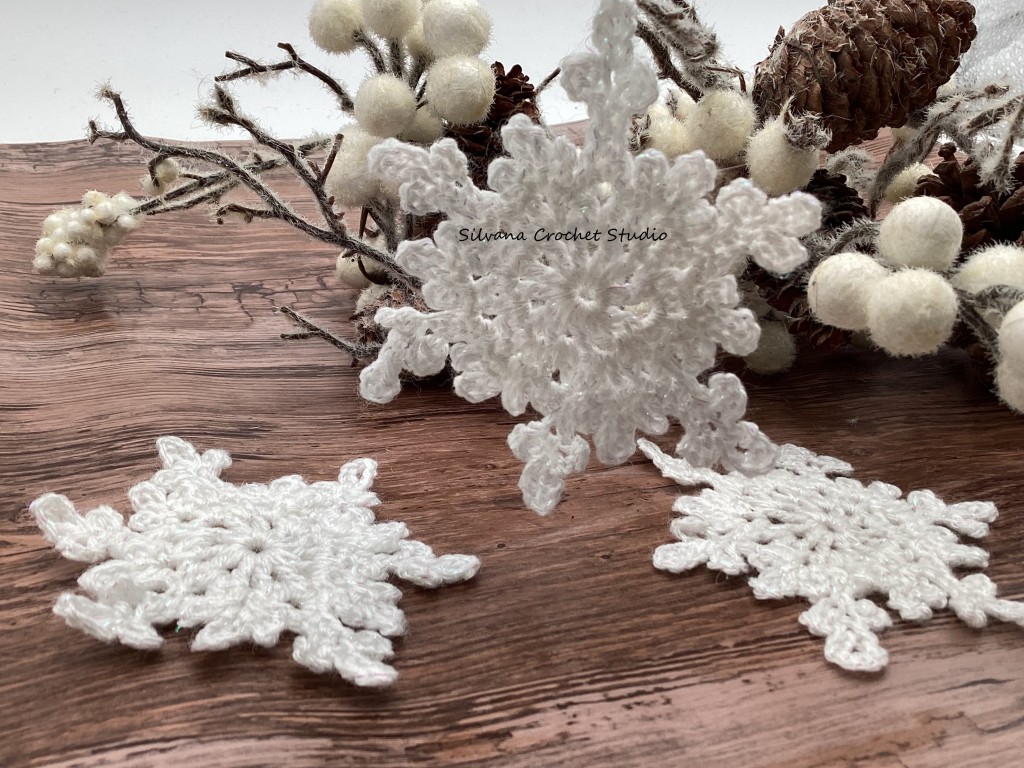
Your tree will look like a winter wonderland when
it’s adorned with these snowflakes.
You can vary the size of them depending on the
yarn you use and the hook size you choose. These
crochet snow flakes are great for crafting a
garland, hanging around a room, or decorating
your Christma tree.
THIS CROCHET PATTERN IS FREE TO VIEW ONLINE BELOW. YOU ALSO HAVE THE OPTION TO PURCHASE THE AD-FREE PDF DOWNLOAD. THIS INCLUDES EXTRA HIGH QUALITY, STEP BY STEP, PHOTOGRAPHS THROUGHOUT AND IN-DEPTH TUTORIAL.
A DOWNLOADABLE PDF OF THIS PATTERN IS AVAILABLE ON RAVERLY AND ETSY FOR A SMALL FEE.
Crocheting your own ornaments is a perfect way to start some handmade Christmas traditions. I love that ornaments are so versatile. You can use them to decorate your tree, string them on your mantle, or even attach them to your gifts.
Christmas Ornament Crochet Patterns
Do you know that feeling of excitement when you pull your Christmas ornaments out every year and remember what you love about each one? Christmas ornaments can be a big part of the homey, cozy Christmas memories that we make year after year with our families and friends.
And what could be more memorable than making your own Christmas ornaments?
You don’t have to keep all of your ornaments to yourself, though! The easy, crocheted Christmas ornament patterns included in this post are quick to make, so they also make perfect projects for selling or gifting to friends.

Best Yarn for Crochet Ornaments
Christmas ornaments are pretty forgiving when it comes to yarn choice. Because size doesn’t matter too much, you don’t need to worry about your gauge for most patterns.
When you’re thinking about how to crochet a Christmas ornament, you’ll want to have all the right supplies. Here are some materials you’ll want to have available (in addition to yarn, of course).
Crochet Hook- your gauge won’t matter as much with ornaments, but you’ll want the right size hook for the yarn you’re using
Tapestry needle- for weaving in ends and possibly joining pieces together
Stitch Marker- for marking your place or preventing your live loop from unraveling
Fiber fill – for stuffing any 3D parts of amigurumi ornaments
Patterns
Often our success with a crochet project has to do with choosing the right pattern to begin with. When you’re looking through this list of crochet ornament ideas, here are a few things to keep in mind:
- Consider the yarn tails: Ornaments with lots of colors will be the most striking on your tree, but they also may include more ends to weave in.
If you despise weaving in ends, choose patterns where the tails can simply be pulled inside like balls and baubles.
- Create a system: Want to make several identical ornaments for gifts or a holiday market? Consider if a pattern can be broken down into smaller sections and completed assembly-line style.
- For example, if you’re crocheting angel ornaments, you might make all the heads first, then all the bodies and then attach all the pieces at the end.
- The easiest ornaments: Many of the ornament patterns are made entirely with single crochet stitches. These will be the most beginner-friendly patterns to start with.
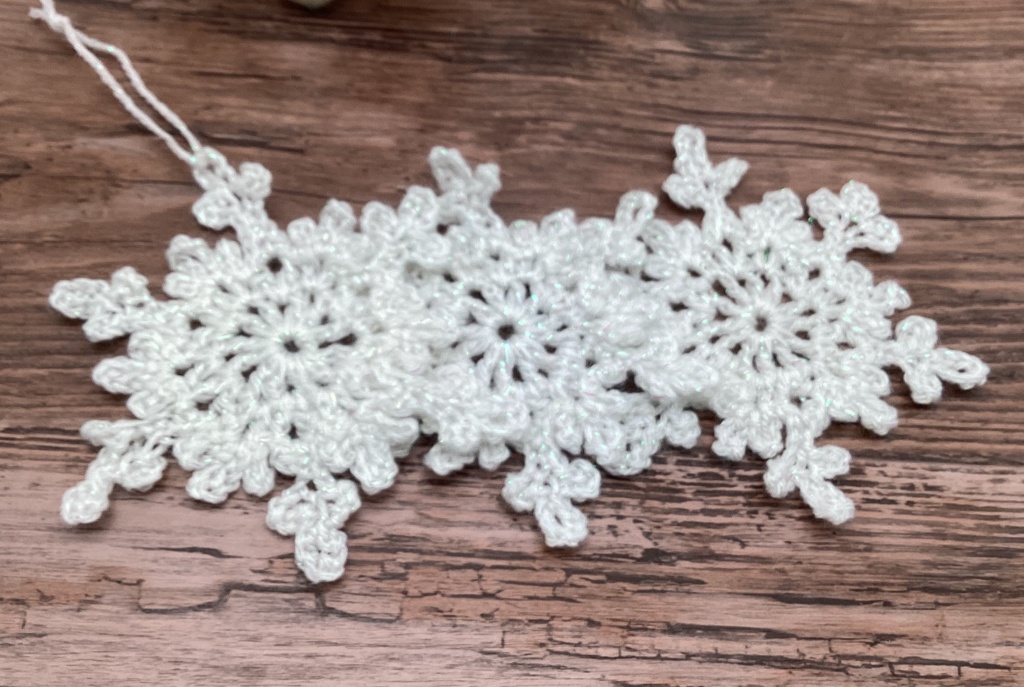
This free crochet pattern for “snowflakes”, will add a touch of vintage charm to your tree or gifts this holiday season. The snowflake made cute gift tag embellishments and can be made larger or smaller depending on your hook size and yarn weight.This gorgeous crochet snowflake pattern captures timeless Christmas magic. Crochet a few this year and enjoy them for decades to come!
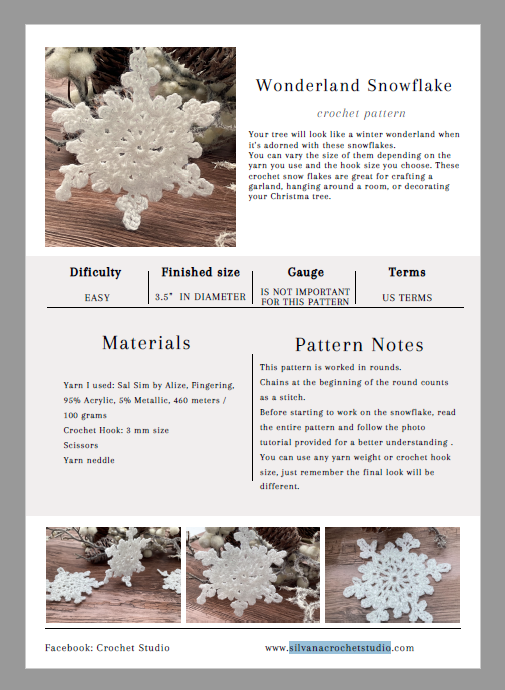
Christmas Wonderland Snowflake Ornament Pattern
Dificulty
EASY
Finished size:
3.5″ IN DIAMETER
Gauge:
IS NOT IMPORTANT FOR THIS PATTERN
Terms: US TERMS
Supplies you need to make the snowflake ornament:
Yarn I used: Sal Sim by Alize, Fingering,
95% Acrylic, 5% Metallic, 460 meters /
100 grams
Crochet Hook: 3 mm size
Scissors
Yarn neddle
Snowflake crochet pattern notes:
Pattern Notes
This pattern is worked in rounds.
Chains at the beginning of the round counts as a stitch.
Before starting to work on the snowflake, read the entire pattern and follow the photo
tutorial provided for a better understanding . You can use any yarn weight or crochet hook
size, just remember the final look will be different.
Terminology Used (US terms):
ch(s)-chain(s)
st(s)-stitch(es)
sl st-slip stitch
sc-single crochet
rnd = round
picot

Crochet Stitches used:
Single crochet (sc): insert the hook in the space/stitich and crochet the first stitch.
You have two stitches on the hook and crochet them together, pulling on the thread
of both at once. Now you have a single crochet stitch.
Slip Stitch (sl st): insert the hook in the crochet piece, and pull the yarn through both
stitches on the hook – the one into which the hook has been inserted and that already
on it. Now we have a slip stitch.
Picot: the picot is several chains that are then slip stitched together. In this pattern,
picot is written as chain 5 or 7, slip stitch to first chain made or to the base of the
chain stitch.
How to make the picot: ch 5(7), sl st to the sc from the base of the ch sts. (Or Slip
stitch back into the first chain you made.)
Snowflake pattern
Snow flake pattern:
Make a slip knot and ch 5, sl st to the first ch to form a circle.
Round 1: Sl st in the ring, ch 4 (ch 3 counts as a dc + ch 1), [dc, ch 1 in the next st],
repeat to the end. Sl st to the 3rd ch from the beg of the round. 12 chs, 12 dc.
Round 2: 1.Sl to the ch 1- space, [sc in the same space, ch2, sc in the same space, dc
in the next st, ch 2 dc in the same st], rep to the end of the round. Sl st to the first sc
st.
Round 3: [Sl st to the next ch 2-space, ch 5 sl into the ch-2 space, ch 7 sl to the same
space, ch 5 sl st to the same space. Slip stitch to the next ch2-space, ch 1, sc in the
space, ch, 2, ch 5 picot, ch 7 picot, ch 5 picot, sc in each of the two chains sts , right
before we started our picot stitches, sc in the ch-2 space], repeat this pattern around
for 5 more times.
Chain 1, fasten off and weave the ends in.
I hope you enjoy the patterns and have fun making!
Enjoy your Christmas!
What’s Next?
Pin this post: Save this tutorial to your >>> Pinterest <<< boards so that you can come back to it later.
Leave a comment: We love to hear your feedback. Tell me in the comments below!
Share on Facebook: When you make this project, share it on social media and tag me.
Have questions? Join the Facebook Group! We created this group for you to share pictures, ask questions, and help each other out.
More Christmas patterns you may like:
- Easy snowflake patern for beginners
- Beautiful Christmas ornaments
- Snowflake pattern ornament
- Crochet Angel Ornament