
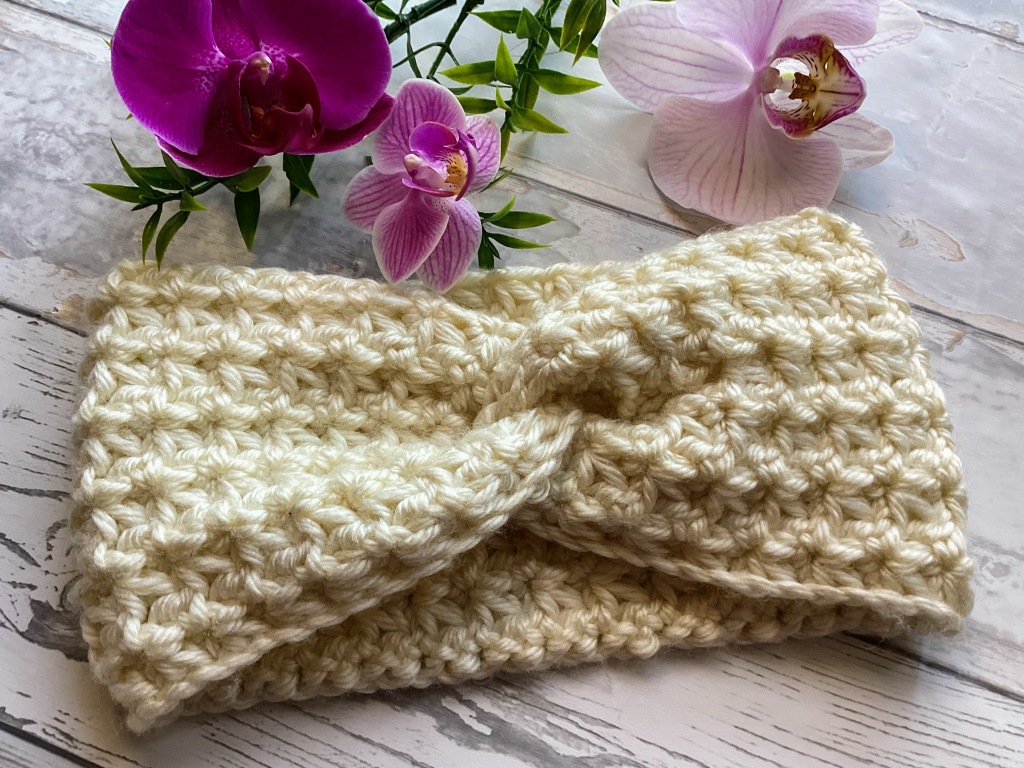
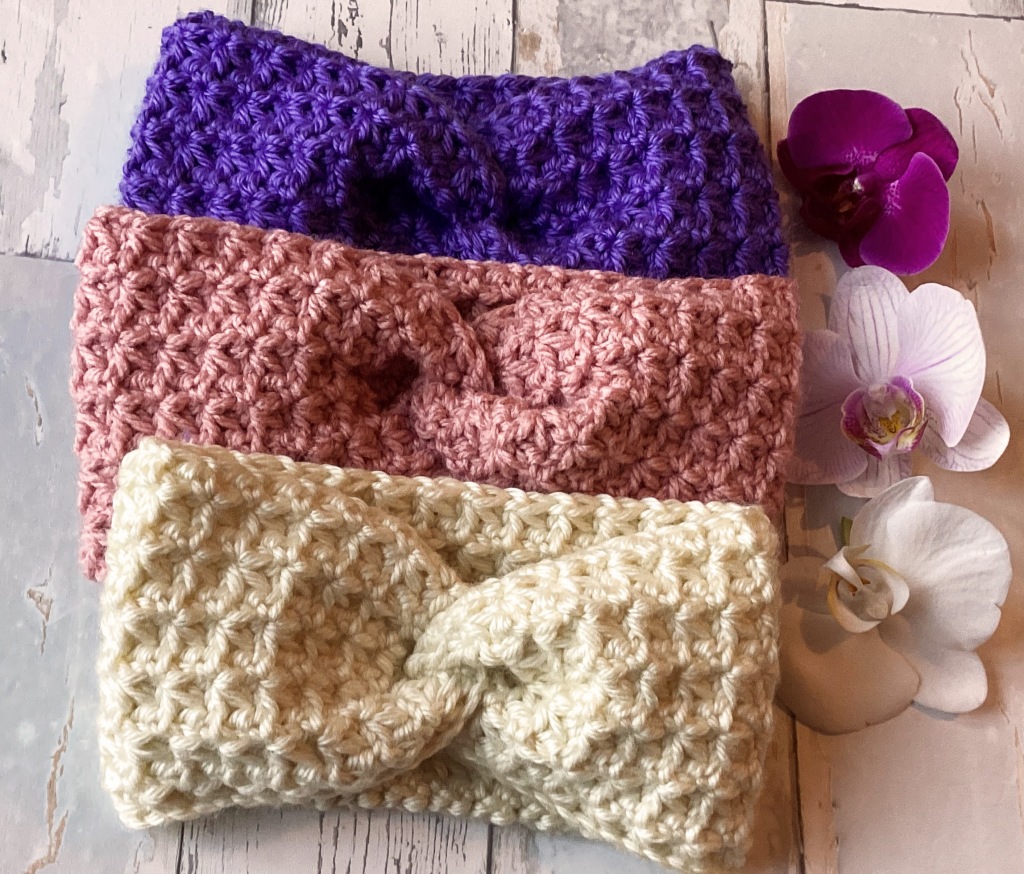
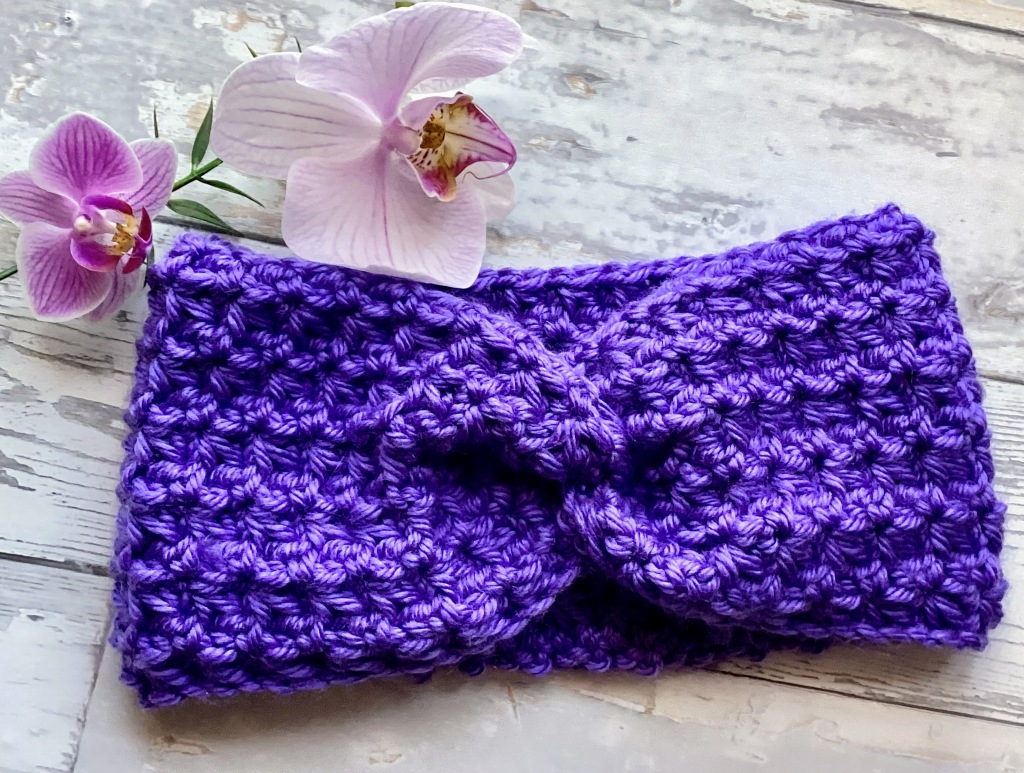
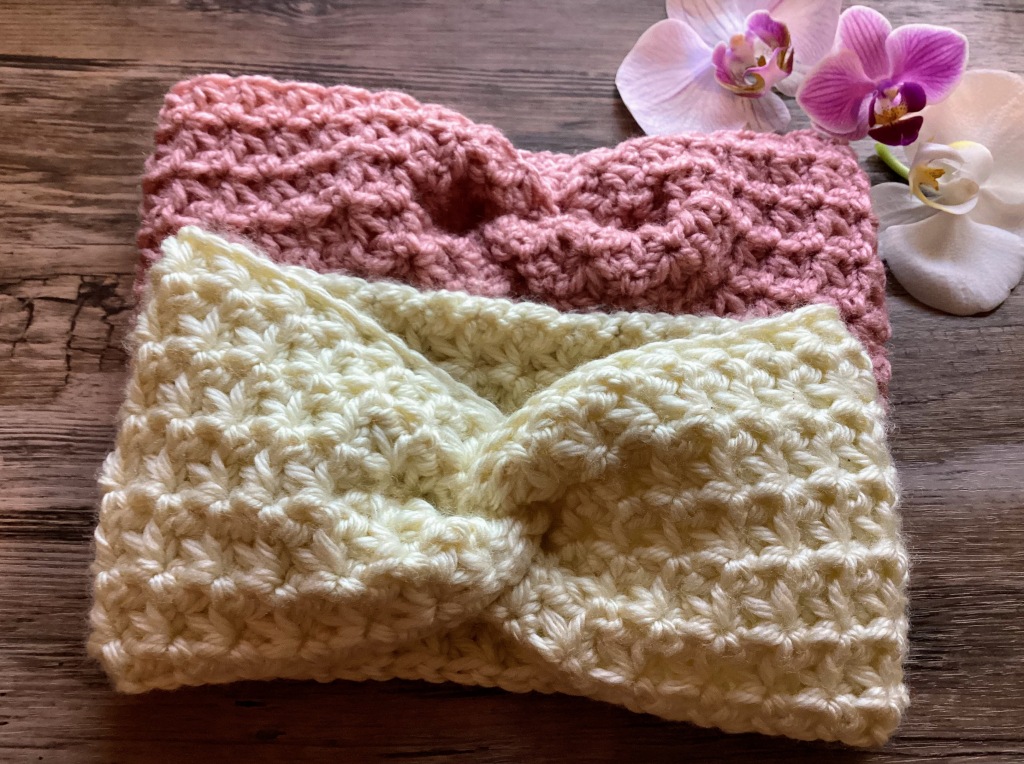
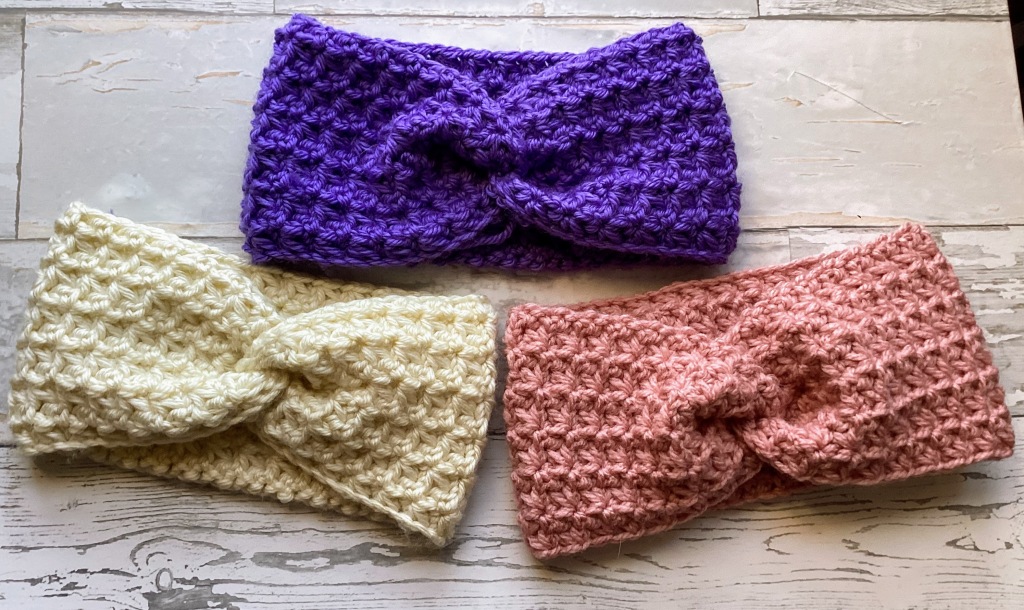
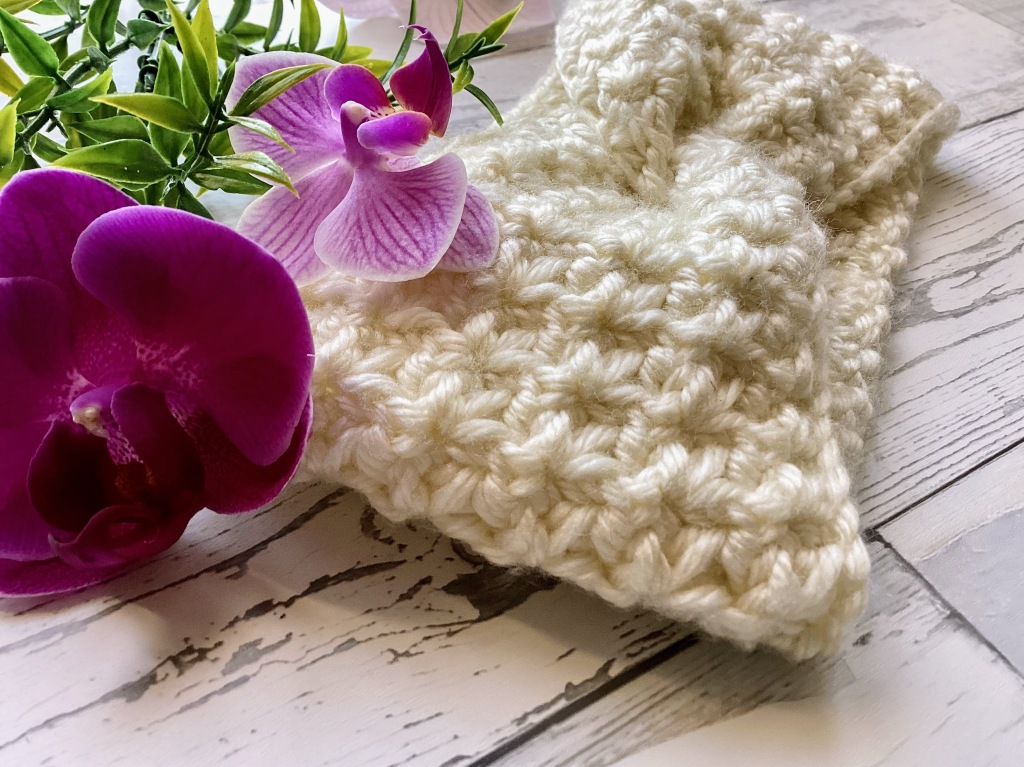
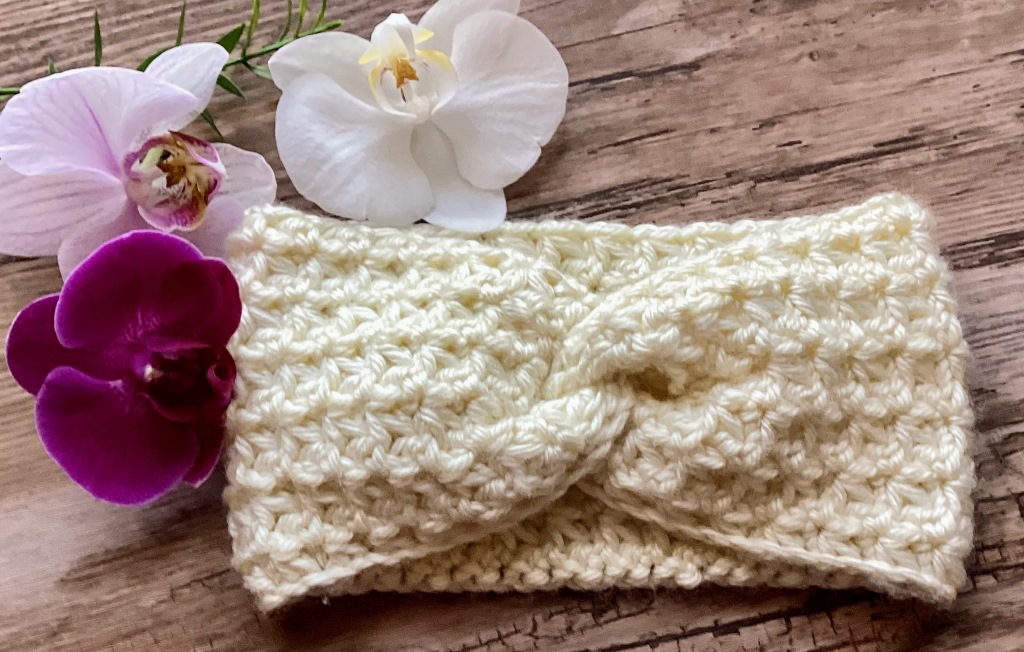
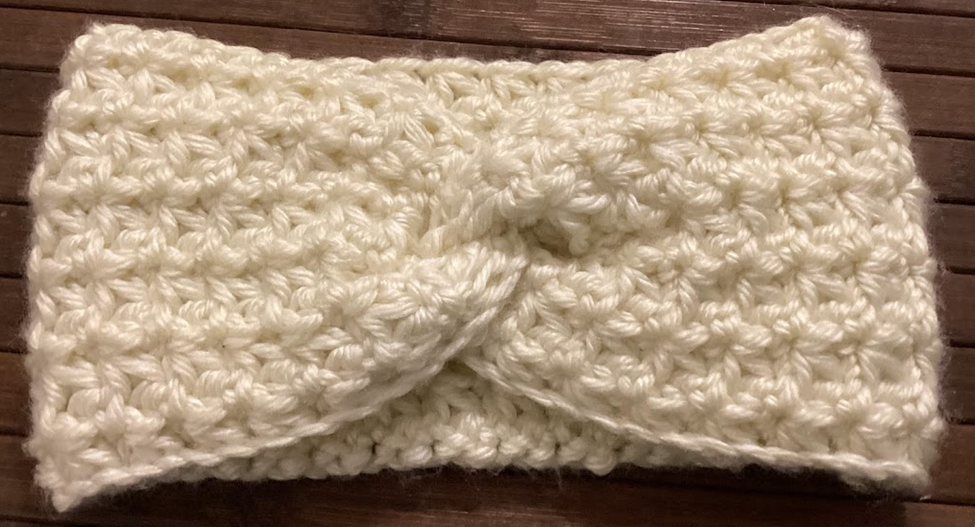
Hi everyone! Today I’m sharing my newest crochet pattern, Florence Headband Crochet Pattern. I love to use simple stitches to creat beautiful textured pattern, so I thought I would make a earwarmer, headband pattern to go along with my ideea of simple is more beautiful.
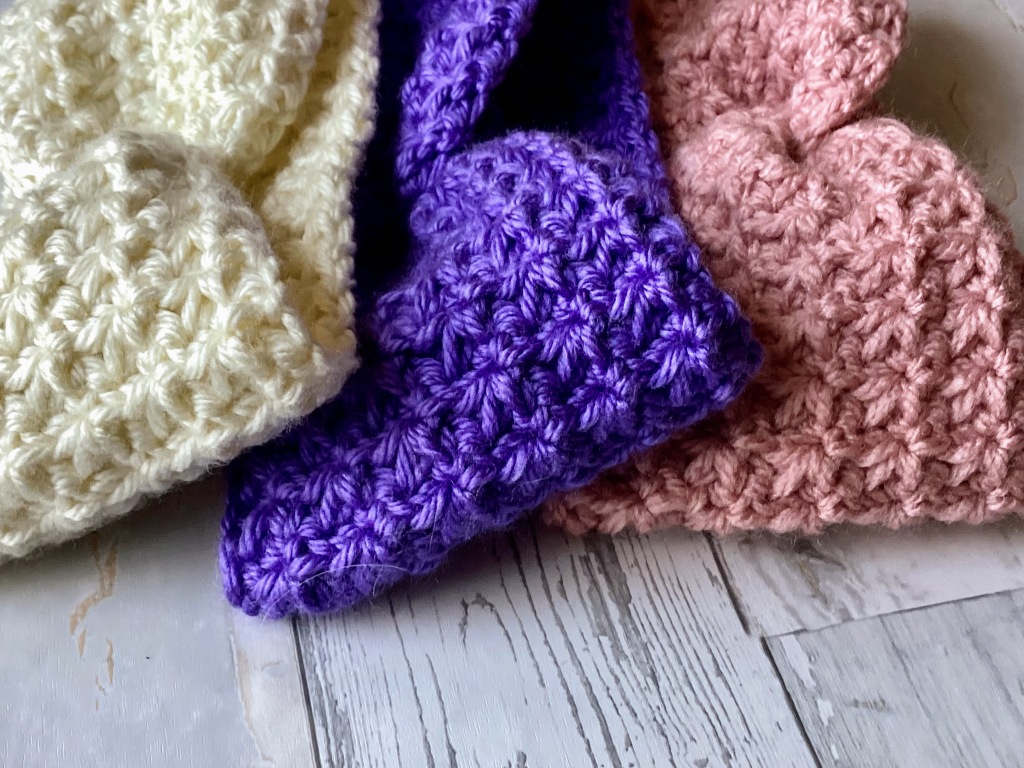
The crochet stitch I decided to use is Trinity Stitch. This is such a fun and easy stitch to learn, so I hope you enjoy it as well. I also show you how to make the front twist, which helps give the headband a nice and trendy look.
At the end of this post I prepared for you, visual learners, a step by step photo tutorial to assis you as you work your project. Make sure you scroll to the end and check the photos before sttarting your project.
This earwarmer is a great project for fairly new crocheters and those of you who love wearing a earwarmer or headband.
I love this crochet headband pattern because it’s beautiful and functional! The #4 weigh yarn is warm and soft and will keep your ears nice and toasty.
Though the front twist may look complicated, I promise that it’s really easy to do. The headband itself is worked flat in rows. It’s joined into a loop with one simple seam. And, the clever design of the seam creates the look of a twist..
THIS CROCHET PATTERN FOR ALL SIZES IS FREE TO VIEW ONLINE BELOW. YOU ALSO HAVE THE OPTION TO PURCHASE THE AD-FREE PDF DOWNLOAD VERSION. THIS INCLUDES EXTRA STEP BY STEP, PHOTOGRAPHS THROUGHOUT AND IN-DEPTH TUTORIAL. CLICK HERE TO GET THE PDF VERSION:
In this post you will find:
Difficulty level for the crochet pattern of the beautiful ear warmer
Notes about the Pattern
Pattern Terminology
Crochet Headband Pattern
Crochet Stitches Used in the Pattern
Materials Needed
Gauge
Sizes
Photo Tutorial for Stitches and Pattern
>>> PIN IT FOR LATER <<<
Difficulty: Easy (Beginner level – knowledge of long chains and and basic stitches.)
Techniques used: chain stitches and and single crochet stitches.
This headband is a great project for fairly new crocheters and those of you who love wearing a earwarmer or earwarmer.
If a different weight brand of yarn or gauge isn’t followed, then the headband will not turn out the same size as written. Make sure you follow the gauge for a perfect fit.
Notes for the pattern
- The pattern starts by chaining a given number of stitches for the size earwarmer you want to make.
- The best way to ensure a good fit is to measure the recipient’s head circumference with a tape measure. Measure exactly where the headband will go around the head. If you are making a gift, and can’t measure the recipient’s head, I prepared a rough guide to head sizes.
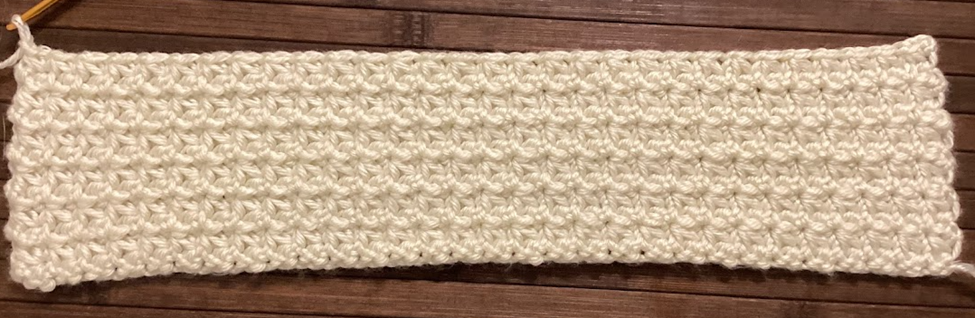
- This headband is worked back and forth in rows.
- You can also easily adjust the sizing by working more or less chain stitches or more or less rounds! To lenght the width, add more or less foundation chain stitches to ! The pattern require an even number of foundation chains. To adjust the width, repeat rounds 3 as many times as necessary to reach your desired lenght.
- The rows always start and end with a single crochet.
- If a different weight brand of yarn or gauge isn’t followed, then the earwarmer will not turn out the same size as written.
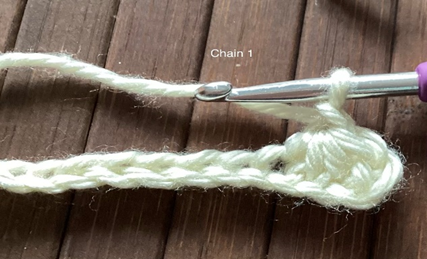
- Chain 1 from the beginning of each round does not count as a stitch.
Tip for crochetting trinity stitch: crochet it more looser than you usualy would especially the chain between the stitches.
Pattern Terminology
Ch(s) – chain(s)
St(es) – stitch(es)
Sc – single crochet
Rep – repeat
Sp – space
YO – yarn over
Crochet Stitches
Single crochet(sc): Insert your hook, yarn over and pull a loop back through, yarn over and pull through two loops.
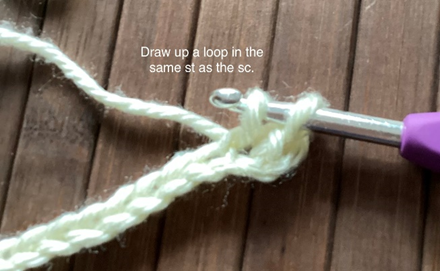
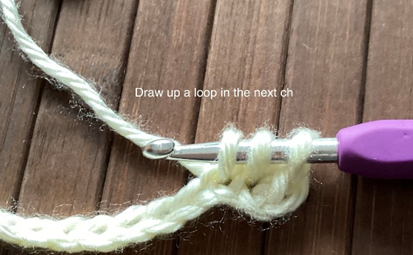
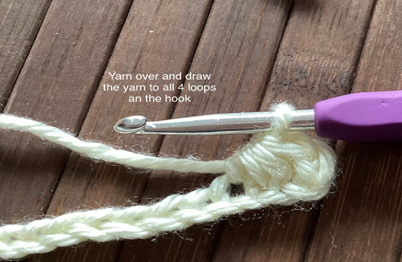
Trinity Stitch: Insert hook in previously worked st, YO, insert hook in next st, YO, insert hook in next st, YO for 4 loops on the hook, YO and pull through all 4 loops, ch 1.
Materials needed:
Soft classic by Red Heart, #4, 100% Acrylic, 330 meters (361 yards) / 200 grams (7.05 ounces)
5 mm size crochet hook
Scissors
Tapestry needle
Measuring tape
Yarn needle
Gauge: 14sc sts = 4 inches/12 rows = 4 inches
Crochet Headband Sizes
Sizes are listed in inches for height and circumference.
Baby 0-3 months: Height 2”, cir. 12”
Baby 3-6 months: Height 2”, cir. 13”
Baby 6-12 months: Height 2”, cir. 15”
Toddler: Height 2”, cir. 16”
Child: Height 3”, cir. 18”
Teen: Height 3.5”, cir. 20
Woman: Height 4”, cir. 21,
Woman Large: Height 4”, cir 23
Headband Pattern for Baby 0-3 months
Foundation Row: Ch 42 or multiples of 2 for your desired width.
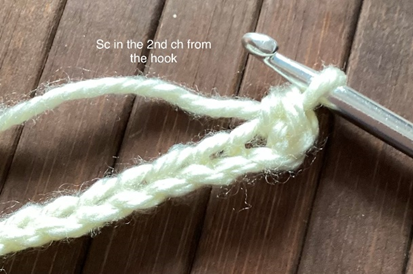
Row 1: In the second ch from the hook, make 1 SC.
Work trinity st across the length of the foundation row. DO NOT ch 1 for the last trinity st of the row and make 1 SC in the last ch.
Row 2: Ch 1 and turn.
Make 1 SC in the same st and work trinity st across. DO NOT ch 1 for the last trinity st and finish the row with 1 SC in the last st. Each row will have the same number of trinity st.
Row 3 – 6: rep row 2 or as long as you’d like your project to be. Fasten off and cut the yarn, leaving a 10” yarn tail.
Finishing the Headband
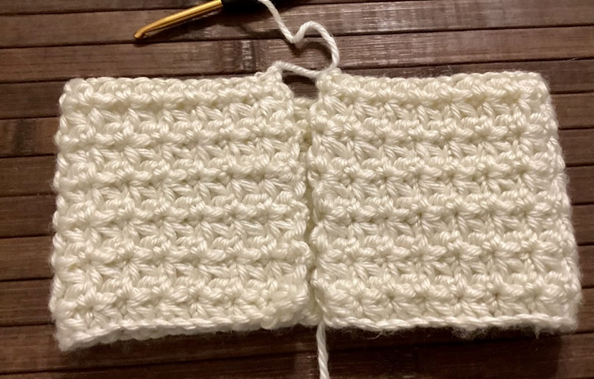
Lay the headband horizontally with the “right side” facing up. Fold the earwarmer in half lengthwise, right sides together.
Hold each of the two short folded sides, one in each hand. Bring the two short, folded sides up to meet one another.
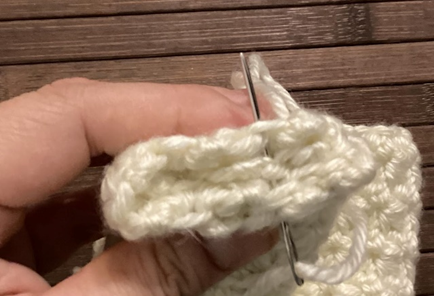
Insert one folded side into the other, overlapping the folded halves. See the photo below. Think of the two ends and two interlocking “C” shapes.
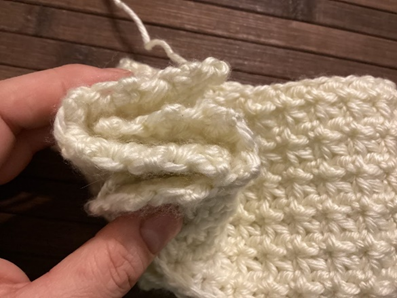
To Seam:
You should have 4 layers to stitch through. With a tapestry needle and the yarn tail, sew the edges together. The seam will be hidden inside the twist. Fasten off yarn and weave in loose ends securely.
Flip the headband inside out so the right side is showing again to see your new headband creation.
Headband Crochet Pattern for Baby 3-6 monts
Foundation Row: Ch 46 or multiples of 2 for your desired width.
Row 1: In the second ch from the hook, make 1 SC.
Work trinity st across the length of the foundation row. DO NOT ch 1 for the last trinity st of the row and make 1 SC in the last ch.
Row 2: Ch 1 and turn.
Make 1 SC in the same st and work trinity st across. DO NOT ch 1 for the last trinity st and finish the row with 1 SC in the last st. Each row will have the same number of trinity st.
Row 3 – 6: rep row 2 or as long as you’d like your project to be. Fasten off and cut the yarn, leaving a 10” yarn tail.
Finishing the Headband
Lay the headband horizontally with the “right side” facing up. Fold the earwarmer in half lengthwise, right sides together.
Hold each of the two short folded sides, one in each hand. Bring the two short, folded sides up to meet one another.
Insert one folded side into the other, overlapping the folded halves. See the photo below. Think of the two ends and two interlocking “C” shapes.
To Seam:
You should have 4 layers to stitch through. With a tapestry needle and the yarn tail, sew the edges together. The seam will be hidden inside the twist. Fasten off yarn and weave in loose ends securely.
Flip the headband inside out so the right side is showing again to see your new headband headband creation.
Headband Crochet Pattern for Baby 6-12 months
Foundation Row: Ch 52 or multiples of 2 for your desired width.
Row 1: In the second ch from the hook, make 1 SC.
Work trinity st across the length of the foundation row. DO NOT ch 1 for the last trinity st of the row and make 1 SC in the last ch.
Row 2: Ch 1 and turn.
Make 1 SC in the same st and work trinity st across. DO NOT ch 1 for the last trinity st and finish the row with 1 SC in the last st. Each row will have the same number of trinity st.
Row 3 – 6: rep row 2 or as long as you’d like your project to be. Fasten off and cut the yarn, leaving a 10” yarn tail.
Finishing the Headband
Lay the Headband horizontally with the “right side” facing up. Fold the earwarmer in half lengthwise, right sides together.
Hold each of the two short folded sides, one in each hand. Bring the two short, folded sides up to meet one another.
Insert one folded side into the other, overlapping the folded halves. See the photo below. Think of the two ends and two interlocking “C” shapes.
To Seam:
You should have 4 layers to stitch through. With a tapestry needle and the yarn tail, sew the edges together. The seam will be hidden inside the twist. Fasten off yarn and weave in loose ends securely.
Flip the headband inside out so the right side is showing again to see your new headband headband creation.
Headband Crochet pattern for Toddler Size
Headband Pattern for Toddler Size
Foundation Row: Ch 56 or multiples of 2 for your desired width.
Row 1: In the second ch from the hook, make 1 SC.
Work trinity st across the length of the foundation row. DO NOT ch 1 for the last trinity st of the row and make 1 SC in the last ch.
Row 2: Ch 1 and turn.
Make 1 SC in the same st and work trinity st across. DO NOT ch 1 for the last trinity st and finish the row with 1 SC in the last st. Each row will have the same number of trinity st.
Row 3 – 8: rep row 2 or as long as you’d like your project to be. Fasten off and cut the yarn, leaving a 10” yarn tail.
Finishing the Headband
Lay the headband horizontally with the “right side” facing up. Fold the earwarmer in half lengthwise, right sides together.
Hold each of the two short folded sides, one in each hand. Bring the two short, folded sides up to meet one another.
Insert one folded side into the other, overlapping the folded halves. See the photo below. Think of the two ends and two interlocking “C” shapes.
To Seam:
You should have 4 layers to stitch through. With a tapestry needle and the yarn tail, sew the edges together. The seam will be hidden inside the twist. Fasten off yarn and weave in loose ends securely.
Flip the headband inside out so the right side is showing again to see your new headband creation.
Headband Crochet Pattern for Child Size
Headband Pattern for Child Size
Foundation Row: Ch 64 or multiples of 2 for your desired width.
Row 1: In the second ch from the hook, make 1 SC.
Work trinity st across the length of the foundation row. DO NOT ch 1 for the last trinity st of the row and make 1 SC in the last ch.
Row 2: Ch 1 and turn.
Make 1 SC in the same st and work trinity st across. DO NOT ch 1 for the last trinity st and finish the row with 1 SC in the last st. Each row will have the same number of trinity st.
Row 3 – 10: rep row 2 or as long as you’d like your project to be. Fasten off and cut the yarn, leaving a 10” yarn tail.
Finishing the Headband
Lay the headband horizontally with the “right side” facing up. Fold the earwarmer in half lengthwise, right sides together.
Hold each of the two short folded sides, one in each hand. Bring the two short, folded sides up to meet one another.
Insert one folded side into the other, overlapping the folded halves. See the photo below. Think of the two ends and two interlocking “C” shapes.
To Seam:
You should have 4 layers to stitch through. With a tapestry needle and the yarn tail, sew the edges together. The seam will be hidden inside the twist. Fasten off yarn and weave in loose ends securely.
Flip the headband inside out so the right side is showing again to see your new headband earwarmer creation.
Headband Crochet Pattern for Teen Size
Headband Pattern for Teen Size
Foundation Row: Ch 70 or multiples of 2 for your desired width.
Row 1: In the second ch from the hook, make 1 SC.
Work trinity st across the length of the foundation row. DO NOT ch 1 for the last trinity st of the row and make 1 SC in the last ch.
Row 2: Ch 1 and turn.
Make 1 SC in the same st and work trinity st across. DO NOT ch 1 for the last trinity st and finish the row with 1 SC in the last st. Each row will have the same number of trinity st.
Row 3 – 12: rep row 2 or as long as you’d like your project to be. Fasten off and cut the yarn, leaving a 10” yarn tail.
Finishing the Headband
Lay the headband horizontally with the “right side” facing up. Fold the earwarmer in half lengthwise, right sides together.
Hold each of the two short folded sides, one in each hand. Bring the two short, folded sides up to meet one another.
Insert one folded side into the other, overlapping the folded halves. See the photo below. Think of the two ends and two interlocking “C” shapes.
To Seam:
You should have 4 layers to stitch through. With a tapestry needle and the yarn tail, sew the edges together. The seam will be hidden inside the twist. Fasten off yarn and weave in loose ends securely.
Flip the headband inside out so the right side is showing again to see your new headband earwarmer creation.
headband Crochet Pattern for Women Size
Headnband Pattern for Women Size
Foundation Row: Ch 74 or multiples of 2 for your desired width.
Row 1: In the second ch from the hook, make 1 SC.
Work trinity st across the length of the foundation row. DO NOT ch 1 for the last trinity st of the row and make 1 SC in the last ch.
Row 2: Ch 1 and turn.
Make 1 SC in the same st and work trinity st across. DO NOT ch 1 for the last trinity st and finish the row with 1 SC in the last st. Each row will have the same number of trinity st.
Row 3 – 12: rep row 2 or as long as you’d like your project to be. Fasten off and cut the yarn, leaving a 10” yarn tail.
Finishing the earwarmer
Lay the headband horizontally with the “right side” facing up. Fold the headband in half lengthwise, right sides together.
Hold each of the two short folded sides, one in each hand. Bring the two short, folded sides up to meet one another.
Insert one folded side into the other, overlapping the folded halves. See the photo below. Think of the two ends and two interlocking “C” shapes.
To Seam:
You should have 4 layers to stitch through. With a tapestry needle and the yarn tail, sew the edges together. The seam will be hidden inside the twist. Fasten off yarn and weave in loose ends securely.
Flip the headband inside out so the right side is showing again to see your new headband earwarmer creation.
Don’t Like Ads? Get the Adsfree PDF for a smal fee here:
Headband Crochet Pattern for Large Women Size
Headband Pattern for Large Women Size
Foundation Row: Ch 80 or multiples of 2 for your desired width.
Row 1: In the second ch from the hook, make 1 SC.
Work trinity st across the length of the foundation row. DO NOT ch 1 for the last trinity st of the row and make 1 SC in the last ch.
Row 2: Ch 1 and turn.
Make 1 SC in the same st and work trinity st across. DO NOT ch 1 for the last trinity st and finish the row with 1 SC in the last st. Each row will have the same number of trinity st.
Row 3 – 12: rep row 2 or as long as you’d like your project to be. Fasten off and cut the yarn, leaving a 10” yarn tail.
Finishing the Headband
Lay the headband horizontally with the “right side” facing up. Fold the headband in half lengthwise, right sides together.
Hold each of the two short folded sides, one in each hand. Bring the two short, folded sides up to meet one another.
Insert one folded side into the other, overlapping the folded halves. See the photo below. Think of the two ends and two interlocking “C” shapes.
To Seam:
You should have 4 layers to stitch through. With a tapestry needle and the yarn tail, sew the edges together. The seam will be hidden inside the twist. Fasten off yarn and weave in loose ends securely.
Flip the headband inside out so the right side is showing again to see your new headband creation.
I hope you enjoyed making this beautiful free headband pattern. Let me know how did you like this pattern. I’d love to hear from you!
Crochet Headband Pattern – photo tutorial
Trinity Stitch

Finishing the earwarmer
SIGN UP FOR MORE PATTERNS TO STAY UPDATED ON PATTERNS:
What’s Next?
Pin this post: Save this tutorial to your >>>Pinterest <<< boards so that you can come back to it later.
Leave a comment: We love to hear your feedback. Tell me in the comments below!
Share on Facebook: When you make this project, share it on social media and tag me.
Have questions? Join the Facebook Group! We created this group for you to share pictures, ask questions, and help each other out.
Terms and conditions:
You are more than welcome to sell your finished items, but please give Silvana Crochet Studio credit as pattern designer and link back to my shop https://www.etsy.com/shop/SilvanaCrochetStudio?ref=profile_header or to Ravelry https://www.ravelry.com/designers/silvana-hagiu
If you have any questions about this pattern please feel free to message me.
My patterns (including all photographs) are copyrighted. You may NOT copy, re-distribute or sell my pattern.
