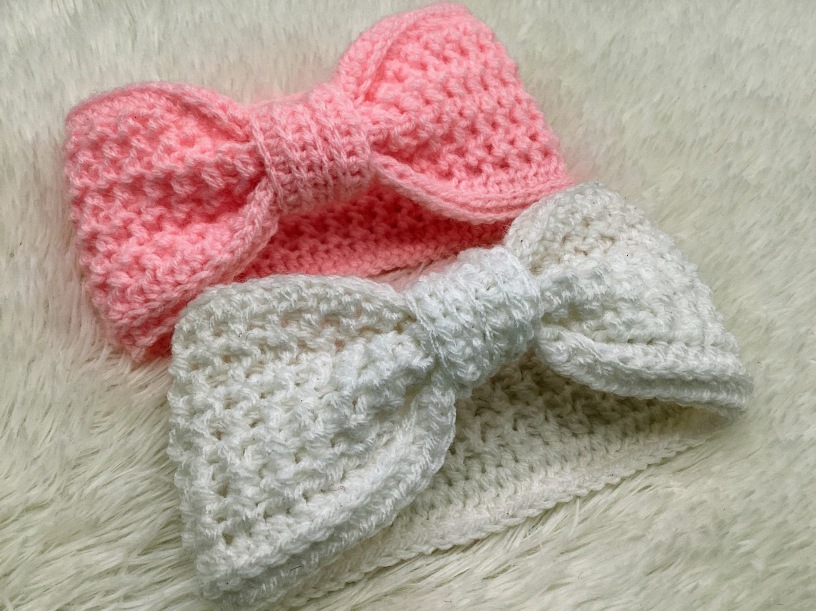
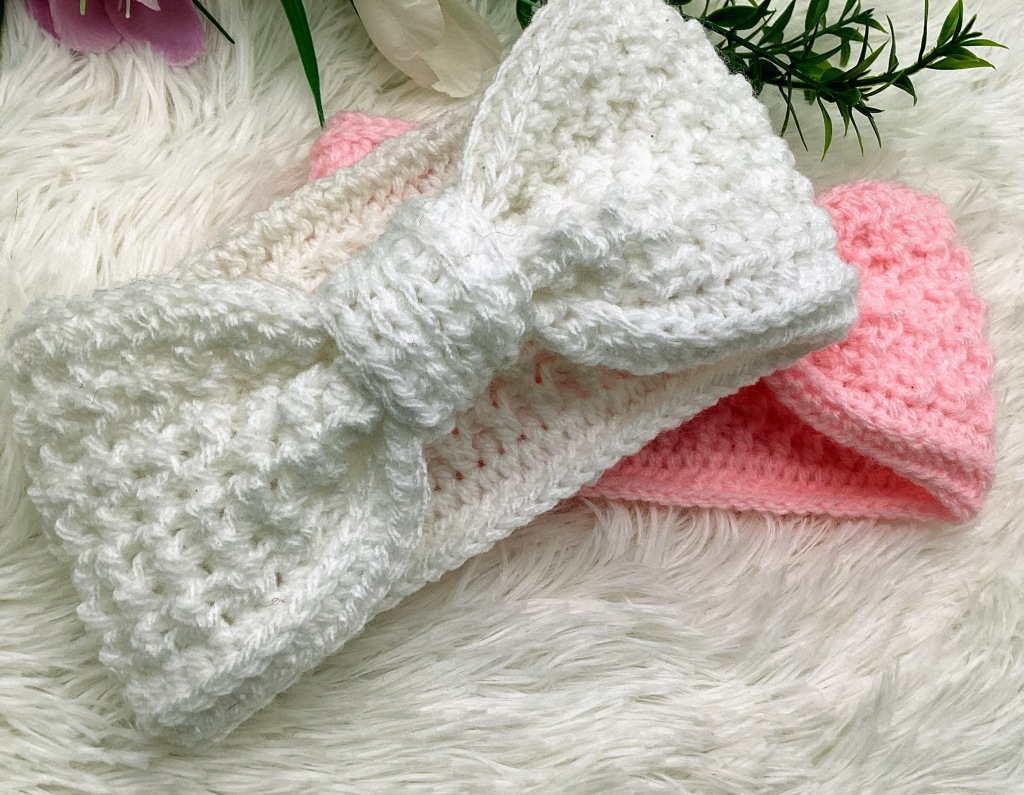
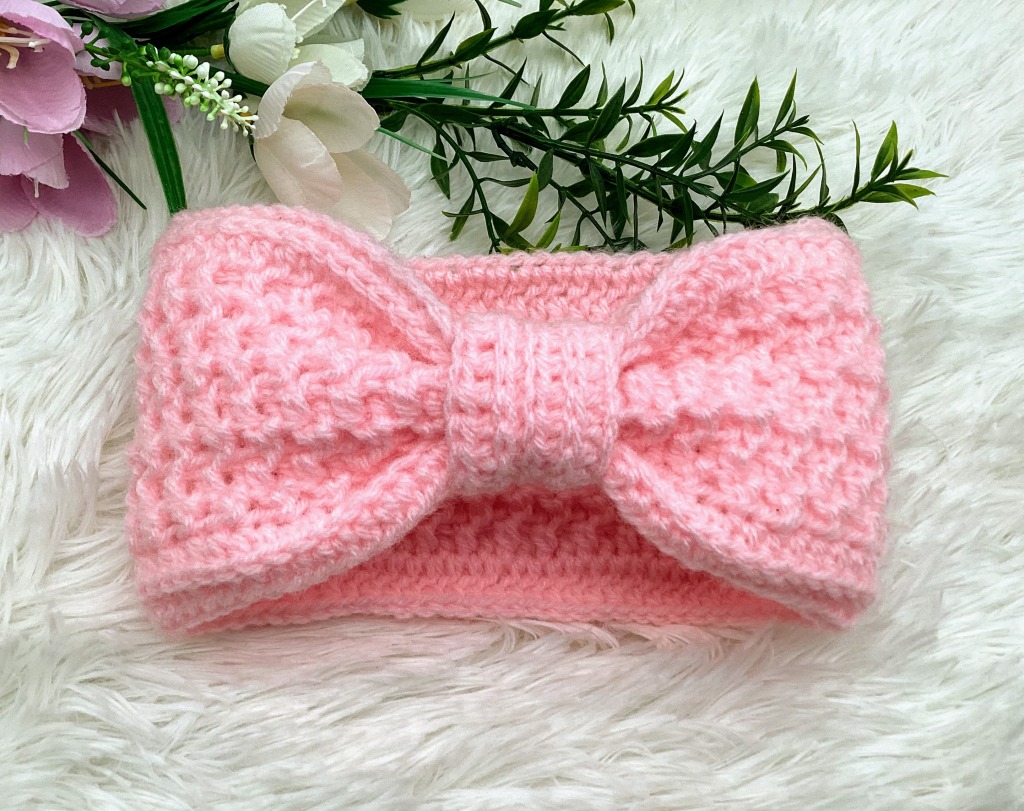
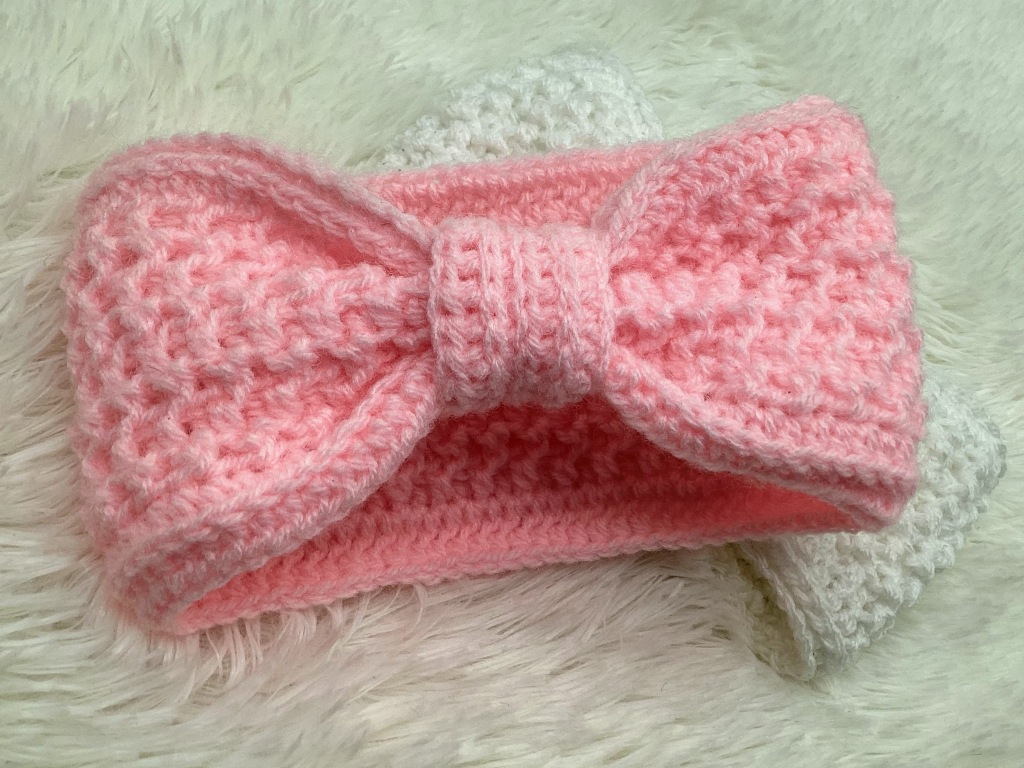
Today, I’m going to show you how to crochet a elegant beautiful headband! I absolutely love how cute and simple this ear warmer pattern is.
This pretty, elegant headband is so easy to make, and it’s simple to adjust to fit any age or head size. The pattern is designed in 8 different sizes ranges from Newborn to Adult Large.
In this post you will find:
About this Free Headband Pattern
Get the PDF ads-free pattern
Materials Needed for This Pattern
Gauge for the Pattern
Crochet Stitches Used
Additional Terms
Sizes
Crochet Pattern for 0-3 Months Baby Size
Crochet Pattern for 3-6 Months Baby Size
Crochet Pattern for 6-12 Months Baby Size
Crochet Pattern for Toddler Size
Crochet Pattern for Child Size
Crochet Pattern for Teen Size
Crochet Pattern for Adult Size
Crochet Pattern for Adult Large Size

About this Free Headband Pattern
- This Free Headband Crochet Pattern is written in American English terms.
- This headband is basically easy! It’s worked back and forth in rows.
- The pattern starts by chaining an even number of stitches puls one, for the size headband you want to make worked back and forth in rows. Make a foundation chain, the length you require for the headband size. The number of stitches will depend on what type of yarn you are using.
- The best way to ensure a good fit is to measure the recipient’s head circumference with a tape measure. Measure exactly where the headband will go arow the head. If you are making a gift, and can’t measure the recipient’s head, I prepared a rough guide to head sizes.
- You can also easily adjust the sizing of the headband by working more or less chain stitches or more or less rows! To adjust the lenght, work more or less foundation chain stitches to row! The pattern require an eveb number of foundation chains plus 1 chain. To adjust the width, repeat rows 3-4 as many times as necessary to reach your desired width.
- Chains at beginning of round do not count as stitch.
- If a different weight brand of yarn or gauge isn’t followed, then the headband will not turn out the same size as written.
- Number within ( ) show the total number of stitches you should have after that round.
- The size of the headband is given by the number of chain stitches you start with.
Get the PDF ads-free pattern:
THIS CROCHET PATTERN FOR THE 8 SIZES IS FREE TO VIEW ONLINE BELOW. YOU ALSO HAVE THE OPTION TO PURCHASE THE AD-FREE PDF DOWNLOAD VERSION FOR A SMALL FEE. THIS INCLUDES EXTRA STEP BY STEP, PHOTOGRAPHS THROUGHOUT AND IN-DEPTH TUTORIAL. CLICK HERE TO GET THE PDF VERSION:
Materials Needed for This Pattern
Yarn: Detroit by Red Heart,100% Acrylic, 250 meters (273 yards)/ 100 grams (3.53 ounces)
3.5 mm crochet hook
Scrissors
Yarn needle
Measuring tape
Gauge: 18 hdc sts/12 row =4”/4”
Crochet Stitches Used
St(es) – stitch(es)
ch – chain
Hdc – half double crochet
Hdc blo – half double crochet back loop only (see photo bellow) Hdc in the 3rd loop – half double crochet in the third loop.
Additional terms:
Working in the back loop: (see photo above) when you crochet a row of half double crochet stitches and look at the top, you’ll see how those little Vs form the stitches you crochet into. When you hold the piece of crochet in front of you with the Vs on top, the part of the V closest to you is the front loop. The part of the V farther away from you on the opposite side is the back loop. When you crochet into the back loop only, you’re only inserting your hook under one loop, not both like usual. The back loop is the one that is farthest from you, when you look at the top of your stitches.
Working in the 3rd loop: (see photo above) Look at the top of the stitch, and locate the sideways “V”, bend the stitch to look at the back and you should see another “V” made by the “yarn over”. When you are working in rows, the 3rd loop will be facing you after you turn as a horizontal bar. When it’s done correctly, working in the 3rd loop pushes the top of the stitch toward the outside of the design. It will create a ridge that look like knitted around the outside of your design.
Here is how it is done:
STEP 1: Yo, and identify the third loop of the first hdc
STEP 2: Insert your hook under the third loop from the bottom up.
STEP 3: Yo, and pull up a loop. Yo, pull through all three loops on your hook to complete your hdc
Sizes
Usually, a headband for an adult will be about 3½ to 4,5 inches (9-11cm) deep, for a child 2 to 3 inches (5-7.5cm) deep and for a baby headband, about 1 inch (2.5cm) deep. Of course, this is totally adaptable to your personal taste. You can simply stitch it as wide or as narrow as you prefer.
| AGE | Head Size |
| Baby 0-3 mths | 14-15” (36-38 cm) |
| Baby 3-6 mths | 15-16” (38-43cm) |
| Baby 6-12 mths | 17-18” (43-46cm) |
| Toddler | 18-20“(46-51 cm) |
| Child | 19-20.5” (51 -52cm) |
| Teen (or sm. adult) | 20.5-22” (52 -56cm) |
| Adult Size M | 21.5-22.5“(53 -56 cm) |
| Adult Size L | 23-24” (58 -61cm) |

Crochet Pattern for 0-3 Months Baby Size
Start by making a chain of 59 chain stitches.
Row 1: hdc in the second chain and in each chain to the end of the row. Chain 1 and turn. (58 hdc)
Row 2: hdc in the 3rd loop only in each stitch to the end of the row. Chain 1 and turn. (58 hdc in the 3rd loop only)
Row 3: in the first stitch work one hdc in the 3rd loop, hdc in the back loop only in the next stitch, [hdc 3rd loop, hdc blo] repeat to the end of the row, ending with a hdc blo stitch. Chain 1 and turn. (29 hdc 3rd loop, 29 hdc blo).
Row 4: [ hdc blo, hdc in the 3rd loop] repeat to the end of the row, ending with a hdc in the 3rd stitch. Chain 1 and turn. (29 hdc blo, 29 hdc in the 3rd loop only)
Row 5- 6: repeat rows 3 and 4.
Row 7: hdc normal in each stitch to the end of the row. Chain 1 and turn. (58 hdc)
Row 8: hdc in the 3rd loop in each stitch around. Fasten off.
CLOSING AND FINISHING
Ch 1 and cut off yarn, leaving a 12” long tail. Lay out headband with the right side facing up. Pinch the top and the bottom where the seam of the headband is and sew them together.
Front band
Row 1: Chain 16 and work 1hdc in the second chain from the hook. Continue working 1 hdc around.
Row 2: hdc in the 3rd loop only in each stitch to the end of the row. Chain 1 and turn.
Row 3: hdc in the back loop only in each stitch to the end of the row. Chain 1 and turn.
Row 4: hdc in the 3rd loop only in each stitch to the end of the row. Fasten off and leave a 10″ tail.
Wrap it around the seam of the crocheted headband and seam the ends together.
Fasten off and weave the ends in.
Crochet Pattern for 3-6 Months Baby Size
Start by making a chain of 63 chain stitches.
Row 1: hdc in the second chain and in each chain to the end of the row. Chain 1 and turn. (62 hdc)
Row 2: hdc in the 3rd loop only in each stitch to the end of the row. Chain 1 and turn. (62 hdc in the 3rd loop only)
Row 3: hdc in the 3rd loop in the in the first stitch, hdc in the back loop in the next stitch, [hdc 3rd loop, hdc back loop] repeat to the end of the row. Chain 1 and turn. (31 hdc 3rd loop, 31 hdc blo)
Row 4: [ hdc blo, hdc in the 3rd loop] repeat to the end of the row. Chain 1 and turn. (31 hdc blo, 31 hdc in the 3rd loop only)
Row 5- 6: repeat rows 3 and 4.
Row 7: hdc normal in each stitch to the end of the row. Chain 1 and turn. (62 hdc)
Row 8: hdc in the 3rd loop in each stitch around. Fasten off.
CLOSING AND FINISHING
Ch 1 and cut off yarn, leaving a 12” long tail. Lay out headband with the right side facing up. Pinch the top and the bottom where the seam of the headband is and sew them together.
Front band
Row 1: Chain 16 and work 1hdc in the second chain from the hook. Continue working 1 hdc around.
Row 2: hdc in the 3rd loop only in each stitch to the end of the row. Chain 1 and turn.
Row 3: hdc in the back loop only in each stitch to the end of the row. Chain 1 and turn.
Row 4: hdc in the 3rd loop only in each stitch to the end of the row. Fasten off and leave a 10″ tail.
Wrap it around the seam of the crocheted headband and seam the ends together.
Fasten off and weave the ends in.
Crochet Pattern for 6-12 Months Baby Size
Start by making a chain of 71 chain stitches.
Row 1: hdc in the second chain and in each chain to the end of the row. Chain 1 and turn. (70 hdc)
Row 2: hdc in the 3rd loop only in each stitch to the end of the row. Chain 1 and turn. (70 hdc in the 3rd loop only)
Row 3: hdc in the 3rd loop in the in the first stitch, hdc in the back loop in the next stitch, [hdc 3rd loop, hdc back loop] repeat to the end of the row. Chain 1 and turn. (35 hdc 3rd loop, 35 hdc blo)
Row 4: [ hdc blo, hdc in the 3rd loop] repeat to the end of the row. Chain 1 and turn. (35 hdc blo, 35 hdc in the 3rd loop only)
Row 5- 8: repeat rows 3 and 4.
Row 9: hdc normal in each stitch to the end of the row. Chain 1 and turn. (70 hdc)
Row 10: hdc in the 3rd loop in each stitch around. Fasten off.
CLOSING AND FINISHING
Ch 1 and cut off yarn, leaving a 12” long tail. Lay out headband with the right side facing up. Pinch the top and the bottom where the seam of the headband is and sew them together.
Front band
Row 1: Chain 16 and work 1hdc in the second chain from the hook. Continue working 1 hdc around.
Row 2: hdc in the 3rd loop only in each stitch to the end of the row. Chain 1 and turn.
Row 3: hdc in the back loop only in each stitch to the end of the row. Chain 1 and turn.
Row 4: hdc in the 3rd loop only in each stitch to the end of the row. Fasten off and leave a 10″ tail.
Wrap it around the seam of the crocheted headband and seam the ends together.
Fasten off and weave the ends in.
Crochet Pattern for Toddler Size
Start by making a chain of 77 chain stitches.
Row 1: hdc in the second chain and in each chain to the end of the row. Chain 1 and turn. (76 hdc)
Row 2: hdc in the 3rd loop only in each stitch to the end of the row. Chain 1 and turn. (76 hdc in the 3rd loop only)
Row 3: hdc in the 3rd loop in the in the first stitch, hdc in the back loop in the next stitch, [hdc 3rd loop, hdc back loop] repeat to the end of the row. Chain 1 and turn. (38 hdc 3rd loop, 38 hdc blo)
Row 4: [ hdc blo, hdc in the 3rd loop] repeat to the end of the row. Chain 1 and turn. (38 hdc blo, 38 hdc in the 3rd loop only)
Row 5- 8: repeat rows 3 and 4.
Row 9: hdc normal in each stitch to the end of the row. Chain 1 and turn. (76 hdc)
Row 10: hdc in the 3rd loop in each stitch around. Fasten off.
CLOSING AND FINISHING
Ch 1 and cut off yarn, leaving a 12” long tail. Lay out headband with the right side facing up. Pinch the top and the bottom where the seam of the headband is and sew them together.
Front band
Row 1: Chain 16 and work 1hdc in the second chain from the hook. Continue working 1 hdc around.
Row 2: hdc in the 3rd loop only in each stitch to the end of the row. Chain 1 and turn.
Row 3: hdc in the back loop only in each stitch to the end of the row. Chain 1 and turn.
Row 4: hdc in the 3rd loop only in each stitch to the end of the row. Fasten off and leave a 10″ tail.
Wrap it around the seam of the crocheted headband and seam the ends together.
Fasten off and weave the ends in.
You may like:
Vintage Baby Bib Pattern
Crochet Pattern for Child Size
Start by making a chain of 87 chain stitches.
Row 1: hdc in the second chain and in each chain to the end of the row. Chain 1 and turn. (86 hdc)
Row 2: hdc in the 3rd loop only in each stitch to the end of the row. Chain 1 and turn. (86 hdc in the 3rd loop only)
Row 3: hdc in the 3rd loop in the in the first stitch, hdc in the back loop in the next stitch, [hdc 3rd loop, hdc back loop] repeat to the end of the row. Chain 1 and turn. (43 hdc 3rd loop, 43 hdc blo)
Row 4: [ hdc blo, hdc in the 3rd loop] repeat to the end of the row. Chain 1 and turn. (43 hdc blo, 43 hdc in the 3rd loop only)
Row 5- 8: repeat rows 3 and 4.
Row 9: hdc normal in each stitch to the end of the row. Chain 1 and turn. (86 hdc)
Row 10: hdc in the 3rd loop in each stitch around. Fasten off.
CLOSING AND FINISHING
Ch 1 and cut off yarn, leaving a 12” long tail. Lay out headband with the right side facing up. Pinch the top and the bottom where the seam of the headband is and sew them together.
Front band
Row 1: Chain 16 and work 1hdc in the second chain from the hook. Continue working 1 hdc around.
Row 2: hdc in the 3rd loop only in each stitch to the end of the row. Chain 1 and turn.
Row 3: hdc in the back loop only in each stitch to the end of the row. Chain 1 and turn.
Row 4: hdc in the 3rd loop only in each stitch to the end of the row. Fasten off and leave a 10″ tail.
Wrap it around the seam of the crocheted headband and seam the ends together.
Fasten off and weave the ends in.
Don’t like ads?… You can get a ads-free PDF version on this pattern for a small fee. Get the pattern here:
Crochet Pattern for Teen Size
Start by making a chain of 95 chain stitches.
Row 1: hdc in the second chain and in each chain to the end of the row. Chain 1 and turn. (94 hdc)
Row 2: hdc in the 3rd loop only in each stitch to the end of the row. Chain 1 and turn. (94 hdc in the 3rd loop only)
Row 3: hdc in the 3rd loop in the in the first stitch, hdc in the back loop in the next stitch, [hdc 3rd loop, hdc back loop] repeat to the end of the row. Chain 1 and turn. (47 hdc 3rd loop, 47 hdc blo)
Row 4: [ hdc blo, hdc in the 3rd loop] repeat to the end of the row. Chain 1 and turn. (47 hdc blo, 47 hdc in the 3rd loop only)
Row 5- 10: repeat rows 3 and 4.
Row 11: hdc normal in each stitch to the end of the row. Chain 1 and turn. (94 hdc)
Row 12: hdc in the 3rd loop in each stitch around. Fasten off.
CLOSING AND FINISHING
Ch 1 and cut off yarn, leaving a 12” long tail. Lay out headband with the right side facing up. Pinch the top and the bottom where the seam of the headband is and sew them together.
Front band
Row 1: Chain 16 and work 1hdc in the second chain from the hook. Continue working 1 hdc around.
Row 2: hdc in the 3rd loop only in each stitch to the end of the row. Chain 1 and turn.
Row 3: hdc in the back loop only in each stitch to the end of the row. Chain 1 and turn.
Row 4: hdc in the 3rd loop only in each stitch to the end of the row. Fasten off and leave a 10″ tail.
Wrap it around the seam of the crocheted headband and seam the ends together.
Fasten off and weave the ends in.
Crochet Pattern for Adult Size
Start by making a chain of 101 chain stitches.
Row 1: hdc in the second chain and in each chain to the end of the row. Chain 1 and turn. (100 hdc)
Row 2: hdc in the 3rd loop only in each stitch to the end of the row. Chain 1 and turn. (100 hdc in the 3rd loop only)
Row 3: hdc in the 3rd loop in the in the first stitch, hdc in the back loop in the next stitch, [hdc 3rd loop, hdc back loop] repeat to the end of the row. Chain 1 and turn. (50 hdc 3rd loop, 50 hdc blo)
Row 4: [ hdc blo, hdc in the 3rd loop] repeat to the end of the row. Chain 1 and turn. (50 hdc blo, 50 hdc in the 3rd loop only)
Row 5- 10: repeat rows 3 and 4.
Row 11: hdc normal in each stitch to the end of the row. Chain 1 and turn. (100 hdc)
Row 12: hdc in the 3rd loop in each stitch around. Fasten off.
CLOSING AND FINISHING
Ch 1 and cut off yarn, leaving a 12” long tail. Lay out headband with the right side facing up. Pinch the top and the bottom where the seam of the headband is and sew them together.
Front band
Row 1: Chain 16 and work 1hdc in the second chain from the hook. Continue working 1 hdc around.
Row 2: hdc in the 3rd loop only in each stitch to the end of the row. Chain 1 and turn.
Row 3: hdc in the back loop only in each stitch to the end of the row. Chain 1 and turn.
Row 4: hdc in the 3rd loop only in each stitch to the end of the row. Fasten off and leave a 10″ tail.
Wrap it around the seam of the crocheted headband and seam the ends together.
Fasten off and weave the ends in.
Crochet Pattern for Adult Large Size
Start by making a chain of 105 chain stitches.
Row 1: hdc in the second chain and in each chain to the end of the row. Chain 1 and turn. (104 hdc)
Row 2: hdc in the 3rd loop only in each stitch to the end of the row. Chain 1 and turn. (104 hdc in the 3rd loop only)
Row 3: hdc in the 3rd loop in the in the first stitch, hdc in the back loop in the next stitch, [hdc 3rd loop, hdc back loop] repeat to the end of the row. Chain 1 and turn. (52 hdc 3rd loop, 52 hdc blo)
Row 4: [ hdc blo, hdc in the 3rd loop] repeat to the end of the row. Chain 1 and turn. (52 hdc blo, 52 hdc in the 3rd loop only)
Row 5- 10: repeat rows 3 and 4.
Row 11: hdc normal in each stitch to the end of the row. Chain 1 and turn. (104 hdc)
Row 12: hdc in the 3rd loop in each stitch around. Fasten off.
CLOSING AND FINISHING
Ch 1 and cut off yarn, leaving a 12” long tail. Lay out headband with the right side facing up. Pinch the top and the bottom where the seam of the headband is and sew them together.
Front band
Row 1: Chain 16 and work 1hdc in the second chain from the hook. Continue working 1 hdc around.
Row 2: hdc in the 3rd loop only in each stitch to the end of the row. Chain 1 and turn.
Row 3: hdc in the back loop only in each stitch to the end of the row. Chain 1 and turn.
Row 4: hdc in the 3rd loop only in each stitch to the end of the row. Fasten off and leave a 10″ tail.
Wrap it around the seam of the crocheted headband and seam the ends together.
Fasten off and weave the ends in.
I hope you enjoyed making this beautiful pattern. Let me know how did you like this pattern. I’d love to hear from you!
Silvana
SIGN UP FOR MORE PATTERNS TO STAY UPDATED ON PATTERNS:
What’s Next?
Pin this post: Save this tutorial to your >>>Pinterest <<< boards so that you can come back to it later.
Leave a comment: We love to hear your feedback. Tell me in the comments below!
Share on Facebook: When you make this project, share it on social media and tag me.
Have questions? Join the Facebook Group! We created this group for you to share pictures, ask questions, and help each other out.
You are more than welcome to sell your finished items, but please give Silvana Crochet Studio credit as pattern designer and link back to my shop https://www.etsy.com/shop/SilvanaCrochetStudio?ref=profile_header or to Ravelry https://www.ravelry.com/designers/silvana-hagiu
If you have any questions about this pattern please feel free to message me.
My patterns (including all photographs) are copyrighted. You may NOT copy, re-distribute or sell my pattern.
