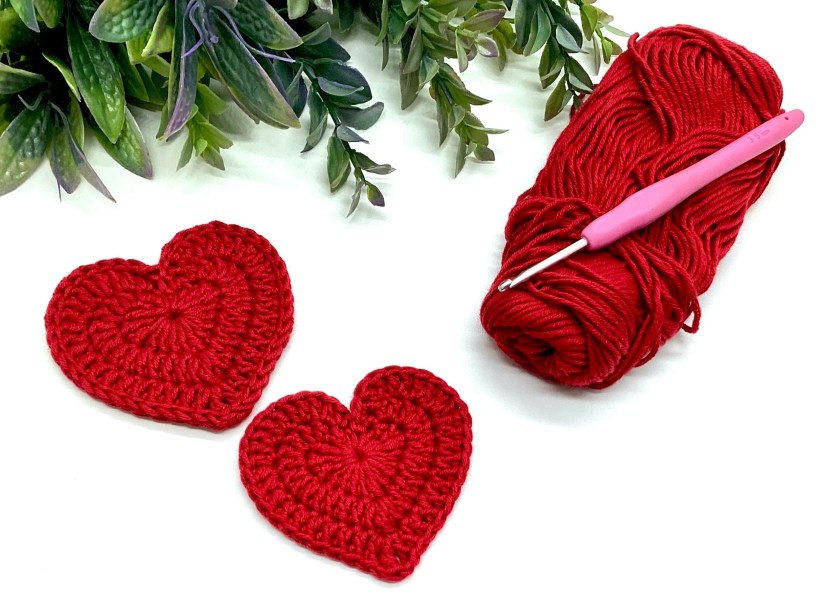

Crocheting a heart is one of the most satisfying and simple ways to spread some love through your craft! Whether you’re creating a special gift, adding a personal touch to a card, or just learning the ropes of crochet, this easy heart pattern is perfect for beginners. With just a few simple stitches and three quick rounds, you’ll be able to make beautiful hearts in no time. Grab your yarn and hook, and let’s get started on this fun, heartwarming project!
This small crochet heart pattern is perfect for beginners! With just three simple rounds and easy stitches, it’s a quick and fun project to make. The pattern uses basic stitches like single crochet, double crochet and slip stitches to create a charming little heart shape, ideal for embellishing gifts, cards, or making keychains. Whether you’re new to crochet or looking for a small, satisfying project, this heart pattern is a great way to practice and build confidence in your crochet skills. The easy-to-follow instructions will guide you through each step to create your very own tiny heart
Why You’ll Love This Free Crochet Heart Pattern
- Beginner-Friendly: If you’re just starting with crochet, this pattern is a great introduction. It only requires basic stitches, such as single crochet (sc), double crochet (dc st) and treble crochet (trc st), so you won’t need to worry about complicated techniques.
- Quick and Simple: With only three rounds, this heart comes together in no time! It’s perfect for practicing the basics without feeling overwhelmed, and you’ll have a finished project in a snap.
- Versatile: These tiny hearts are perfect for all kinds of projects. Add them to gift tags, cards, or home décor to give your creations a special touch. You can even make a bunch and turn them into a cute garland, or use them as keychains or zipper pulls.
- Great for Scrap Yarn: This pattern doesn’t require much yarn, making it a great way to use up those little bits of leftover yarn you have lying around. It’s a perfect project for experimenting with different colors!
What Can You Do with These Hearts?
Once you’ve completed a few of these adorable little hearts, the possibilities are endless! Here are some fun ideas for how to use them:
- Gift Tags: Attach a heart to a gift for an extra personal touch.
- Keychains: Turn them into a cute keychain by adding a jump ring and chain.
- Card Embellishments: Add them to birthday or Valentine’s Day cards for a sweet, handmade detail.
- Home Decor: String a series of hearts together to create a lovely garland for your mantel or wall.
- Scrapbooking: Use them as embellishments on scrapbook pages to give your memories a little extra love.
What You’ll Need
- Yarn: Any yarn can work for this pattern, but I recommend a DK or medium-weight yarn (like worsted weight) for a nice balance of structure and softness. You’ll need just a small amount!
- Crochet Hook: Use a hook that is appropriate for your yarn size. For worsted weight yarn, a 4mm is good and for DK yarn, 3.5 mm hook is a good choice.
- Scissors: To trim your yarn when you’re finished.
- Tapestry Needle: To weave in any loose ends.
Crochet Stitches Used
Here’s a quick guide to the basic crochet stitches and terminology you’ll need for this pattern:
Slip Stitch (sl st)
- Description: The slip stitch is the shortest and simplest stitch in crochet. It’s used to join stitches or move your working yarn to a different part of your project without adding any height.
- How to do it: Insert your hook into the stitch, yarn over, and pull the yarn through both the stitch and the loop on your hook.
- Terminology: sl st
Single Crochet (sc)
- Description: The single crochet stitch is a basic, dense stitch that creates a tight fabric. It’s one of the most commonly used stitches in crochet.
- How to do it: Insert your hook into the stitch, yarn over, and pull through so you have two loops on your hook. Yarn over again and pull through both loops.
- Terminology: sc
Double Crochet (dc)
- Description: The double crochet stitch is taller than the single crochet, creating a looser, more open fabric. It’s a versatile stitch often used in blankets, scarves, and many other projects.
- How to do it: Yarn over, insert your hook into the stitch, yarn over again, and pull through so you have three loops on your hook. Yarn over and pull through the first two loops. Yarn over and pull through the remaining two loops.
- Terminology: dc
Treble Crochet (trc)
- Description: The treble crochet stitch is even taller than the double crochet, creating an open and airy fabric. It’s used in many projects like shawls, laces, and blankets to create more height with fewer stitches.
- How to do it: Yarn over twice, insert your hook into the stitch, yarn over again, and pull through so you have four loops on your hook. Yarn over and pull through the first two loops. Yarn over and pull through the next two loops. Yarn over and pull through the remaining two loops.
- Terminology: trc
Chain (ch)
- Description: The chain stitch is the most basic stitch in crochet, often used to begin projects or as a foundation for other stitches. Each chain creates a small loop of yarn.
- How to do it: Yarn over and pull the yarn through the loop on your hook.
How to Make a Magic Ring:
Making a magic ring (also called a magic circle) is an essential technique for crochet, especially when you’re working in the round. It helps create a tight, adjustable ring that you can pull closed, preventing any gaps in the center of your work. Here’s how you can make a magic ring step by step:
- Step 1: Hold the yarn tail (the short end) in your left hand and the working yarn (the longer end) in your right hand.
- Step 2: Create a loop with the working yarn, leaving a small tail. Hold the loop between your thumb and middle finger, with the tail at the bottom and the working yarn at the top.
- Step 3: Insert your hook under the loop, from front to back.
- Step 4: Yarn over (wrap the working yarn around the hook) and pull it through the loop, creating a new loop on your hook.
- Step 5: Now, you have your magic ring! You can begin crocheting into this ring by working your stitches (like single crochet, double crochet, etc.) into the center of the loop, as instructed in your pattern.
To Close the Magic Ring:
- Once you’ve completed the required number of stitches into the magic ring (as per your pattern), gently pull the short tail of the yarn to tighten the loop.
- Continue crocheting as needed, or join the last stitch to close the round with a slip stitch, depending on your pattern.
Tips for Success:
- Keep the loop loose enough so that you can still tighten it later, but not so loose that it slips off your hook.
- Practice will help you get comfortable with making and adjusting the magic ring, and it’s a great technique for projects like crochet amigurumi, crochet hats, crochet hearts and crochet flowers!
Once you’ve mastered the magic ring, it’ll become a go-to method for starting any project worked in the round!
Terminology
- ch = Chain
- sl st = Slip Stitch
- sc = Single Crochet
- dc = Double Crochet
- trc = Treble Crochet
- ch = Chain
The Free Crochet Heart Pattern
Start with a magic ring.
Round 1 of Crochet Heart Pattern:
- Begin by making a chain of 1 into the magic ring. (This chain does not count as a stitch.),
- Work one half double crochet (hdc) into the magic ring,
- work 3 treble crochet (trc) stitches into the magic ring,
- 4 double crochet (dc) stitches into the magic ring,
- 1 treble crochet (trc) stitch into the magic ring.
You’ve just finished the first side of the heart in this round. Now, mirror the stitch pattern you’ve just worked by repeating the steps symmetrically in reverse as flollows:
- 4 double crochet (dc) stitches into the magic ring,
- 3 treble crochet (trc) stitches into the magic ring,
- one half double crochet (hdc) into the magic ring,
- and slip stitch into the magic ring.
This round should form a nice, rounded shape. Make sure to tighten your magic ring at the end to avoid any gaps.
Round 2 of Crochet Heart Pattern:
- Chain 1 (this does not count as a stitch).
- Single crochet (sc) into the first stitch of the round.
- In the next stitch, work 1 double crochet (dc) and 1 treble crochet (trc) into the same stitch.
- In the next two stitches, work 3 treble crochet (trc) into each stitch.
- In the next stitch, work 2 double crochet (dc) into the same stitch.
- Work 1 double crochet (dc) into each of the next 3 stitches.
- In the next stitch, work 1 double crochet (dc), 1 treble crochet (trc), and 1 double crochet (dc) into the same stitch.
You’ve just finished the first side of the heart in the second round. Now, mirror the stitch pattern you’ve just worked by repeating the steps symmetrically in reverse as flollows:
- Work 1 double crochet (dc) into each of the next 3 stitches.
- In the next stitch, work 2 double crochet (dc) into the same stitch.
- In the next two stitches, work 3 treble crochet (trc) into each stitch.
- In the next stitch, work 1 double crochet (dc) and 1 treble crochet (trc) into the same stitch.
- Single crochet (sc) into the last stitch of the round.
- Slip stitch in the join of the previous round.
This round has a variety of crochet stitch combinations, which should balance out to form a rounded shape. It will make your heart take more defined form, with the mirrored stitching adding symmetry to the design.
Round 3 of Crochet Heart Pattern:
- Single crochet (sc) into the first stitch of the round.
- Work 2 double crochet (dc) stitches into each of the next 6 stitches.
- Work 1 double crochet (dc) into each of the next 8 stitches.
- In the next stitch, work 1 double crochet (dc), then chain 1 (ch 1), 1 treble crochet (trc), then chain 1 (ch 1) again, and finish with 1 double crochet (dc) in the same stitch.
Mirror backward: Now, mirror the stitch pattern you’ve just worked by repeating the steps symmetrically in reverse as follows:
- Work 1 double crochet (dc) into each of the next 8 stitches.
- Work 2 double crochet (dc) stitches into each of the next 6 stitches.
- Single crochet (sc) into the last stitch of the round.
- Join with a slip stitch (sl st) to the first stitch of the round (the base of your initial sc).
This round finishes the heart shape, continuing the texture and symmetry you’ve created in the previous rounds, it includes a mix of double crochets, a chain, and a treble crochet that creates a more detailed, textured effect and a nice symmetry across the shape.
Once you finish this round, your heart will begin to take shape with the beautifully mirrored stitches, giving it a professional look!
Shaping the Crochet Heart:
- Gently pull the tail of yarn to shape the heart.
- Use your tapestry needle to weave in the loose ends.
Let me know if you’d like further assistance with this pattern or any other crochet techniques!
Watch the Video Tutorial
If you’d like to follow along with a video tutorial, head over to my YouTube channel where I walk you through each step of making this cute heart! It’s a great way to learn while crocheting. Be sure to subscribe for more free crochet patterns and tutorials!
Subscribe to my YouTube Channel to stay updated to all my new tutorials: https://www.youtube.com/@SilvanaCrochetStudio
Tips & Tricks
For Beginners:
- Count Your Stitches: The heart pattern relies on a consistent stitch count, so be sure to count your stitches at the end of each round. If you notice your edges are uneven, you might need to adjust the number of stitches.
- Maintaining the Shape: Keep your tension even throughout the project. If the heart starts to flare out or pull in, try adjusting your tension to ensure it stays even and lies flat.
- Playing with Colors: Feel free to experiment with color changes! You can alternate colors every row to create a striped heart look, or add a pop of color in the center for a fun twist.
Final Thoughts
This simple crochet heart pattern is perfect for beginners who want to try something quick, fun, and rewarding. With just a few basic stitches and three easy rounds, you’ll have a cute, handmade heart in no time! Practice your crochet skills while creating something versatile and delightful. And remember, crochet is all about having fun and experimenting, so feel free to customize your hearts with different colors and yarns!
Happy crocheting, and may your hearts be full of love! 💖
What’s Next?
Pin this post: Save this tutorial to your >>>Pinterest <<< boards so that you can come back to it later.
Subscribe to my YouTube Channel to stay updated to all my new tutorials: https://www.youtube.com/@SilvanaCrochetStudio
Leave a comment: We love to hear your feedback. Tell me in the comments below!
Share on Facebook: When you make this project, share it on social media and tag me.
Have questions? Join the Facebook Group! We created this group for you to share pictures, ask questions, and help each other out.
You are more than welcome to sell your finished items, but please give Silvana Crochet Studio credit as pattern designer and link back to my shop Ravelry https://www.ravelry.com/designers/silvana-hagiu
If you have any questions about this pattern please feel free to message me.
My patterns (including all photographs) are copyrighted. You may NOT copy, re-distribute or sell my pattern.
