Are you new to crochet and looking for a simple, yet stylish project to start with? Look no further than headbands! This crochet headband is a fantastic way to practice your basic crochet skills while creating something practical and beautiful. Whether you’re looking to make a cozy winter accessory or a trendy fashion statement, headbands are quick to make and can be customized in countless ways.
In this post, I’ll walk you through this crochet pattern for beginners, along with tips and tricks to help you get started on your crochet journey.
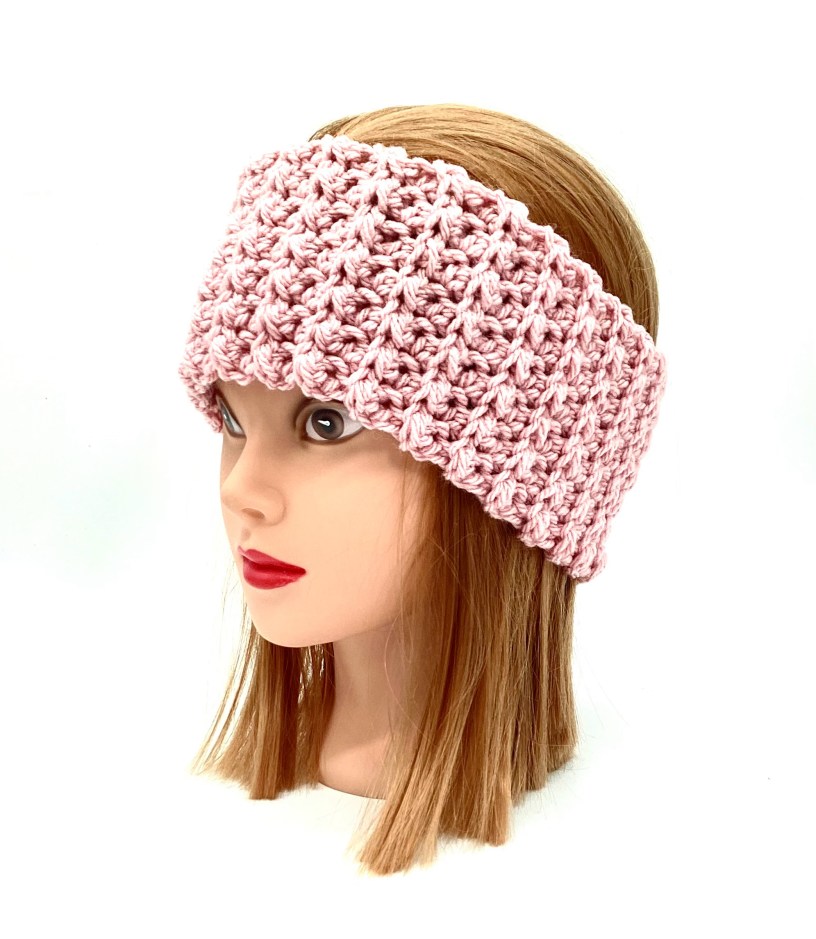
This elastic crochet headband is perfect for beginners and experienced crocheters alike! It’s stylish, comfortable, and easy to make using a few simple stitches. In this tutorial, I’ll walk you through how to create a beautiful headband with alternating half double crochet (HDC) and slip stitch (SL) stitches, making it both stretchy and fashionable.
Why Crochet Headbands Are Perfect for Beginners
When it comes to learning crochet, headbands are ideal for beginners for several reasons:
- Simple Stitching: Most headband patterns use basic stitches like chains, single crochet, half double crochet, and double crochet. These stitches are easy to learn and master, making them perfect for practice.
- Quick Project: Headbands don’t take long to crochet, which means you’ll get to see your progress quickly and feel motivated to keep going.
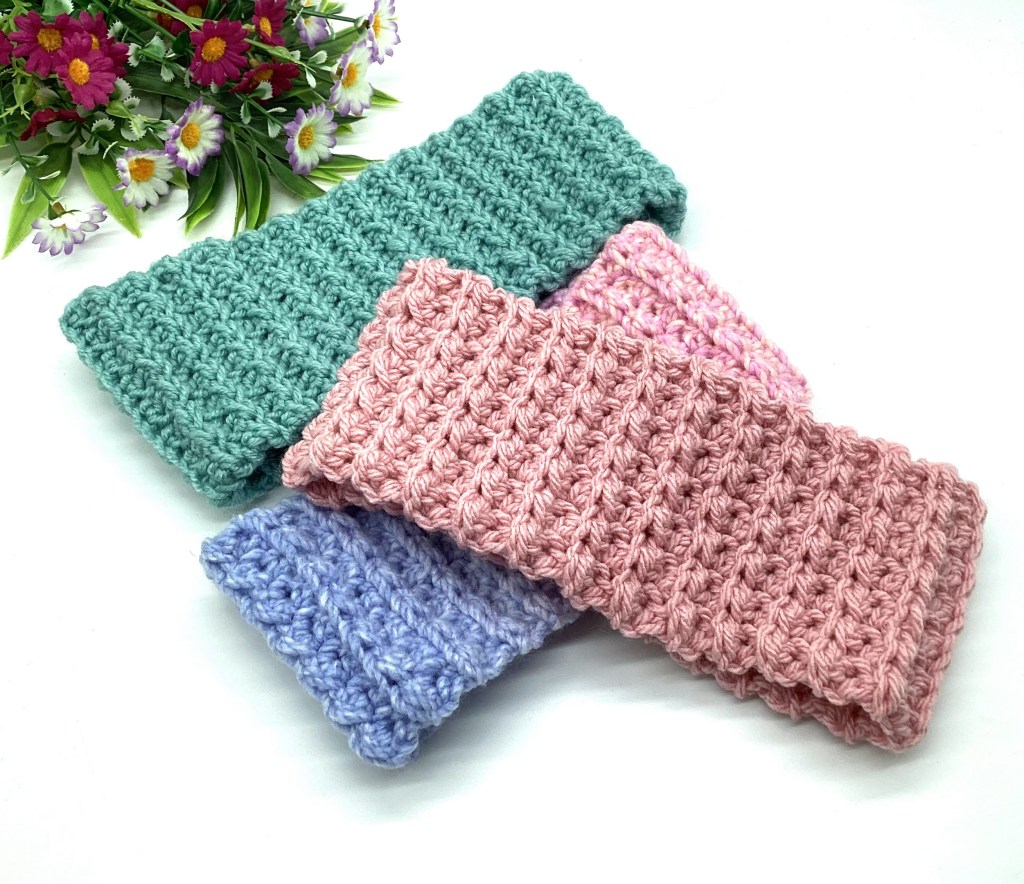
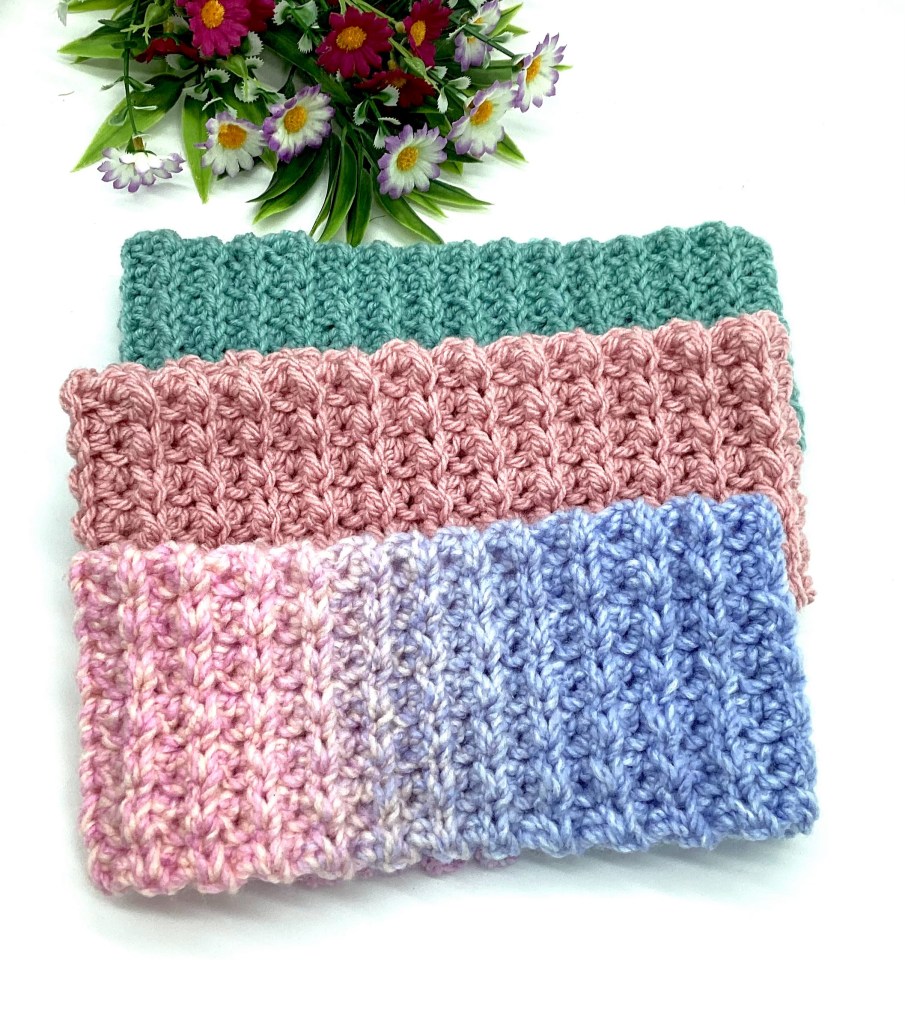
- Customizable Designs: You can personalize your headbands by adding embellishments like buttons, beads, or flowers, making them as unique as you are.
- Perfect for Gifts: Handmade headbands make thoughtful and personal gifts, perfect for friends, family, or even selling at markets!
Basic Materials You’ll Need
Before you dive into crocheting your headband, here’s a list of basic supplies you’ll need:
- Yarn: Choose a soft, medium-weight yarn (like worsted weight) that’s easy to work with. Acrylic or cotton yarns are great choices for beginners.
- Crochet Hook: Depending on the yarn you choose, a 5mm (H-8) crochet hook should work well for most headband patterns.
- Scissors: To trim your yarn once you’re done.
- Yarn Needle: For weaving in your ends and finishing the project neatly.
Tips for Success
- Tension: Keep your tension consistent while crocheting to ensure your headband is even and looks professional.
- Stretchability: For a headband that stretches comfortably, try using a yarn that has some stretch or elasticity, like a cotton-blend or acrylic.
- Practice: Don’t worry if your first few headbands aren’t perfect. Crochet is all about practice, and each project will help you get better.
Ready to get started? Grab your yarn, hook, and let’s begin your crochet journey with this beginner-friendly headband pattern!
This simple crochet headband pattern is perfect for beginners! Using just a few basic stitches, you’ll create a textured, stylish headband. The pattern involves half double crochet (hdc) and slip stitch (sl st) in both the regular and back loop only (blo) for added texture. Let’s get started!
Notes About the Headband Pattern
Chain 1 from the beginning of each row doesn’t count as a stitch.
If you’d like a thicker headband, simply add more chains to the starting chain or adjust the stitch count.
Feel free to add embellishments like flowers or buttons for a personal touch.
Each row starts with an half double crochet (hdc) and ends with an half double crochet stitch (hdc).
Materials Needed:
- Yarn of your choice (I recommend worsted weight yarn for beginners)
- Crochet hook (size H-8, 5mm)
- Scissors
- Yarn needle for seaming
Abbreviations:
- ch = chain
- hdc = half double crochet
- sl st = slip stitch
- blo = back loop only
- st = stitch
Gauge: 15 sts in the pattern/14 rows = 4″ (10 cm)/4″(10 cm)
📺 YouTube Tutorial
Instructions for Crochet Headband Adult Size
- Start with a foundation chain:
- Ch 16 (or any number of even chain stitches you need)
- Row 1:
- Hdc in the 2nd ch from the hook.
- Sl st in the next ch.
- Hdc in the next ch.
- Sl st in the next ch.
- Repeat this pattern (hdc, sl st) across the entire row. You should end with a half double crochet stitch in the last stitch. (8 hdc, 7 sl sts)
- Row 2:
- Ch 1 and turn your work.
- Hdc in the first st (back loop only).
- Sl st in the next st (back loop only).
- Repeat this pattern (hdc, sl st) across the entire row, working in the back loop only (blo). You should end with a half double crochet stitch in t6he back loop only in the last stitch. (8 hdc, 7 sl sts)
- The rows always start with an half double crochet and ends with an half double crochet stitch.
- Repeat Row 2:
- Continue repeating Row 2 until you have a total of 74 rows or until your headband reaches the desired length, about 21 inches (53 cm) long. You will need to have a even number of rows. Measure it around your head to ensure it fits comfortably.
- Finishing:
- Once your headband is the desired length, fasten off your yarn leaving a long yarn tail to seam the short sides together.
- Use a yarn needle to seam the short sides of the headband together with a whip stitch, inserting the needle through the foundation chain and through the back loop of the stitch on the other side.
Instructions for Crochet Headband Teen Size
- Start with a foundation chain:
- Ch 14 (or any number of even chain stitches you need)
- Row 1:
- Hdc in the 2nd ch from the hook.
- Sl st in the next ch.
- Hdc in the next ch.
- Sl st in the next ch.
- Repeat this pattern (hdc, sl st) across the entire row. You should end with a half double crochet stitch in the last stitch. (7 hdc, 6 sl sts)
- Row 2:
- Ch 1 and turn your work.
- Hdc in the first st (back loop only).
- Sl st in the next st (back loop only).
- Repeat this pattern (hdc, sl st) across the entire row, working in the back loop only (blo). You should end with a half double crochet stitch in t6he back loop only in the last stitch. (7 hdc, 6 sl sts)
- The rows always start with an half double crochet and ends with an half double crochet stitch.
- Repeat Row 2:
- Continue repeating Row 2 until you have a total of 66 rows or until your headband reaches the desired length, about 19 inches (48 cm) long. You will need to have a even number of rows. Measure it around your head to ensure it fits comfortably.
- Finishing:
- Once your headband is the desired length, fasten off your yarn leaving a long yarn tail to seam the short sides together.
- Use a yarn needle to seam the short sides of the headband together with a whip stitch, inserting the needle through the foundation chain and through the back loop of the stitch on the other side.
Instructions for Crochet Headband Child Size
- Start with a foundation chain:
- Ch 12 (or any number of even chain stitches you need)
- Row 1:
- Hdc in the 2nd ch from the hook.
- Sl st in the next ch.
- Hdc in the next ch.
- Sl st in the next ch.
- Repeat this pattern (hdc, sl st) across the entire row. You should end with a half double crochet stitch in the last stitch. (6 hdc, 5 sl sts)
- Row 2:
- Ch 1 and turn your work.
- Hdc in the first st (back loop only).
- Sl st in the next st (back loop only).
- Repeat this pattern (hdc, sl st) across the entire row, working in the back loop only (blo). You should end with a half double crochet stitch in t6he back loop only in the last stitch. (6 hdc, 5 sl sts)
- The rows always start with an half double crochet and ends with an half double crochet stitch.
- Repeat Row 2:
- Continue repeating Row 2 until you have a total of 62 rows or until your headband reaches the desired length, about 18 inches (45 cm) long. You will need to have a even number of rows. Measure it around your head to ensure it fits comfortably.
- Finishing:
- Once your headband is the desired length, fasten off your yarn leaving a long yarn tail to seam the short sides together.
- Use a yarn needle to seam the short sides of the headband together with a whip stitch, inserting the needle through the foundation chain and through the back loop of the stitch on the other side.
Instructions for Crochet Headband Toddler Size
- Start with a foundation chain:
- Ch 10 (or any number of even chain stitches you need)
- Row 1:
- Hdc in the 2nd ch from the hook.
- Sl st in the next ch.
- Hdc in the next ch.
- Sl st in the next ch.
- Repeat this pattern (hdc, sl st) across the entire row. You should end with a half double crochet stitch in the last stitch. (5 hdc, 4 sl sts)
- Row 2:
- Ch 1 and turn your work.
- Hdc in the first st (back loop only).
- Sl st in the next st (back loop only).
- Repeat this pattern (hdc, sl st) across the entire row, working in the back loop only (blo). You should end with a half double crochet stitch in t6he back loop only in the last stitch. (5 hdc, 4 sl sts)
- The rows always start with an half double crochet and ends with an half double crochet stitch.
- Repeat Row 2:
- Continue repeating Row 2 until you have a total of 58 rows or until your headband reaches the desired length, about 17 inches (43 cm) long. You will need to have a even number of rows. Measure it around your head to ensure it fits comfortably.
- Finishing:
- Once your headband is the desired length, fasten off your yarn leaving a long yarn tail to seam the short sides together.
- Use a yarn needle to seam the short sides of the headband together with a whip stitch, inserting the needle through the foundation chain and through the back loop of the stitch on the other side.
Instructions for Crochet Headband 6-12 Mounts Baby Size
- Start with a foundation chain:
- Ch 8 (or any number of even chain stitches you need)
- Row 1:
- Hdc in the 2nd ch from the hook.
- Sl st in the next ch.
- Hdc in the next ch.
- Sl st in the next ch.
- Repeat this pattern (hdc, sl st) across the entire row. You should end with a half double crochet stitch in the last stitch. (4 hdc, 3 sl sts)
- Row 2:
- Ch 1 and turn your work.
- Hdc in the first st (back loop only).
- Sl st in the next st (back loop only).
- Repeat this pattern (hdc, sl st) across the entire row, working in the back loop only (blo). You should end with a half double crochet stitch in t6he back loop only in the last stitch. (4 hdc, 3 sl sts)
- The rows always start with an half double crochet and ends with an half double crochet stitch.
- Repeat Row 2:
- Continue repeating Row 2 until you have a total of 58 rows or until your headband reaches the desired length, about 16 inches (40 cm) long. You will need to have a even number of rows. Measure it around your head to ensure it fits comfortably.
- Finishing:
- Once your headband is the desired length, fasten off your yarn leaving a long yarn tail to seam the short sides together.
- Use a yarn needle to seam the short sides of the headband together with a whip stitch, inserting the needle through the foundation chain and through the back loop of the stitch on the other side.
Conclusion:
Now you have a beautiful, handmade crochet headband!
Join Our Crochet Community!
Loved this crochet headband pattern? Want more easy and stylish crochet projects delivered straight to your inbox? Subscribe to our email list today! Get exclusive patterns, tips, and tutorials to help you grow your crochet skills and stay inspired. Whether you’re a beginner or an experienced crocheter, there’s always something new to discover.
Simply enter your email below, and you’ll never miss a stitch!
Happy crocheting, and we can’t wait to see you in our community! 😊
What’s Next?
Pin this post: Save this tutorial to your >>>Pinterest <<< boards so that you can come back to it later.
Leave a comment: We love to hear your feedback. Tell me in the comments below!
Subscribe to my YouTube Channel to stay updated to all my new tutorials: https://www.youtube.com/@SilvanaCrochetStudio
Share on Facebook: When you make this project, share it on social media and tag me.
Have questions? Join the Facebook Group! We created this group for you to share pictures, ask questions, and help each other out.
You are more than welcome to sell your finished items, but please give Silvana Crochet Studio credit as pattern designer and link back to my shop Ravelry https://www.ravelry.com/designers/silvana-hagiu
If you have any questions about this pattern please feel free to message me.
My patterns (including all photographs) are copyrighted. You may NOT copy, re-distribute or sell my pattern.
#Crochet headband pattern #Beginner crochet pattern #Easy crochet headband #Crochet accessories #Headband crochet tutorial #Crochet headband for beginners #Simple crochet pattern #Half double crochet headband #Crochet headband free pattern #DIY crochet headband #Headband crochet project
#Quick crochet pattern
#Crochet for beginners
