
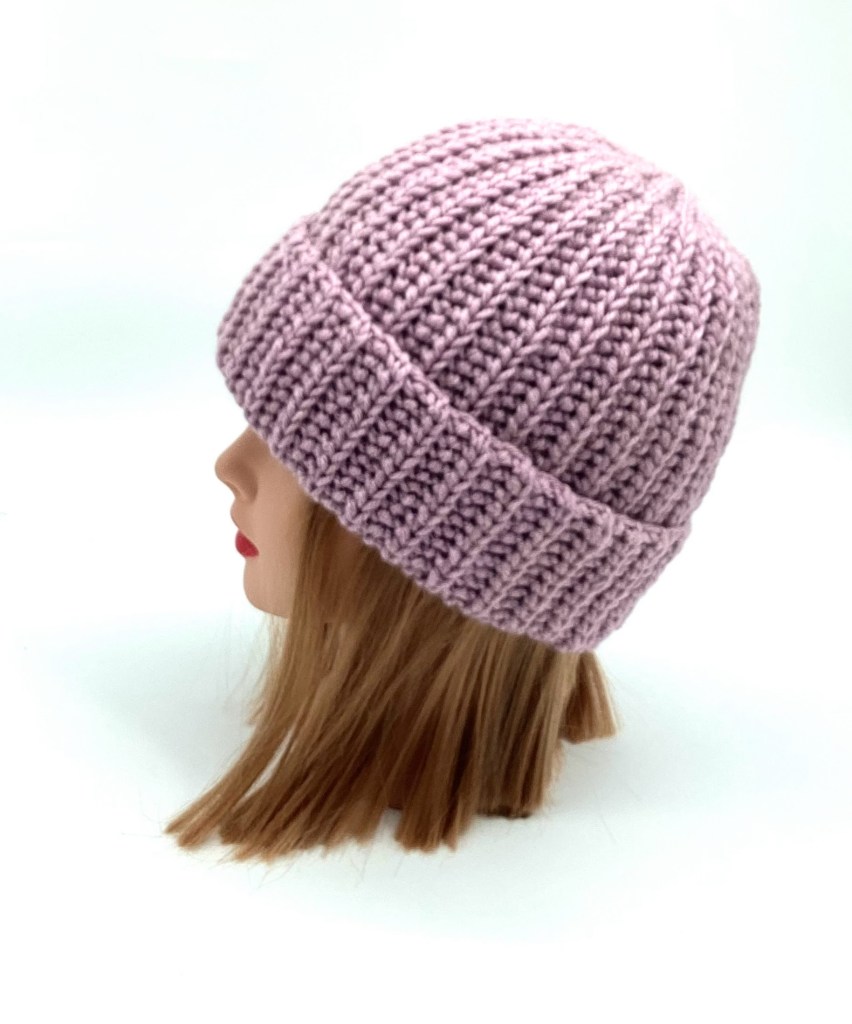
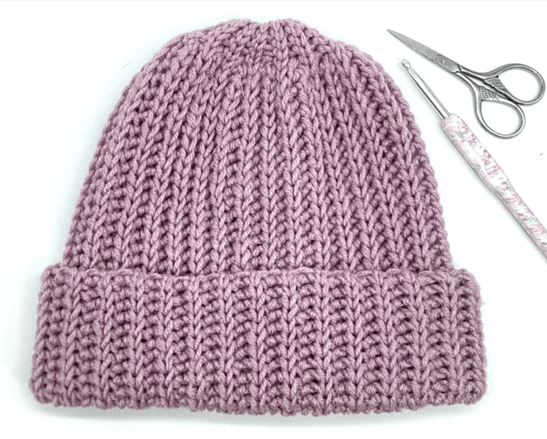
Looking for the perfect crochet beanie pattern to make this season? You’re in the right place! This crochet hat pattern for all ages is designed to look like it’s been knitted — but it’s 100% crochet. Whether you’re a beginner looking for an easy crochet beanie pattern or an experienced maker who wants a quick, cozy project, this is a great choice.
Note: Later in this post, you’ll find the full crochet beanie hat pattern written for each size, including baby, child, teen, and adult options, so you can create the perfect fit for anyone!
Watch the Crochet Beanie Hat Pattern Full Video Tutorial
Learn step-by-step how to make this knit-look crochet beanie in our YouTube tutorial below!
Follow along and then grab the full PDF crochet beanie pattern to start your own project.
Enjoyed the video? Grab the full crochet beanie hat pattern PDF here for instant download: https://ravel.me/knit-look-unisex-crochet-beanie
AdvertisementsDon’t Miss a Stitch!
If you love this crochet beanie hat pattern, there’s plenty more where that came from! 🧶
Subscribe to our newsletter / YouTube channel / blog to get:
- Free crochet tutorials and pattern tips
- Exclusive beginner-friendly patterns
- Seasonal crochet projects straight to your inbox
- Early access to new PDF crochet patterns
➡ Subscribe Now and join our cozy crochet community!
Why You’ll Love This Crochet Beanie Pattern
- Beginner-Friendly Instructions: Step-by-step directions make this an easy crochet hat pattern for beginners.
- Multiple Sizes: Includes baby, child, teen, and adult crochet beanie pattern sizes.
- Cozy + Stylish: Made with worsted medium yarn, this beanie is perfect for winter.
- Knit-Look Finish: Get the look of a knit hat with simple crochet stitches.
What Makes the Best Crochet Beanie Hat Pattern
When it comes to choosing the perfect crochet beanie pattern, there are a few things that truly set the best patterns apart. First, clarity is key. A high-quality crochet hat pattern provides step-by-step instructions, clear stitch counts, and helpful tips to ensure your project turns out exactly as expected. This is especially important if you’re searching for an easy crochet beanie pattern for beginners.
Another essential factor is versatility. The best crochet beanie patterns come with multiple size options — from baby and child to teen and adult — so everyone can enjoy a perfectly fitting cozy hat. Many top patterns also include variations like slouchy or ribbed designs, giving your project a customizable touch.
Material recommendations can make a huge difference, too. A well-designed crochet hat pattern will suggest yarn weights, hook sizes, and stitch techniques that create a warm, soft, and durable beanie. This ensures your final product isn’t just stylish but also functional for winter wear.
Design style is equally important. People love patterns that mimic a knit-look finish or add textured stitches like ribbing or cables, providing a professional, handmade aesthetic. This gives your crochet beanie the appearance of a high-end knitted hat, without the extra effort.
Finally, a top-tier crochet beanie hat pattern often includes helpful extras like optional pom-poms, tips for customizing length or fit, and advice on finishing touches. These little details make a big difference in creating a polished, wearable project.
The Perfect Handmade Gift
One of the reasons this crochet beanie hat pattern stands out is its gift potential. Handmade hats are thoughtful, practical, and loved by everyone, making them an ideal present for birthdays, holidays, or special occasions. With this easy crochet beanie pattern, you can create multiple hats in different colors and sizes, delighting friends and family with a personalized, cozy gift.
Ideal for Seasonal Projects
Winter is the perfect time to crochet, and this chunky crochet hat pattern is designed with cold weather in mind. The warm, soft yarn and knit-look texture make it a go-to winter crochet beanie pattern that will keep anyone snug and stylish. Seasonal patterns like this are especially popular on Pinterest and Etsy, so featuring them in your shop or blog can drive traffic and sales during the colder months.
Instant Download Convenience
A top-quality crochet beanie pattern PDF allows you to start immediately — no waiting for shipping. The PDF format is portable, easy to read, and includes multiple sizes for all your crochet projects.
Materials You’ll Need
To make your new favorite hat, you’ll need:
- worsted weight yarn (aran size works great!)
- 5mm crochet hook
- Yarn needle
- Scissors
Optional: Add a faux fur pom-pom for a trendy touch!
How to Get the Pattern
You can grab this crochet beanie hat pattern PDF right now — just click below to purchase and download:
➡ Download the Crochet Beanie Pattern PDF Here
This is an instant download crochet pattern, so you can start your project right away.
Tips for Crocheting Your Beanie
- Check Your Gauge: This ensures your beanie will fit perfectly.
- Try Different Colors: Solid neutrals look classic, while variegated yarn gives a fun, unique vibe.
- Customize the Fit: Want a slouchy crochet beanie pattern? Just add extra foundation chain stitches to make it longer.
Perfect for Gift-Making
This winter crochet beanie pattern is a favorite for handmade gifts. Whip up a matching set for the whole family with the included size options!
Level: easy. beginner friendly, knowledge basic crochet stitches.
Techniques used: chain stitches, half double crochet and slip stitches.
Notes about the Crochet Beanie Hat Pattern
- I recommend reading through the pattern and doing a gauge swatch before starting.
- This beanie has a flat construction, worked in one panel and seamed together at the end, which makes it easy to crochet for almost any level of crocheter.
- The initial chain of this pattern will be the height of the beanie and the rows worked will be the width.
- Chains from the beginning of each row do not count as the first stitch of the row.
- Follow along with gauge + hat size chart for a perfectly fitted crochet hat.
- To find your perfect size, use a tape measure to measure the widest part of your head. This will give you your head circumference measurement. Then, subtract about 2″ (5 cm) from this to get the finished hat size measurement. Since this stitch pattern is so stretchy, I find that 2″ (5 cm) of negative ease gives a nice snug fit.
- If a different weight brand of yarn or gauge isn’t followed, then the beanie will not turn out the same size as written.
Materials
- Superlambs 25 yarn by Nako, 75% Acrylic, 25% Wool, 199 meters (218 yards) / 100 grams (3.53 ounces) any worsted #4 size yarn you have, making sure to fit the gauge using one size bigger or smaller crochet hook size.
- 5 mm size crochet hook
- Scissors
- Measuring tape
- Tapestry needle
- Stitch marker
Terminology (US Terms):
ch – chain st – stitch
sl st – slip stitch
yo – yarn over
yo-sl st – yarn over slip stitch
blo – back loop only
sk = skip
Gauge
16 yo-sl sts/14 rows = 4 inches (10 cm) using 5 mm crochet hook
Crochet Stitches Used
Yarn over Slip Stitch (yo-sl st) also known as Half Double Crochet Slip Stitch (hdc slst):
Step 1. Yarn over and insert the hook into the indicated stitch.
Step 2. Yarn over and pull up a loop. You now have three loops on the hook.
Step 3. Pull the first loop through the second and third loops on the hook.
PRO TIP! After pulling up a loop and while pulling it through, it helps to rotate your hook towards you so that the lip of the hook points downwards.
Special Crochet Stitches
Working in the back loop only (blo): when you crochet a row of single crochet or half double crochet stitches and look at the top, you’ll see how those little Vs form the stitches you crochet into. When you hold the piece of crochet in front of you with the Vs on top, the part of the V closest to you is the front loop. The part of the V farther away from you on the opposite side is the back loop. To crochet in the back loop of a stitch, insert your crochet hook underneath the back loop only and make the stitch as indicated in the pattern.
Women Size Pattern 22”, 55 cm circumference/4.5”, 11 cm height
Foundation row: Ch 45
Row 1: Yo-sl st in the back bump of the second chain from the hook and in the back bump of the first 39 chains. (39 yo-sl sts)
✨ Pro Tip: Keep a loose, relaxed tension as you work. If you’re a tighter crocheter, try going up one hook size to help maintain the knit-look texture.
Row 2: Ch 1, turn. Yo-sl st (blo) in the first stitch and in each stitch across. (39 yo-sl st blo)Note: Beginning with Row 2, all stitches in this pattern are worked in the back loop only (blo).
Row 3: Ch 1, turn. Yo-sl st (blo) in each of the first 39 stitches. Then, insert your hook into the edge of Row 2 and into the first chain of the foundation chain and work a slip stitch. Continue working slip stitches into each chain across, keeping your tension very relaxed. (39 yo-sl st blo, 5 sl sts)
Row 4: Ch 1, turn. Sl st (blo) in each of the first 5 sts, yo-sl st (blo) in each of the next 39 sts. (5 sl st blo, 39 yo-sl st blo)
Row 5: Ch 1, turn. Yo-sl st (blo) in each of the first 39 sts. (39 yo-sl st blo)
Row 7: Ch 1, turn. Yo-sl st (blo) in each of the first 39 stitches. Then, insert your hook into the edge of Row 6 and into the back loop of the first slip stitch of row 4 and work a slip stitch. Continue working slip stitches (blo) into each stitch across, keeping your tension very relaxed. (39 yo-sl st blo, 5 sl sts)
Row 8: Ch 1, turn. Sl st (blo) in each of the first 5 sts, yo-sl st (blo) in each of the next 39 sts. (5 sl st blo, 39 yo-sl st blo)
Rows 9–68: Repeat Rows 5–8 until your work measures about 20 inches (50 cm) in length (or until you reach the desired size).
Make sure your final row is a Row 8 repeat.
Finishing
To join the panel together to form a hat you will lay it down flat with the right side out. Slip stitch the two short ends of the panel together to form a tube, inserting the hook through the back loop only of each stitch of the first side and in each foundation chain loop of the other side.
Once you reach the top, fasten off yarn leaving a 15-20 inches tail (less for the smaller hat sizes), then using a yarn needle weave along the top of the hat in and out pulling in every few stitches to tighten up the top of the beanie until you reach the beginning.
Then weave in the yarn end back and forth through the top of the beanie to secure. Finishing with the yarn tail on the inside of the beanie.
Weave in all remaining ends with the yarn needle! Turn the beanie insight out and fold the brim up. Optional, attach a faux fur pompom on the top for decoration.
Baby Size (14-16 inches, 35-40 cm circ./ 5-6 inches,12-15 cm height)
Foundation row: Ch 35
Row 1: Yo-sl st in the back bump of the second chain from the hook and in the back bump of the first 30 chains. (30 yo-sl sts)
✨ Pro Tip: Keep a loose, relaxed tension as you work. If you’re a tighter crocheter, try going up one hook size to help maintain the knit-look texture.
Row 2: Ch 1, turn. Yo-sl st (blo) in the first stitch and in each stitch across. (30 yo-sl st blo)Note: Beginning with Row 2, all stitches in this pattern are worked in the back loop only (blo).
Row 3: Ch 1, turn. Yo-sl st (blo) in each of the first 30 stitches. Then, insert your hook into the edge of Row 2 and into the first chain of the foundation chain and work a slip stitch. Continue working slip stitches into each chain across, keeping your tension very relaxed. (30 yo-sl st blo, 4 sl sts)
Row 5: Ch 1, turn. Yo-sl st (blo) in each of the first 30 sts. (30 yo-sl st blo)
Row 6: Ch 1, turn. Yo-sl st (blo) in the first stitch and in each stitch across. (30 yo-sl st blo)
Row 7: Ch 1, turn. Yo-sl st (blo) in each of the first 30 stitches. Then, insert your hook into the edge of Row 6 and into the back loop of the first slip stitch of row 4 and work a slip stitch. Continue working slip stitches (blo) into each stitch across, keeping your tension very relaxed. (30 yo-sl st blo, 4 sl sts)
Row 8: Ch 1, turn. Sl st (blo) in each of the first 4 sts, yo-sl st (blo) in each of the next 30 sts. (4 sl st blo, 30 yo-sl st blo)
Rows 9–48: Repeat Rows 5–8 until your work measures about 14 inches (35 cm) in length (or until you reach the desired size).
Make sure your final row is a Row 8 repeat.
Finishing:
To join the panel together to form a hat you will lay it down flat with the right side out. Slip stitch the two short ends of the panel together to form a tube, inserting the hook through the back loop only of each stitch of the first side and in each foundation chain loop of the other side.
Once you reach the top, fasten off yarn leaving a 15-20 inches tail (less for the smaller hat sizes), then using a yarn needle weave along the top of the hat in and out pulling in every few stitches to tighten up the top of the beanie until you reach the beginning.
Then weave in the yarn end back and forth through the top of the beanie to secure. Finishing with the yarn tail on the inside of the beanie.
Weave in all remaining ends with the yarn needle! Turn the beanie insight out and fold the brim up. Optional, attach a faux fur pompom on the top for decoration.
Watch the Full Video Tutorial
If you’d like to follow along with a video tutorial, head over to my YouTube channel where I walk you through each step of making this easy crochet beanie hat for all ages! It’s a great way to learn while crocheting. Be sure to subscribe for more free crochet patterns and tutorials!
Toddler Size: 16-17”,40 – 42.5 cm circumference/7”, 17.5 cm height
Foundation row: Ch 38
Row 1: Yo-sl st in the back bump of the second chain from the hook and in the back bump of the first 33 chains. (33 yo-sl sts)
✨ Pro Tip: Keep a loose, relaxed tension as you work. If you’re a tighter crocheter, try going up one hook size to help maintain the knit-look texture.
Row 2: Ch 1, turn. Yo-sl st (blo) in the first stitch and in each stitch across. (33 yo-sl st blo)Note: Beginning with Row 2, all stitches in this pattern are worked in the back loop only (blo).
Row 3: Ch 1, turn. Yo-sl st (blo) in each of the first 33 stitches. Then, insert your hook into the edge of Row 2 and into the first chain of the foundation chain and work a slip stitch. Continue working slip stitches into each chain across, keeping your tension very relaxed. (33 yo-sl st blo, 4 sl sts)
Row 5: Ch 1, turn. Yo-sl st (blo) in each of the first 33 sts. (33 yo-sl st blo)
Row 6: Ch 1, turn. Yo-sl st (blo) in the first stitch and in each stitch across. (33 yo-sl st blo)
Row 7: Ch 1, turn. Yo-sl st (blo) in each of the first 33 stitches. Then, insert your hook into the edge of Row 6 and into the back loop of the first slip stitch of row 4 and work a slip stitch. Continue working slip stitches (blo) into each stitch across, keeping your tension very relaxed. (33 yo-sl st blo, 4 sl sts)
Row 8: Ch 1, turn. Sl st (blo) in each of the first 4 sts, yo-sl st (blo) in each of the next 33 sts. (4 sl st blo, 33 yo-sl st blo)
Rows 9–52: Repeat Rows 5–8 until your work measures about 15 inches (38 cm) in length (or until you reach the desired size).
Make sure your final row is a Row 8 repeat.
Finishing:
To join the panel together to form a hat you will lay it down flat with the right side out. Slip stitch the two short ends of the panel together to form a tube, inserting the hook through the back loop only of each stitch of the first side and in each foundation chain loop of the other side.
Once you reach the top, fasten off yarn leaving a 15-20 inches tail (less for the smaller hat sizes), then using a yarn needle weave along the top of the hat in and out pulling in every few stitches to tighten up the top of the beanie until you reach the beginning.
Then weave in the yarn end back and forth through the top of the beanie to secure. Finishing with the yarn tail on the inside of the beanie.
Weave in all remaining ends with the yarn needle! Turn the beanie insight out and fold the brim up. Optional, attach a faux fur pompom on the top for decoration.
Child Size Pattern 19”-20”, 47.5-50 cm circumference/7.5”, 19 cm height
Foundation row: Ch 42
Row 1: Yo-sl st in the back bump of the second chain from the hook and in the back bump of the first 36 chains. (36 yo-sl sts)
✨ Pro Tip: Keep a loose, relaxed tension as you work. If you’re a tighter crocheter, try going up one hook size to help maintain the knit-look texture.
Row 2: Ch 1, turn. Yo-sl st (blo) in the first stitch and in each stitch across. (36 yo-sl st blo)Note: Beginning with Row 2, all stitches in this pattern are worked in the back loop only (blo).
Row 3: Ch 1, turn. Yo-sl st (blo) in each of the first 36 stitches. Then, insert your hook into the edge of Row 2 and into the first chain of the foundation chain and work a slip stitch. Continue working slip stitches into each chain across, keeping your tension very relaxed. (36 yo-sl st blo, 5 sl sts)
Row 5: Ch 1, turn. Yo-sl st (blo) in each of the first 36 sts. (36 yo-sl st blo)
Row 6: Ch 1, turn. Yo-sl st (blo) in the first stitch and in each stitch across. (36 yo-sl st blo)
Row 7: Ch 1, turn. Yo-sl st (blo) in each of the first 36 stitches. Then, insert your hook into the edge of Row 6 and into the back loop of the first slip stitch of row 4 and work a slip stitch. Continue working slip stitches (blo) into each stitch across, keeping your tension very relaxed. (36 yo-sl st blo, 5 sl sts)
Row 8: Ch 1, turn. Sl st (blo) in each of the first 5 sts, yo-sl st (blo) in each of the next 36 sts. (5 sl st blo, 36 yo-sl st blo)
Rows 9–60: Repeat Rows 5–8 until your work measures about 17 inches (42 cm) in length (or until you reach the desired size).
Make sure your final row is a Row 8 repeat.
Finishing:
To join the panel together to form a hat you will lay it down flat with the right side out. Slip stitch the two short ends of the panel together to form a tube, inserting the hook through the back loop only of each stitch of the first side and in each foundation chain loop of the other side.
Once you reach the top, fasten off yarn leaving a 15-20 inches tail (less for the smaller hat sizes), then using a yarn needle weave along the top of the hat in and out pulling in every few stitches to tighten up the top of the beanie until you reach the beginning.
Then weave in the yarn end back and forth through the top of the beanie to secure. Finishing with the yarn tail on the inside of the beanie.
Weave in all remaining ends with the yarn needle! Turn the beanie insight out and fold the brim up. Optional, attach a faux fur pompom on the top for decoration.
Teen Size Pattern: 21” (52.5 cm) circumference/8” (20 cm) height
Foundation row: Ch 44
Row 1: Yo-sl st in the back bump of the second chain from the hook and in the back bump of the first 38 chains. (38 yo-sl sts)
✨ Pro Tip: Keep a loose, relaxed tension as you work. If you’re a tighter crocheter, try going up one hook size to help maintain the knit-look texture.
Row 2: Ch 1, turn. Yo-sl st (blo) in the first stitch and in each stitch across. (38 yo-sl st blo)Note: Beginning with Row 2, all stitches in this pattern are worked in the back loop only (blo).
Row 3: Ch 1, turn. Yo-sl st (blo) in each of the first 38 stitches. Then, insert your hook into the edge of Row 2 and into the first chain of the foundation chain and work a slip stitch. Continue working slip stitches into each chain across, keeping your tension very relaxed. (38 yo-sl st blo, 5 sl sts)
Row 5: Ch 1, turn. Yo-sl st (blo) in each of the first 38 sts. (38 yo-sl st blo)
Row 6: Ch 1, turn. Yo-sl st (blo) in the first stitch and in each stitch across. (38 yo-sl st blo)
Row 7: Ch 1, turn. Yo-sl st (blo) in each of the first 38 stitches. Then, insert your hook into the edge of Row 6 and into the back loop of the first slip stitch of row 4 and work a slip stitch. Continue working slip stitches (blo) into each stitch across, keeping your tension very relaxed. (38 yo-sl st blo, 5 sl sts)
Row 8: Ch 1, turn. Sl st (blo) in each of the first 5 sts, yo-sl st (blo) in each of the next 36 sts. (5 sl st blo, 38 yo-sl st blo)
Rows 9–64: Repeat Rows 5–8 until your work measures about 18 inches (45 cm) in length (or until you reach the desired size).
Make sure your final row is a Row 8 repeat.
Finishing:
To join the panel together to form a hat you will lay it down flat with the right side out. Slip stitch the two short ends of the panel together to form a tube, inserting the hook through the back loop only of each stitch of the first side and in each foundation chain loop of the other side.
Once you reach the top, fasten off yarn leaving a 15-20 inches tail (less for the smaller hat sizes), then using a yarn needle weave along the top of the hat in and out pulling in every few stitches to tighten up the top of the beanie until you reach the beginning.
Then weave in the yarn end back and forth through the top of the beanie to secure. Finishing with the yarn tail on the inside of the beanie.
Weave in all remaining ends with the yarn needle! Turn the beanie insight out and fold the brim up. Optional, attach a faux fur pompom on the top for decoration.
Watch the Full Video Tutorial
If you’d like to follow along with a video tutorial, head over to my YouTube channel where I walk you through each step of making this easy crochet beanie hat for all ages! It’s a great way to learn while crocheting. Be sure to subscribe for more free crochet patterns and tutorials!
Large Adult Size Pattern: 23-24”, 58-60 cm circumference/9.5” 24 cm height
Foundation row: Ch 49
Row 1: Yo-sl st in the back bump of the second chain from the hook and in the back bump of the first 42 chains. (42 yo-sl sts)
✨ Pro Tip: Keep a loose, relaxed tension as you work. If you’re a tighter crocheter, try going up one hook size to help maintain the knit-look texture.
Row 2: Ch 1, turn. Yo-sl st (blo) in the first stitch and in each stitch across. (42 yo-sl st blo)Note: Beginning with Row 2, all stitches in this pattern are worked in the back loop only (blo).
Row 3: Ch 1, turn. Yo-sl st (blo) in each of the first 42 stitches. Then, insert your hook into the edge of Row 2 and into the first chain of the foundation chain and work a slip stitch. Continue working slip stitches into each chain across, keeping your tension very relaxed. (42 yo-sl st blo, 6 sl sts)
Row 5: Ch 1, turn. Yo-sl st (blo) in each of the first 42 sts. (42 yo-sl st blo)
Row 6: Ch 1, turn. Yo-sl st (blo) in the first stitch and in each stitch across. (42 yo-sl st blo)
Row 7: Ch 1, turn. Yo-sl st (blo) in each of the first 42 stitches. Then, insert your hook into the edge of Row 6 and into the back loop of the first slip stitch of row 4 and work a slip stitch. Continue working slip stitches (blo) into each stitch across, keeping your tension very relaxed. (42 yo-sl st blo, 6 sl sts)
Row 8: Ch 1, turn. Sl st (blo) in each of the first 6 sts, yo-sl st (blo) in each of the next 42 sts. (6 sl st blo, 42 yo-sl st blo)
Rows 9–76: Repeat Rows 5–8 until your work measures about 21-22 inches (52 – 55 cm) in length (or until you reach the desired size).
Make sure your final row is a Row 8 repeat.
Finishing:
To join the panel together to form a hat you will lay it down flat with the right side out. Slip stitch the two short ends of the panel together to form a tube, inserting the hook through the back loop only of each stitch of the first side and in each foundation chain loop of the other side.
Once you reach the top, fasten off yarn leaving a 15-20 inches tail (less for the smaller hat sizes), then using a yarn needle weave along the top of the hat in and out pulling in every few stitches to tighten up the top of the beanie until you reach the beginning.
Then weave in the yarn end back and forth through the top of the beanie to secure. Finishing with the yarn tail on the inside of the beanie.
Weave in all remaining ends with the yarn needle! Turn the beanie insight out and fold the brim up. Optional, attach a faux fur pompom on the top for decoration.
Final Thoughts
Whether you’re looking for a ribbed crochet beanie pattern, a unisex crochet hat pattern, or just a quick and cozy weekend project, this design checks all the boxes. The chunky crochet hat pattern works up fast and looks amazing.
Ready to make your own?
➡ Get Your Crochet Beanie Pattern PDF Today and start crocheting your new favorite hat!
Don’t Miss a Stitch!
If you love this crochet beanie hat pattern, there’s plenty more where that came from! 🧶
Subscribe to our newsletter / YouTube channel / blog to get:
- Free crochet tutorials and pattern tips
- Exclusive beginner-friendly patterns
- Seasonal crochet projects straight to your inbox
- Early access to new PDF crochet patterns
➡ Subscribe Now and join our cozy crochet community!
Crochet beanie pattern
Easy crochet beanie pattern
Knit-look crochet hat pattern
Chunky crochet hat PDF
Winter crochet beanie pattern
Slouchy crochet beanie pattern
Crochet hat pattern for beginners
Crochet pattern PDF instant download
Adult crochet beanie pattern
Baby crochet hat pattern
Child crochet beanie pattern
Unisex crochet hat pattern
Ribbed crochet beanie pattern
Cozy crochet hat pattern
Handmade crochet hat tutorial
Chunky yarn beanie pattern
Crochet gift idea pattern
DIY crochet beanie pattern
Knit-style crochet pattern
Warm winter crochet hat pattern
