Free crochet twisted headband pattern for beginners. Learn how to make an easy textured crochet ear warmer with ribbing and a twist front. Includes sizes for all ages, video tutorial, and printable PDF upgrade.

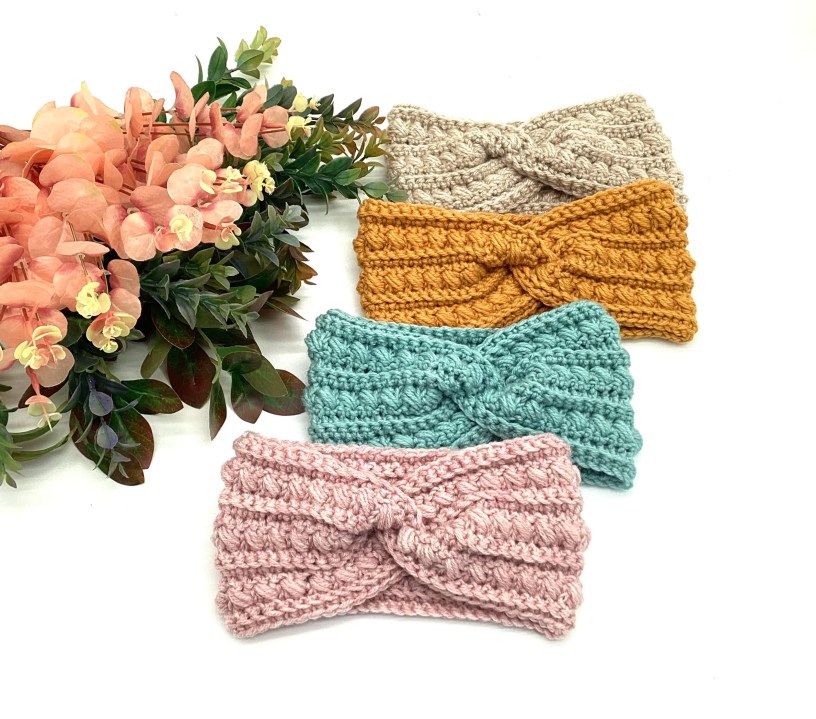
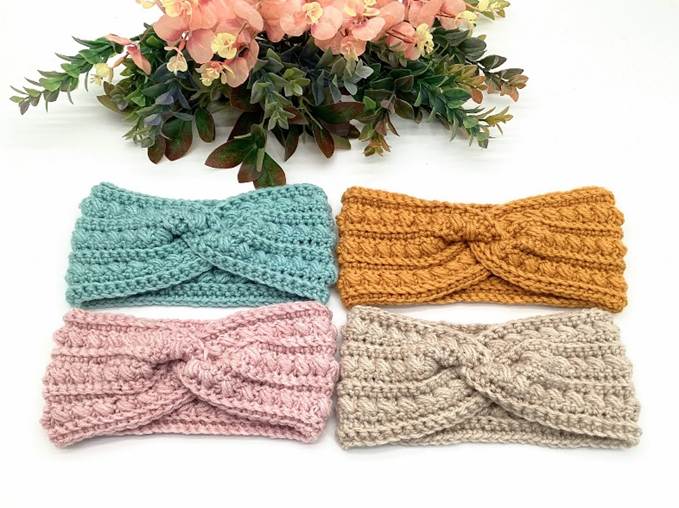
Meet the Easy Textured Headband, a stylish and cozy crochet earwarmer featuring a beautiful mix of puff stitches and ridge texture, finished with a sleek front twist. This pattern is perfect for makers who love modern accessories with a touch of feminine charm.
Whether you’re selling at markets, gifting handmade pieces, or treating yourself, the Poppy Puff Headband is quick, fun, and satisfying to make!
If you’re looking for an easy crochet ear warmer pattern that works up quickly, looks stylish, and is perfect for beginners, you’re in the right place! This Twisted Textured Earwarmer is one of the coziest and most practical winter accessories you can make—and it’s designed with new crocheters in mind. This simple yet modern crochet twisted headband pattern uses basic stitches to create beautiful texture, making it the perfect project for anyone who wants to learn how to crochet or practice their skills.
Crochet headbands are incredibly popular because they work up faster than full hats, require very little yarn, and are great for gifting or selling at markets. This beginner-friendly crochet headband offers the trendy twisted-front look we all love while staying stretchy, warm, and comfortable for everyday wear. Whether you’re searching for a free crochet earwarmer pattern, a textured crochet headband tutorial, or a quick winter crochet project, this pattern checks every box.
What makes this design special is its combination of clean ribbing, squishy texture, and a simple construction that’s easy enough for true beginners—but still enjoyable for experienced crocheters. This twisted crochet earwarmer can be made in under 30 minutes, fits all ages, and is fully customizable to any head size. It’s the perfect stash-buster project, travel project, or “just one more before bed” type of make.
In this post, you’ll find the free written pattern, helpful sizing tips, and a link to the full step-by-step YouTube tutorial. If you prefer a printable version you can keep forever, I also offer an ad-free PDF crochet pattern on Ravelry.
Whether you’re making a cozy accessory for your winter wardrobe, preparing for a craft fair, or creating a handmade gift, this easy crochet twisted textured headband is sure to become one of your favorite go-to patterns.
Let’s get crocheting! 🧶✨
What Makes the Best Crochet Headband Earwarmer Pattern
A great crochet headband earwarmer pattern is more than just a set of instructions—it’s a blend of style, comfort, and ease that makes crocheting satisfying and the finished accessory wearable and fashionable. Whether you’re a beginner or an experienced crocheter, knowing what to look for in a headband pattern ensures your project is both fun and successful. Here’s what makes a pattern truly stand out:
1. Beginner-Friendly Construction
The best patterns are easy to follow, using simple stitches and clear directions. Look for patterns that include:
- Step-by-step instructions
- Abbreviations and stitch guides
- Row-by-row details
- Notes for shaping or finishing
Even beginners can create a professional-looking earwarmer when the pattern is clear and approachable.
2. Stretchy, Comfortable Fit
A headband should fit snugly without feeling tight. Patterns that use ribbing, back loop stitches (sc blo), or textured stitches naturally provide stretch and comfort. This ensures the earwarmer stays in place while remaining cozy and wearable.
3. Stylish Texture
Texture is key to turning a simple crochet band into a fashionable accessory. Stitches like:
- Puff stitches
- Ribbing
- Half double crochet or double crochet variations
…add depth and visual interest, creating a modern, stylish earwarmer that looks polished and high-quality.
4. Quick to Make
Crochet headbands are perfect fast projects. The best patterns work up quickly—often under an hour—making them ideal for:
- Gifts
- Craft fairs
- Stash-busting projects
Quick projects mean instant gratification and a finished item you can enjoy immediately.
5. Multiple Style Options
Variety makes a pattern more versatile. Look for patterns that include multiple styles, such as:
- Simple bands
- Bow-style headbands
- Twisted-front designs
Having options allows you to customize for personal style or different age groups.
6. Multiple Size Options
Head sizes vary widely. Patterns that provide instructions for:
- Baby
- Toddler
- Child
- Teen
- Adult
…make it easy to create the perfect fit for everyone in your life. Size-adjustment instructions are also helpful for customizing width and length.
7. Easy-to-Follow Visuals
Images or video tutorials can make a huge difference, especially for beginners. The best patterns include:
- Step-by-step photos
- Close-ups of textured stitches
- Demonstrations of twists or seams
Visual aids reduce confusion and help crocheters feel confident throughout the project.
8. Yarn Flexibility
Patterns that work with common yarn weights, like worsted (4) or bulky yarn, make it easier to use your existing stash. Versatile yarn options also allow you to customize thickness, warmth, and stretch.
9. Clean, Professional Seaming
A polished finish elevates your earwarmer. The best patterns guide you through:
- Tidy seams
- Invisible twists
- Neat finishing and weaving in ends
These finishing tips make the headband look store-bought quality.
10. Printable and Digital Options
Crocheters love flexibility! The best patterns are offered as:
- Free written patterns on blogs
- Premium PDF downloads for ad-free, printable convenience
This ensures you can crochet anywhere, anytime, whether online or offline.
✨ Final Thoughts
A well-designed crochet headband earwarmer pattern is easy, stylish, versatile, and fun to make. Look for patterns that combine clear instructions, beginner-friendly stitches, multiple sizes, and optional styles like twists or bows. Whether you’re gifting, selling, or making for yourself, the right pattern makes every project a success.
Ready to Make Your Own Twisted Textured Earwarmer?
Now that you know what makes the best crochet headband earwarmer pattern, it’s time to grab your hook and yarn and start crocheting! This twisted textured headband is perfect for beginners, quick to make, and looks stylish on everyone—from babies to adults.
📄 Free Written Pattern (All Sizes)
Get the full step-by-step written instructions for every size on my blog. Make sure to scroll down to the end to find all the informations you need to make your own Twisted Texture Earwarmer
🧶 Printable PDF Pattern
Prefer a clean, ad-free PDF you can print or save to your device? Find it on Ravelry here:
👉 https://ravel.me/poppy-puff-headband
🎥 Watch the Video Tutorial
Follow along with the full YouTube tutorial and see each stitch in action:
👉 https://youtu.be/_gPseH3PX6E
This way, you can choose the format that works best for you—written, printable, or visual.
Don’t forget to share your finished headband on social media using #TwistedTexturedEarwarmer! I love seeing your creations and it’s a great way to inspire other crocheters.
🌐 Free Pattern for All Sizes
You can also find the free written pattern for each size here on my blog. Scroll to the end to find your desired size.
Perfect if you want size-specific instructions.
📄 Prefer an Ads Free PDF Printable Version?
You can download the ad-free PDF pattern here:
👉 HERE https://ravel.me/poppy-puff-headband
Great for offline use, printing, or saving to your crochet library.
✨ Why You’ll Love This Earwarmer
- Beginner Friendly – uses basic stitches
- Quick Make – perfect for last-minute gifts
- Twisted Front Finish – trendy + polished look
- Fully Adjustable – sizes from baby to adult
- Yarn Friendly – works with any worsted weight yarn
This earwarmer also pairs beautifully with winter outfits and makes excellent market stock!
🧶 Materials
- Worsted weight (4) yarn
- 5 mm (H) crochet hook
- Yarn needle
- Scissors
- Stitch marker (optional)
📏 Sizes Available
The free written pattern below includes measurements and stitch counts for:
- Baby
- Toddler
- Child
- Teen
- Adult Medium
- Adult Large
You can easily adjust the length for a custom fit.
Tips for Crocheting Your Headband
Crochet headbands are quick, stylish, and versatile—but a few simple tips can help your finished project look professional, fit perfectly, and feel comfortable. Whether you’re making a twisted textured earwarmer, a bow-style headband, or a simple ribbed band, these tips will ensure success.
1. Choose the Right Yarn
- Use medium weight (4) yarn for a stretchy, cozy fit.
- Wool blends give warmth; acrylic is soft, durable, and easy to care for.
- Smooth yarns make textured stitches like puff stitches or ribbing stand out.
2. Select the Correct Hook
- A 5 mm (H) crochet hook works well with worsted weight yarn.
- If your headband feels too loose, go down a hook size; if too tight, go up.
3. Keep Even Tension
- Consistent tension is key for neat rows and uniform texture.
- Practice on a small swatch if you’re new to textured stitches like puff stitches.
4. Use Stitch Markers
- Mark the beginning of rounds or key stitch locations for texture repeats.
- Helps keep track of puff stitch rows, ribbing, or twists.
5. Customize Your Size
- Measure head circumference before starting.
- Adjust the number of rows for width and length to fit babies, kids, or adults.
- Consider making the band slightly stretchier to ensure a snug but comfortable fit.
6. Perfect the Twist or Bow
- For twisted headbands, fold and wrap the ends carefully before seaming.
- For bow-style headbands, leave a longer yarn tail and wrap neatly to create the bow shape.
- Use a yarn needle to secure seams invisibly for a polished finish.
7. Finish Neatly
- Fasten off securely and weave in all ends to prevent unraveling.
- Block your headband lightly if needed to smooth stitches and define texture.
8. Experiment With Texture
- Try ribbing, puff stitches, or bobbles to create unique patterns.
- Changing textures adds visual interest and can transform a simple headband into a statement piece.
9. Pair With Accessories
- Matching sets are fun! Pair your headband with:
- Beanies
- Fingerless gloves
- Coordinated accessories make perfect gifts or market-ready items.
10. Have Fun!
- Don’t worry about perfection. Crochet is meant to be creative and relaxing.
- Play with colors, textures, and finishes to make your headband truly your own.
🌸 Stitches Used
- ch – chain
- sc – single crochet
- sc blo – single crochet in the back loop only
- Puff Stitch (if your texture uses it—optional)
- sl st – slip stitch
This pattern uses a mix of basic stitches that create a beautiful ribbed texture.
Subscribe to my YouTube channel !
🧶 Stitch Descriptions
Chain (ch)
To make a chain, yarn over and pull the yarn through the loop on your hook. Chains create the foundation row or add height at the start of a row.
Single Crochet (sc)
Insert your hook into the stitch, yarn over, pull up a loop, yarn over again, and pull through both loops on the hook. This creates a tight, dense stitch.
Puff Stitch (puff st)
Yarn over, insert your hook into the stitch, pull up a loop. Repeat this 2 more times to gather 7 loops on your hook. Yarn over and pull through all loops on the hook. This creates a puffy, textured stitch.
Working in the back bump of the chains: to find the back bump, simply turn the chain over and find the single bump on the back of the chain. This back bump is where you will insert your hook to make your first row of stitches! You make your stitches as usual; you’re just working into a slightly different part of the chain. As a result, the “V” from the front of the starting chain will now be your bottom edge.
Single Crochet in the Back Loop Only (sc blo)
Work a single crochet as usual, but insert your hook into only the back loop of the stitch (the loop farthest from you). This creates stretch and ribbed texture.
🧶 Crochet Stitch Abbreviations
- ch – chain
- sl st – slip stitch
- sc – single crochet
- sc blo – single crochet in the back loop only
- puff st – puff stitch
- st(s) – stitch(es)
- yo – yarn over
- sk – skip
- rep – repeat
🧵 Twisted Textured Earwarmer – Free Written Pattern
Notes
- This headband pattern is easy since it can be made with #4 weight yarn and easy stitches. It’s worked back and forth in rows to make a long strip across the head. The advantage of crocheting your headband across the width is that you can try it on to get a really accurate length.
- The best way to ensure a good fit is to measure the recipient’s head circumference with a tape measure. Measure exactly where the headband will go around the head. If you are making a gift, and can’t measure the recipient’s head, I prepared a rough guide to head sizes.
- Make the foundation row, the width it is required for the headband size. The number of stitches will depend on what type of yarn you are using. You can also easily adjust the sizing by working more or less foundation stitches. The pattern requires an odd number of foundation chain stitches.
- Pattern is written in American English terms.
- Before you start working on the headband make sure you read through the entire pattern.
- The Ch 1 at the beginning of a row does not count as a stitch.
- Weave in ends as needed.
- If a different weight brand of yarn or gauge isn’t followed, then the headband will not turn out the same size as written.
Gauge: 16sc blo sts/14 rows = 4 inches (10 cm) using 5 mm crochet hook
Subscribe to my YouTube channel !
Baby Size (14-16 inches, 35-40 cm circ./2 inches, 5 cm height)
Foundation Chain: With a 6 mm crochet hook, chain 57 stitches.
Switch to a 5 mm crochet hook and proceed to work Row 1.
Row 1: work one single crochet in the second chain from the hook in the back bump and in the back bump of each chain across. (56 sc sts)
Row 2-3: Ch 1 and turn, sc blo in the first stitch and in each st to the end of the row. (56 sc blo sts)
Note: On Row 4, work all stitches through both loops of each stitch (not in the back loop only).
Row 4: ch 1 and turn. Sc in the first stitch. [Skip the next stitch, sc in the next. Now, go back to the skipped stitch and work a puff stitch in that stitch (see photos below)]. Repeat from [ to ] to the end of the row, single crochet in the last stitch of the row. (56 sts)
Row 5-6: Ch 1 and turn, sc blo in the first stitch and in each st to the end of the row. (56 sc blo sts)
Fasten off and leave a 15-20 inches (38-50 cm) yarn tail to do the seam.
🪡 How to Create the Twist
Once you finish crocheting the rectangle:
- Fold it in half.
- Layer the short ends together by slipping one end halfway into the other (like interlocking two C-shapes).
- Sew across all four layers.
- Turn right-side out — the twist forms automatically!
A clean, beautiful twist every time.
📺 Watch the Video Tutorial
Prefer learning visually?
Follow along with the full step-by-step YouTube tutorial here:
👉 https://youtu.be/_gPseH3PX6E
The video walks you through the entire process—from stitches to sewing the twist.
📄 Prefer an Ads Free PDF Printable Version?
You can download the ad-free PDF pattern here:
👉 HERE https://ravel.me/poppy-puff-headband
Great for offline use, printing, or saving to your crochet library.
Subscribe to my YouTube channel !
Toddler Size: 16-18” (40-45 cm) circumference/3” (7.5 cm) height
Foundation Chain: With a 6 mm crochet hook, chain 61 stitches.
Switch to a 5 mm crochet hook and proceed to work Row 1.
Row 1: work one single crochet in the second chain from the hook in the back bump and in the back bump of each chain across. (60 sc sts)
Row 2-3: Ch 1 and turn, sc blo in the first stitch and in each st to the end of the row. (60 sc blo sts)
Note: On Row 4, work all stitches through both loops of each stitch (not in the back loop only).
Row 4: ch 1 and turn. Sc in the first stitch. [Skip the next stitch, sc in the next. Now, go back to the skipped stitch and work a puff stitch in that stitch (see photos below)]. Repeat from [ to ] to the end of the row, single crochet in the last stitch of the row. (60 sts)
Row 5-7: Ch 1 and turn, sc blo in the first stitch and in each st to the end of the row. (60 sc blo sts)
Note: On Row 8, work all stitches through both loops of each stitch (not in the back loop only).
Row 8: ch 1 and turn. Sc in the first stitch. [Skip the next stitch, sc in the next. Now, go back to the skipped stitch and work a puff stitch in that stitch (see photos below)]. Repeat from [ to ] to the end of the row, single crochet in the last stitch of the row. (60 sts)
Row 9-10: Ch 1 and turn, sc blo in the first stitch and in each st to the end of the row. (60 sc blo sts)
Fasten off and leave a 15-20 inches (38-50 cm) yarn tail to do the seam.
🪡 How to Create the Twist
Once you finish crocheting the rectangle:
- Fold it in half.
- Layer the short ends together by slipping one end halfway into the other (like interlocking two C-shapes).
- Sew across all four layers.
- Turn right-side out — the twist forms automatically!
A clean, beautiful twist every time.
📺 Watch the Video Tutorial
Prefer learning visually?
Follow along with the full step-by-step YouTube tutorial here:
👉 https://youtu.be/_gPseH3PX6E
The video walks you through the entire process—from stitches to sewing the twist.
📄 Prefer an Ads Free PDF Printable Version?
You can download the ad-free PDF pattern here:
👉 HERE https://ravel.me/poppy-puff-headband
Great for offline use, printing, or saving to your crochet library.
Subscribe to my YouTube channel !
Child Size Pattern 19”-20” (47.5-50 cm) circumference /3” (7.5 cm) height
Foundation Chain: With a 6 mm crochet hook, chain 71 stitches.
Switch to a 5 mm crochet hook and proceed to work Row 1.
Row 1: work one single crochet in the second chain from the hook in the back bump and in the back bump of each chain across. (70 sc sts)
Row 2-3: Ch 1 and turn, sc blo in the first stitch and in each st to the end of the row. (70 sc blo sts)
Note: On Row 4, work all stitches through both loops of each stitch (not in the back loop only).
Row 4: ch 1 and turn. Sc in the first stitch. [Skip the next stitch, sc in the next. Now, go back to the skipped stitch and work a puff stitch in that stitch (see photos below)]. Repeat from [ to ] to the end of the row, single crochet in the last stitch of the row. (70 sts)
Row 5-7: Ch 1 and turn, sc blo in the first stitch and in each st to the end of the row. (70 sc blo sts)
Note: On Row 8, work all stitches through both loops of each stitch (not in the back loop only).
Row 8: ch 1 and turn. Sc in the first stitch. [Skip the next stitch, sc in the next. Now, go back to the skipped stitch and work a puff stitch in that stitch (see photos below)]. Repeat from [ to ] to the end of the row, single crochet in the last stitch of the row. (70 sts)
Row 9-10: Ch 1 and turn, sc blo in the first stitch and in each st to the end of the row. (70 sc blo sts)
Fasten off and leave a 15-20 inches (38-50 cm) yarn tail to do the seam.
🪡 How to Create the Twist
Once you finish crocheting the rectangle:
- Fold it in half.
- Layer the short ends together by slipping one end halfway into the other (like interlocking two C-shapes).
- Sew across all four layers.
- Turn right-side out — the twist forms automatically!
A clean, beautiful twist every time.
📺 Watch the Video Tutorial
Prefer learning visually?
Follow along with the full step-by-step YouTube tutorial here:
👉 https://youtu.be/_gPseH3PX6E
The video walks you through the entire process—from stitches to sewing the twist.
📄 Prefer an Ads Free PDF Printable Version?
You can download the ad-free PDF pattern here:
👉 HERE https://ravel.me/poppy-puff-headband
Great for offline use, printing, or saving to your crochet library.
Subscribe to my YouTube channel !
Teen Size Pattern: 20-22” (50-55cm) circumference/4” (10cm) height
Foundation Chain: With a 6 mm crochet hook, chain 75 stitches.
Switch to a 5 mm crochet hook and proceed to work Row 1.
Row 1: work one single crochet in the second chain from the hook in the back bump and in the back bump of each chain across. (74 sc sts)
Starting row 2, you’ll be working in the back loop only. To avoid loops at the edge, the last stitch of each row will be worked using both top loops.
Row 2-3: Ch 1 and turn, sc blo in the first stitch and in each st to the end of the row. (74 sc blo sts)
Note: On Row 4, work all stitches through both loops of each stitch (not in the back loop only).
Row 4: ch 1 and turn. Sc in the first stitch. [Skip the next stitch, sc in the next. Now, go back to the skipped stitch and work a puff stitch in that stitch (see photos below)]. Repeat from [ to ] to the end of the row, single crochet in the last stitch of the row. (74 sts)
Row 5-7: Ch 1 and turn, sc blo in the first stitch and in each st to the end of the row. (74 sc blo sts)
Note: On Row 8, work all stitches through both loops of each stitch (not in the back loop only).
Row 8: ch 1 and turn. Sc in the first stitch. [Skip the next stitch, sc in the next. Now, go back to the skipped stitch and work a puff stitch in that stitch (see photos below)]. Repeat from [ to ] to the end of the row, single crochet in the last stitch of the row. (74 sts)
Row 9-12: repeat row 5-8.
Row 13-14: Ch 1 and turn, sc blo in the first stitch and in each st to the end of the row. (74 sc blo sts
Fasten off and leave a 15-20 inches (38-50 cm) yarn tail to do the seam.
🪡 How to Create the Twist
Once you finish crocheting the rectangle:
- Fold it in half.
- Layer the short ends together by slipping one end halfway into the other (like interlocking two C-shapes).
- Sew across all four layers.
- Turn right-side out — the twist forms automatically!
A clean, beautiful twist every time.
📺 Watch the Video Tutorial
Prefer learning visually?
Follow along with the full step-by-step YouTube tutorial here:
👉 https://youtu.be/_gPseH3PX6E
The video walks you through the entire process—from stitches to sewing the twist.
📄 Prefer an Ads Free PDF Printable Version?
You can download the ad-free PDF pattern here:
👉 HERE https://ravel.me/poppy-puff-headband
Great for offline use, printing, or saving to your crochet library.
Subscribe to my YouTube channel !
Women Size Pattern: 22-23” (55-57.5 cm) circ/4” (10cm) height
Foundation Chain: With a 6 mm crochet hook, chain 81 stitches.
Switch to a 5 mm crochet hook and proceed to work Row 1.
Row 1: work one single crochet in the second chain from the hook in the back bump and in the back bump of each chain across. (80 sc sts)
Row 2-3: Ch 1 and turn, sc blo in the first stitch and in each st to the end of the row. (80 sc blo sts)
Note: On Row 4, work all stitches through both loops of each stitch (not in the back loop only).
Row 4: ch 1 and turn. Sc in the first stitch. [Skip the next stitch, sc in the next. Now, go back to the skipped stitch and work a puff stitch in that stitch (see photos below)]. Repeat from [ to ] to the end of the row, single crochet in the last stitch of the row. (80 sts)
Row 5-7: Ch 1 and turn, sc blo in the first stitch and in each st to the end of the row. (80 sc blo sts)
Note: On Row 8, work all stitches through both loops of each stitch (not in the back loop only).
Row 8: ch 1 and turn. (See photo tutorial in row 4.) Sc in the first stitch. [Skip the next stitch, sc in the next. Now, go back to the skipped stitch and work a puff stitch in that stitch (see photos below)]. Repeat from [ to ] to the end of the row, single crochet in the last stitch of the row. (80 sts)
Row 9-12: repeat row 5-8.

Row 13: Ch 1 and turn, sc blo in the first stitch and in each st to the end of the row. (80 sc blo sts)
Row 14: Ch 1 and turn, sc blo in the first stitch and in each st to the end of the row. (80 sc blo sts)
Fasten off and leave a 15-20 inches (38-50 cm) yarn tail to do the seam.
🪡 How to Create the Twist
Once you finish crocheting the rectangle:
- Fold it in half.
- Layer the short ends together by slipping one end halfway into the other (like interlocking two C-shapes).
- Sew across all four layers.
- Turn right-side out — the twist forms automatically!
A clean, beautiful twist every time.
📺 Watch the Video Tutorial
Prefer learning visually?
Follow along with the full step-by-step YouTube tutorial here:
👉 https://youtu.be/_gPseH3PX6E
The video walks you through the entire process—from stitches to sewing the twist.
📄 Prefer an Ads Free PDF Printable Version?
You can download the ad-free PDF pattern here:
👉 HERE https://ravel.me/poppy-puff-headband
Great for offline use, printing, or saving to your crochet library.
Subscribe to my YouTube channel !
Large Adult Size Pattern: 23-24” (58-60 cm) circumference/4” (10 cm) height
Foundation Chain: With a 6 mm crochet hook, chain 85 stitches.
Switch to a 5 mm crochet hook and proceed to work Row 1.
Row 1: work one single crochet in the second chain from the hook in the back bump and in the back bump of each chain across. (84 sc sts)
Starting row 2, you’ll be working in the back loop only. To avoid loops at the edge, the last stitch of each row will be worked using both top loops.
Row 2-3: Ch 1 and turn, sc blo in the first stitch and in each st to the end of the row. (84 sc blo sts)
Note: On Row 4, work all stitches through both loops of each stitch (not in the back loop only)..
Row 4: ch 1 and turn. Sc in the first stitch. [Skip the next stitch, sc in the next. Now, go back to the skipped stitch and work a puff stitch in that stitch (see photos below)]. Repeat from [ to ] to the end of the row, single crochet in the last stitch of the row. (84 sts)
Row 5-7: Ch 1 and turn, sc blo in the first stitch and in each st to the end of the row. (84 sc blo sts)
Note: On Row 8, work all stitches through both loops of each stitch (not in the back loop only).
Row 8: ch 1 and turn. Sc in the first stitch. [Skip the next stitch, sc in the next. Now, go back to the skipped stitch and work a puff stitch in that stitch (see photos below)]. Repeat from [ to ] to the end of the row, single crochet in the last stitch of the row. (84 sts)
Row 9-12: repeat row 5-8.
Row 13-14: Ch 1 and turn, sc blo in the first stitch and in each st to the end of the row. (84 sc blo sts)
Fasten off and leave a 15-20 inches (38-50 cm) yarn tail to do the seam.
🪡 How to Create the Twist
Once you finish crocheting the rectangle:
- Fold it in half.
- Layer the short ends together by slipping one end halfway into the other (like interlocking two C-shapes).
- Sew across all four layers.
- Turn right-side out — the twist forms automatically!
A clean, beautiful twist every time.
📺 Watch the Video Tutorial
Prefer learning visually?
Follow along with the full step-by-step YouTube tutorial here:
👉 https://youtu.be/_gPseH3PX6E
The video walks you through the entire process—from stitches to sewing the twist.
📄 Prefer an Ads Free PDF Printable Version?
You can download the ad-free PDF pattern here:
👉 HERE https://ravel.me/poppy-puff-headband
Great for offline use, printing, or saving to your crochet library.
Flip the headband inside out so the right side is showing again to see your new headband creation.
I hope you enjoyed making this beautiful pattern. Let me know how you like this pattern. I’d love to hear from you!
✨ Final Thoughts
A well-designed crochet headband earwarmer pattern is easy, stylish, versatile, and fun to make. Look for patterns that combine clear instructions, beginner-friendly stitches, multiple sizes, and optional styles like twists or bows. Whether you’re gifting, selling, or making for yourself, the right pattern makes every project a success.
Ready to make your own?
➡ Get Your Crochet Headband Pattern PDF Today and start crocheting your new favorite hat!
Don’t Miss a Stitch!
If you love this crochet beanie hat pattern, there’s plenty more where that came from! 🧶
Subscribe to our newsletter / YouTube channel / blog to get:
- Free crochet tutorials and pattern tips
- Exclusive beginner-friendly patterns
- Seasonal crochet projects straight to your inbox
- Early access to new PDF crochet patterns
➡ Subscribe Now and join our cozy crochet community!
Have questions? Join the Facebook Group! We created this group for you to share pictures, ask questions, and help each other out.
You are more than welcome to sell your finished items, but please give Silvana Crochet Studio credit as pattern designer and link back to my shop Ravelry https://www.ravelry.com/designers/silvana-hagiu
If you have any questions about this pattern please feel free to message me.
My patterns (including all photographs) are copyrighted. You may NOT copy, re-distribute or sell my pattern.
1. Free Crochet Twisted Headband Pattern for Beginners (Textured Ear Warmer)
2. How to Crochet a Twisted Ear Warmer – Easy Textured Headband Pattern
3. Beginner Crochet Ear Warmer Pattern – Twisted Textured Headband Tutorial
4. Quick & Easy Twisted Crochet Headband – Free Textured Ear Warmer Pattern
5. Twisted Crochet Ear Warmer Pattern (Beginner Friendly + Free Tutorial)
crochet headband
twisted headband crochet
crochet earwarmer
textured crochet headband
beginner crochet headband
easy crochet earwarmer
winter crochet headband
free crochet pattern
- how to crochet a twisted headband
- crochet headband pattern for beginners
- textured earwarmer crochet tutorial
- simple crochet headband with twist
- easy winter crochet accessories
- crochet headband PDF pattern
- beginner-friendly crochet headband
- DIY crochet earwarmer
- handmade crochet winter headband
- crochet hair accessories
- crochet winter set
- matching crochet headband and beanie
- crochet ribbed headband
- crochet puff stitch headband
- crochet for beginners step by step
- cozy crochet headband
