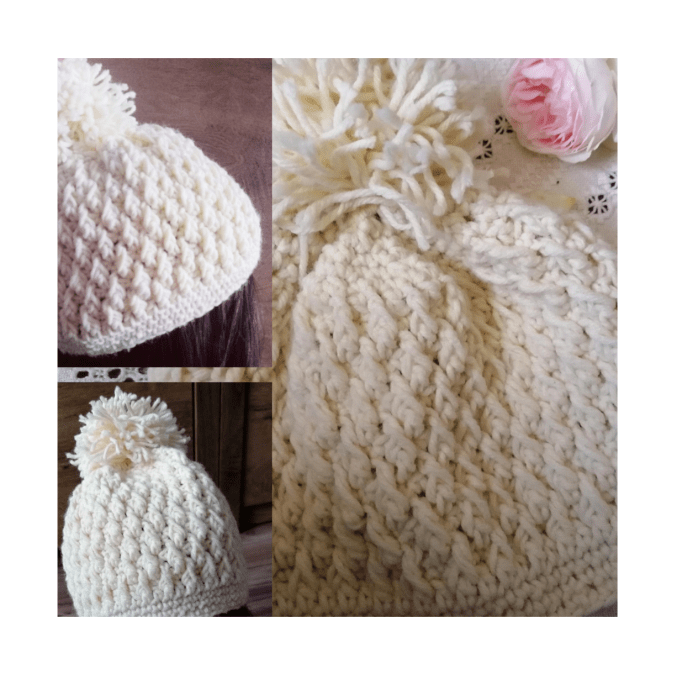

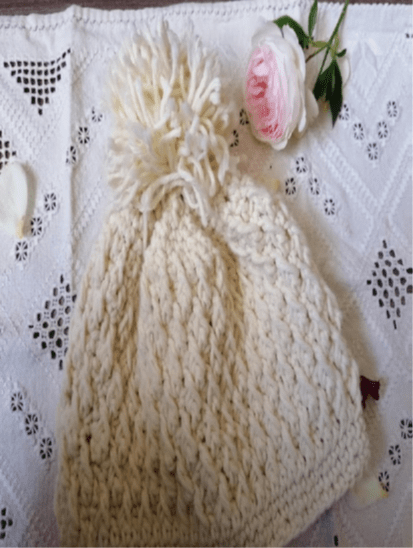
When cold weather starts to set in, you may want something with added thickness to keep your ears warm.The Alpin Hat will do just that! Not only will your ears be toasty warm, but you’ll look stylish with a fun texture.
This Gorgeous Alpin Crochet Hat Pattern is a quick and easy crochet hat project. And this is what Alpin stich hat is all about! It comes in 3 sizes and doesn’t take much time to complete. It is soft, squishy, warm and fun to make.
One of the best things about this crochet hat is that even if you’re a beginner, Alpin hat is a crochet hat pattern that is much simpler that it sounds, it’s worked with front post double crochet stitches with “regular” double crochet stitches in between, in alternating rows separated by one row of single crochet stitches. Once you get through this pattern, you’ll see just how simple it really is!

63 Piece Crochet Kit with Yarn Set– Premium Bundle Includes 9 Crochet Hooks, 24 Acrylic Crochet Yarn Balls, 6 Needles, eBook, Bags and more – Beginner and Professional Starter Pack for Adults and Kids
Terminology
CH: Chain
DC: Double crochet
DEC: Single crochet decrease
FPDC: Front post double crochet
SC: Single crochet
SL ST(s): Slip stitch(es)
ST(s): Stitch(es)
[ ]: Repeat instructions within brackets as many times as directed
Size: child, woman, man
Gauge: 12 stiches & 8 rows =4″ x 4″ SQ
Materials
- This pattern is a crochet hat pattern written for an average woman’s head circumference of 22″. Other sizes are listed on the page too.
- Wool-Ease Thick & Quick Yarn , 97 Meters, FishermanWool Ease Solids, Heathers & Twists, from Lion Brand
- the pattern used between 188 and 198 yards of yarn without the pompom
- 6mm crochet hook size
- scrissors
yarn needle.
Notes
- I recommend reading through the pattern and doing a gauge swatch before starting.
- This beanie is made from the bottom-up in rounds using mostly the alpine stitch.
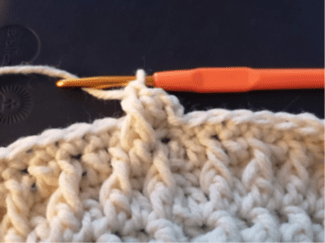
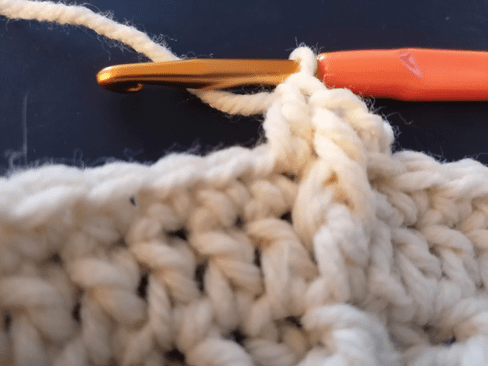
- Chains do not count as the first stitch of the round. Make sure you’re joining rounds at the top of the first stitch and not into the chain space or chain stitch b. The first stitch of a new round goes into the same stitch that you joined the end of the previous round to (unless you’re working a round that starts with a FPDC).
- When you start working the DC rounds for the alpine stitch, the “regular” DCs of the round always go into the top of a SC from the previous SC round. The FPDC will be worked around the DCs from the previous DC round. Make sure you’re working your FPDCs as seen in the photos below.

SIZES BY HEAD CIRCUMFERENCE &HAT LENGHTS
- child: 18-20” / Approx. 7.5” tall after closing top hole (54)
- teen: 20-21” / Approx. 8-8.5” tall after closing top hole (60)
- woman: 22-23” / Approx. 8.5-9” tall after closing top hole (66)
Crochet hat pattern for a child
Child (small)18-19” / Approx. 7.5” tall after closing top hole
With 6mm hook, CH 55. Join with a SL ST.
Round 1: 1SC in the second chain from the hook, 1SC in each remaining chain loops. SL to the first SC ST of round 1 (54 SC).
Round 2: CH 1, 1SC in the same ST, 1 SC in each stitch till the end of the round, join with a SL ST in the top of the first SC ST (54 SC).
Round 3: CH 1, 1SC in the same ST, 1 SC in each stitch till the end of the round, join with a SL ST in the top of the first SC ST (54 SC).
Round 4: CH 2, 1 DC in the same ST, 1 DC in each stitch till the end of the round, join with a SL ST in the top of the first DC ST (54 SC).
Round 5: CH 1, 1SC in the same ST, 1 SC in each stitch till the end of the round, join with a SL ST in the top of the first SC ST (54 SC).

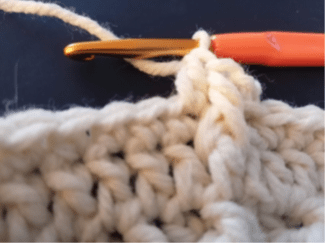
Round 6: CH 2. [DC x1, FPDC x1 around the next DC below (please see the notes section and accompanying photos above)] x27. Join with a SL ST (54 DC).
Round 7: CH 1, 1SC in the same ST, 1 SC in each stitch till the end of the round, join with a SL ST in the top of the first SC ST (54 SC).
Round 8: CH 2. [FPDC x1, DC x1around into the top of a SC from the previous SC round (please see the notes section and accompanying photos above)] x27. Join with a SL ST (54 DC).
Round 9: 1SC in the same ST, 1 SC in each stitch till the end of the round, join with a SL ST in the top of the first SC ST (54 SC)
Round 10: CH 2. [DC x1, FPDC x1 around the next DC below] x27. Join with a SL ST (54 DC).
Round 11: 1SC in the same ST, 1 SC in each stitch till the end of the round, join with a SL ST in the top of the first SC ST (54 SC)
Round 12: CH 2. [FPDC x1, DC x1around into the top of a SC from the previous SC round] x27. Join with a SL ST (54 DC).
Round 13: 1SC in the same ST, 1 SC in each stitch till the end of the round, join with a SL ST in the top of the first SC ST (54 SC)
Round 14: CH 2. [DC x1, FPDC x1 around the next DC below] x27. Join with a SL ST (54 DC).
Continue repeating rounds 11-14 until your beanie is at least 6” tall and ending on a DC round (if you want it longer, keep going until your beanie is approximately 1.5” less than the desired length).
Working the crown:
Round 1: CH 1. [SC x4, DEC x1] x9. Join with a SL ST (45 SC).
Round 2: CH 1. [SC x3, DEC x1] x9. Join with a SL ST (36 SC).
Round 3: CH 1. [SC x2, DEC x1] x9. Join with a SL ST (27 SC).
Round 4: CH 1 [SC x1, DEC x1] x9. Join with a SL ST (18 SC).
CH 1. DEC x9. Join with a SL ST (9 SC). Finish off leaving a long tail.
Finish: Flip the hat inside out to weave the tail in and out of every other stitch of the last row with a yarn needle. Pull the tail to close the hole. Secure the tail and any remaining ends with knots, and weave them all in.
Crochet hat pattern for teens
Teen (medium) 19-21” / Approx. 8-8.5” tall after closing top hole
With 6mm hook, CH 61. Join with a SL ST.
Round 1: 1SC in the second chain from the hook, 1SC in each remaining chain loops. SL to the first SC ST of round 1 (60 SC).
Round 2: CH 1, 1SC in the same ST, 1 SC in each stitch till the end of the round, join with a SL ST in the top of the first SC ST (60 SC).
Round 3: CH 1, 1SC in the same ST, 1 SC in each stitch till the end of the round, join with a SL ST in the top of the first SC ST (60 SC).
Round 4: CH 1, 1SC in the same ST, 1 SC in each stitch till the end of the round, join with a SL ST in the top of the first SC ST (60 SC).
Round 5: CH 2, 1 DC in the same ST, 1 DC in each stitch till the end of the round, join with a SL ST in the top of the first DC ST (60 SC).
Round 6: CH 1, 1SC in the same ST, 1 SC in each stitch till the end of the round, join with a SL ST in the top of the first SC ST (60 SC).


Round 7: CH 2. [DC x1, FPDC x1 around the next DC below (please see the notes section and accompanying photos above)] x30. Join with a SL ST (60 DC).
Round 8: CH 1, 1SC in the same ST, 1 SC in each stitch till the end of the round, join with a SL ST in the top of the first SC ST (60 SC).
Round 9: CH 2. [FPDC x1, DC x1around into the top of a SC from the previous SC round (please see the notes section and accompanying photos above)] x30. Join with a SL ST (60 DC).
Round 10: 1SC in the same ST, 1 SC in each stitch till the end of the round, join with a SL ST in the top of the first SC ST (60 SC)
Round 11: CH 2. [DC x1, FPDC x1 around the next DC below] x30. Join with a SL ST (60 DC).
Round 12: 1SC in the same ST, 1 SC in each stitch till the end of the round, join with a SL ST in the top of the first SC ST (60 SC)
Round 13: CH 2. [FPDC x1, DC x1around into the top of a SC from the previous SC round] x30. Join with a SL ST (60 DC).
Round 14: 1SC in the same ST, 1 SC in each stitch till the end of the round, join with a SL ST in the top of the first SC ST (60 SC)
Round 15: CH 2. [DC x1, FPDC x1 around the next DC below] x30. Join with a SL ST (60 DC).
Continue repeating rounds 12-15 until your beanie is at least 6.5” tall and ending on a DC round (if you want it longer, keep going until your beanie is approximately 1.5” less than the desired length).
Working the crown:
Round 1: CH 1. [SC x4, DEC x1] x10. Join with a SL ST (50SC).
Round 2: CH 1. [SC x3, DEC x1] x10. Join with a SL ST (40 SC).
Round 3: CH 1. [SC x2, DEC x1] x10. Join with a SL ST (30 SC).
Round 4: CH 1 [SC x1, DEC x1] x10. Join with a SL ST (20 SC).
CH 1. DEC x10. Join with a SL ST (10 SC). Finish off leaving a long tail.
Finish: Flip the hat inside out to weave the tail in and out of every other stitch of the last row with a yarn needle. Pull the tail to close the hole. Secure the tail and any remaining ends with knots, and weave them all in.

Woman 22” / Approx. 8.5-9” tall
With 6mm hook, CH 67. Join with a SL ST.
Round 1: 1SC in the second chain from the hook, 1SC in each remaining chain loops. SL to the first
SC ST of round 1 (66 SC).
Round 2: CH 1, 1SC in the same ST, 1 SC in each stitch till the end of the round, join with a SL ST in
the top of the first SC ST (66 SC).
Round 3: CH 1, 1SC in the same ST, 1 SC in each stitch till the end of the round, join with a SL ST in
the top of the first SC ST (66 SC).
Round 4: CH 1, 1SC in the same ST, 1 SC in each stitch till the end of the round, join with a SL ST in
the top of the first SC ST (66 SC).
Round 5: CH 2, 1 DC in the same ST, 1 DC in each stitch till the end of the round, join with a SL ST in
the top of the first DC ST (66 SC).
Round 6: CH 1, 1SC in the same ST, 1 SC in each stitch till the end of the round, join with a SL ST in
the top of the first SC ST (66 SC).

Round 7: CH 2. [DC x1, FPDC x1 around the next DC below (please see the notes section and
accompanying photos above)] x33. Join with a SL ST (66 DC).
Round 8: CH 1, 1SC in the same ST, 1 SC in each stitch till the end of the round, join with a SL ST
in the top of the first SC ST (66 SC).
Round 9: CH 2. [FPDC x1, DC x1around into the top of a SC from the previous SC round (please
see the notes section and accompanying photos above)] x33. Join with a SL ST (66DC).
Round 10: 1SC in the same ST, 1 SC in each stitch till the end of the round, join with a SL ST in the
top of the first SC ST (66 SC)
Round 11: CH 2. [DC x1, FPDC x1 around the next DC below] x33. Join with a SL ST (66DC).
Round 12: 1SC in the same ST, 1 SC in each stitch till the end of the round, join with a SL ST in the
top of the first SC ST (66 SC)
Round 13: CH 2. [FPDC x1, DC x1around into the top of a SC from the previous SC round] x33. Join
with a SL ST (66 DC).
Round 14: 1SC in the same ST, 1 SC in each stitch till the end of the round, join with a SL ST in the
top of the first SC ST (66 SC)
Round 15: CH 2. [DC x1, FPDC x1 around the next DC below] x33. Join with a SL ST (66 DC).
Continue repeating rounds 12-15 until your beanie is at least 6.5” tall and ending on a DC round
(if you want it longer, keep going until your beanie is approximately 1.5” less than the desired
length).
Working the crown:
Round 1: CH 1. [SC x4, DEC x1] 11 times. Join with a SL ST (55SC).
Round 2: CH 1. [SC x3, DEC x1] x11. Join with a SL ST (44 SC).
Round 3: CH 1. [SC x2, DEC x1] x11. Join with a SL ST (33 SC).
Round 4: CH 1 [SC x1, DEC x1] x10. Join with a SL ST (22 SC).
CH 1. DEC x11. Join with a SL ST (11 SC). Finish off leaving a long tail.
Finish: Flip the hat inside out to weave the tail in and out of every other stitch of the last row
with a yarn needle. Pull the tail to close the hole. Secure the tail and any remaining ends with
knots, and weave them all in.
I hope you enjoyed making this beautiful pattern! I loved to crochet a hat pattern that has beautiful texture and is easy to make.
What’s Next?
Pin this post: Save this tutorial to your >>>Pinterest <<< boards so that you can come back to it later.
Leave a comment: We love to hear your feedback. Tell me in the comments below!
Share on Facebook: When you make this project, share it on social media and tag me.
Have questions? Join the Facebook Group! We created this group for you to share pictures, ask questions, and help each other out.
Happy Crocheting!
>>> Pin it for later <<<
Get more free patterns direct in your email by subscribing bellow!
More Hats and Beanies Patterns you may like:
Buttercream Easy Crochet Hat – Free Pattern
Diamon Crochet Hat – free pattern
Panda Crochet Hat – Free Pattern
Free Easy and Fast Crochet Hat Pattern

Where are the directions for the woman’s size
LikeLike
Hello, Nanni! Thank you for the message. I didn’t realized I left it out, so I just added.
Happy Crocheting!
LikeLike