
Are you looking for your new favorite crochet hat pattern? Today, I am excited to share this best crochet hat and beanie pattern. This free patterns is beautifully designed and suitable for both beginners and experienced crocheters.
Favorite Crochet Hat and Beanie Patterns
Crochet hats and beanies are easy to make and will keep you warm all winter long! Crocheting a hat is not only fun, but it can also be very rewarding – especially when you find a fun new pattern to try.
In this post, I’ve curated a free hat crochet pattern that I know you’ll love. I selected these particular pattern because it is one of my favorite crochet hat and beanie patterns. In fact, I’ve made a few of them myself!
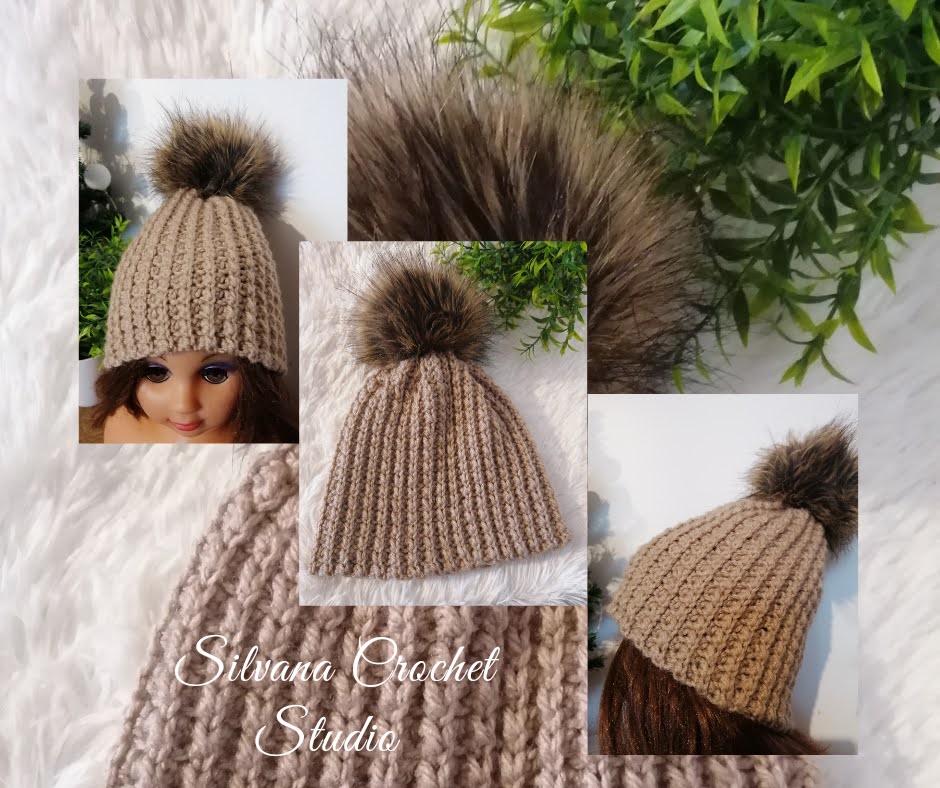
The Buttercream hat is a fabulously quick and textured, soft, squishy, warm and fun to make crochet hat pattern to suit everyone this winter season.
This crochet hat has a flat construction, worked in one panel and sewn together at the end which makes it easy to crochet for almost any level of crocheter. It comes in seven sizes from preemie crochet hat to large adult.
Find the free crochet pattern instructions bellow, or purchase a print-optimized, ad-free PDF by clicking HERE.
About the Buttercream Crochet Hat Pattern
I love designing patterns that look more complex than they actually are. For example my Alpin Crochet Hat is seamless crochet hat which has a down to top construction using one colour, so no yarn switching and tangling! It comes in sizes from preemie crochet hat to large adult.
This hat pattern is worked back and forth in rows in medium weight [4] yarn and it is fitted to your head. It is a crochet hat worked flat! This is an easy to crochet project but I have included a tutorial to teach you how to make it for the first time.
THIS CROCHET PATTERN IS FREE TO VIEW ONLINE BELOW. YOU ALSO HAVE THE OPTION TO PURCHASE THE AD-FREE PDF DOWNLOAD VERSION FOR A SMALL FEE. CLICK HERE TO GET THE PDF VERSION: ETSY AND RAVERLY
Yarn
To make the chunky hat I used CARON CAKES YARN, BUTTERCREAM.

It’s a really fun yarn to work with that has the most awesome speckled colour range too! It’s is a 80% Acrylic, 20% Wool, 7.1 oz./ 200g , 383 yd. / 350 m.
1 ball is enough to make one larger size or two medium/smaller size hats.
Tension and Sizing
The hats are sized to fit Preemie, (Baby, Toddler, Child, Medium Adult, Large Adult).
This pattern is a crochet hat pattern written for an average woman’s head circumference of 22″. Other sizes are listed on the page too.
Scroll on down to learn how to crochet a hat that doesn’t include changing colors and much more!
The initial chain of this will be the height of the hat pattern and the rows worked will be the width. You’ll be able to use the hat size chart below, so you know exactly the perfect size crochet hat to make.
Changing the size of a hat is as simple as changing the width of the hat as well as the height.


How to Measure Hat Size for Crochet
Measuring a crochet hat is easy. You’ll need a soft tape measure , so you can get the circumference of the head. For example, if you are wanting to make a men’s crochet hat you would crochet your hat to a width of 22 to 24 inches with a 9 or 9.5 inch height more than likely, but measuring that person’s head will give you an exact measurement. The same thing goes any size of crochet hat you want to make from the chart.
The best bet is to always measure the circumference of the persons head you want to make the hat or beanie for because their size may differ from the standard sizes on the chart. If it is not possible to measure, then you can go by the standard chart above when crocheting a hat.

Below in the pattern you will be able to see the hat sizes I designed this hat in, so you’ll know exactly how many chains and rows to crochet to get the size you need.
Gauge
4” x 4” (10 cm x 10 cm)
13 sc x 14 rows with 5 mm crochet hook
- Gauge pattern: Ch 8 and work pattern like below.
- Gauge is important for a proper sized crochet hat
Materials
Crochet Hook: 5 mm, US – H/8
Tapestry needle
Scrissors
Measuring tape
Abbreviations
The patterns is written in standard US terms.
st(s) – stitch(es)
ch(s) – chain(s)
sl st – slip stitch
hdc – half souble crochet
blo = back loop only
Notes
I recommend reading through the pattern and doing a gauge swatch before starting.
Chains do not count as the first stitch of the row.
Follow along with gauge + hat size chart for a perfectly fitted crochet hat.
The initial chain is the height of the hat.
All sizes take less than 1 skein of yarn.
Crochet Stitches for a Hat
This beanie hat uses easy crochet stitches, so any level of crocheter could try to make this if they are feeling adventurous.
The best part (in my opinion) about this hat is that it only uses two simple crochet stitches! If you can slip stitch and half double crochet, then you are good to go with crocheting this beautiful design.
Since this hat is made in one panel you will work an half double crochet stitch followed by a hdc which is the main part of the hat pattern.
The Stitches
Learn more about each crochet stitch below, so you will be able to crochet this hat as soon as possible. They are easy stitches!
Slip stitch : You can work a slip stitch at just about any point after you begin your project. If you already have an active loop on your crochet hook, insert your hook into the spot where you want to crochet the slip stitch. Then hook your yarn, pull yarn through, finally, draw the newly created loop through the active loop on your hook. Once you try these steps a few times, it becomes almost like a single motion. The slip stitch is now complete.

Half double crochet: Yarn over and insert the crochet hook into the stitch. Yarn over again and pull the yarn through the stitch. You should now have three loops on the hook. Yarn over one more time and pull the yarn through all three loops. That completes the first half double crochet stitch.
Purchase a print-optimized, ad-free PDF by clicking HERE.
The Hat Pattern Preemie Size
Pattern sizes are as shown Preemie (Baby, Toddler, Child, Teen, Woman, Man) Ch 13 (17, 21, 21, 23, 25, 25)
To Start: Ch 14.
Row 1: In the third chain from hook work one hdc stitch, and into the next stitch one slip stitch. Continue the to the end of the chains row working 1hdc, 1sl st . The last stitch of the row will be a sl st. (6 hdc, 6 sl sts)
Starting row 2 all the stitches for this crochet hat pattern will be work in the back loop only.
Make sure to work the hdc sts on the top of the hdc sts from the previous row and sl sts on the top of sl sts of the previous row.
Row 2: Chain 1, sl st blo in the first st, then work one half double crochet stitch blo in the next. Continue working 1 sl st blo, followed by 1 hdc blo in the remaining stitches to the end of the row. Turn. The last stitch of the row will be an hdc. (6 hdc, 6 sl sts)
Row 3: ch1, hdc st blo in the first st, then work one slip stitch blo in the next. Continue working 1 hdc st blo, followed by 1 sl st blo in the remaining stitches to the end of the row. Turn. The last stitch of the row will be an sl st. (6 hdc, 6 sl sts)
Repeat rows 2 and 3 until you have a total of 18 rows.
Finishing: Fasten off yarn leaving a 15-20 inch tail (less for the smaller hat sizes).

Joining the Hat
To join the panel together to form a hat you will lay it down flat. Join the two short ends together. Attach the yarn needle to the yarn tail. Weave up the side of the hat to join the two short ends of the panel together to form a tube.
Once you reach the top you will use the yarn needle and weave along the top of the hat in and out pulling in every few stitches to tighten up the top of the hat until you reach the beginning.
Then weave in the yarn end back and forth through the top of the hat to secure. Finishing with the yarn tail on the inside of the hat.

Finishing: Weave in all remaining ends of the hat with the yarn needle! You are done with your new crochet hat! Attach a faux fur pompom on the top for decoration.


DON’T LIKE ADS???…. CLICK HERE TO GET THE PDF VERSION: ETSY AND RAVERLY
The Hat Pattern Baby Size
To Start: Ch 18.
Row 1: In the third chain from hook work one hdc stitch, and into the next stitch one slip stitch. Continue the to the end of the chains row working 1hdc, 1sl st . The last stitch of the row will be a sl st. (8 hdc, 8 sl sts)
Starting row 2 all the stitches for this crochet hat pattern will be work in the back loop only.
Make sure to work the hdc sts on the top of the hdc sts from the previous row and sl sts on the top of sl sts of the previous row.
Row 2: Chain 1, sl st blo in the first st, then work one half double crochet stitch blo in the next. Continue working 1 sl st blo, followed by 1 hdc blo in the remaining stitches to the end of the row. Turn. The last stitch of the row will be an hdc. (8 hdc, 8sl sts)
Row 3: ch1, hdc st blo in the first st, then work one slip stitch blo in the next. Continue working 1 hdc st blo, followed by 1 sl st blo in the remaining stitches to the end of the row. Turn. The last stitch of the row will be an sl st. (8 hdc, 8sl sts).
Repeat rows 2 and 3 until you have a total of 28 rows.
Joining the Hat
To join the panel together to form a hat you will lay it down flat. Join the two short ends together. Attach the yarn needle to the yarn tail. Weave up the side of the hat to join the two short ends of the panel together to form a tube.
Once you reach the top you will use the yarn needle and weave along the top of the hat in and out pulling in every few stitches to tighten up the top of the hat until you reach the beginning.
Then weave in the yarn end back and forth through the top of the hat to secure. Finishing with the yarn tail on the inside of the hat.
Finishing: Weave in all remaining ends of the hat with the yarn needle! You are done with your new crochet hat!
The Hat Pattern Toddler’ Size
To Start: Ch 22.
Row 1: In the third chain from hook work one hdc stitch, and into the next stitch one slip stitch. Continue the to the end of the chains row working 1hdc, 1sl st . The last stitch of the row will be a sl st. (10 hdc, 10 sl sts)
Starting row 2 all the stitches for this crochet hat pattern will be work in the back loop only.
Make sure to work the hdc sts on the top of the hdc sts from the previous row and sl sts on the top of sl sts of the previous row.
Row 2: Chain 1, sl st blo in the first st, then work one half double crochet stitch blo in the next. Continue working 1 sl st blo, followed by 1 hdc blo in the remaining stitches to the end of the row. Turn. The last stitch of the row will be an hdc. (10 hdc, 8=10sl sts)
Row 3: ch1, hdc st blo in the first st, then work one slip stitch blo in the next. Continue working 1 hdc st blo, followed by 1 sl st blo in the remaining stitches to the end of the row. Turn. The last stitch of the row will be an sl st. (10 hdc, 10sl sts) )
Repeat rows 2 and 3 until you have a total of 32 rows.
Joining the Hat
To join the panel together to form a hat you will lay it down flat. Join the two short ends together. Attach the yarn needle to the yarn tail. Weave up the side of the hat to join the two short ends of the panel together to form a tube.
Once you reach the top you will use the yarn needle and weave along the top of the hat in and out pulling in every few stitches to tighten up the top of the hat until you reach the beginning.
Then weave in the yarn end back and forth through the top of the hat to secure. Finishing with the yarn tail on the inside of the hat.
Finishing: Weave in all remaining ends of the hat with the yarn needle! You are done with your new crochet hat!
The Hat Pattern for Children’s Size
To Start: Ch 24.
Row 1: In the third chain from hook work one hdc stitch, and into the next stitch one slip stitch. Continue the to the end of the chains row working 1hdc, 1sl st . The last stitch of the row will be a sl st. (11 hdc, 11 sl sts)
Starting row 2 all the stitches for this crochet hat pattern will be work in the back loop only.
Make sure to work the hdc sts on the top of the hdc sts from the previous row and sl sts on the top of sl sts of the previous row.
Row 2: Chain 1, sl st blo in the first st, then work one half double crochet stitch blo in the next. Continue working 1 sl st blo, followed by 1 hdc blo in the remaining stitches to the end of the row. Turn. The last stitch of the row will be an hdc. (11 hdc, 11sl sts)
Row 3: ch1, hdc st blo in the first st, then work one slip stitch blo in the next. Continue working 1 hdc st blo, followed by 1 sl st blo in the remaining stitches to the end of the row. Turn. The last stitch of the row will be an sl st. (11 hdc, 11sl sts).
Repeat rows 2 and 3 until you have a total of 36 rows.
Joining the Hat
To join the panel together to form a hat you will lay it down flat. Join the two short ends together. Attach the yarn needle to the yarn tail. Weave up the side of the hat to join the two short ends of the panel together to form a tube.
Once you reach the top you will use the yarn needle and weave along the top of the hat in and out pulling in every few stitches to tighten up the top of the hat until you reach the beginning.
Then weave in the yarn end back and forth through the top of the hat to secure. Finishing with the yarn tail on the inside of the hat.
Finishing: Weave in all remaining ends of the hat with the yarn needle! You are done with your new crochet hat!
Hat Pattern for Teen’s Size
To Start: Ch 24.
Row 1: In the third chain from hook work one hdc stitch, and into the next stitch one slip stitch. Continue the to the end of the chains row working 1hdc, 1sl st . The last stitch of the row will be a sl st. (12 hdc, 12 sl sts)
Starting row 2 all the stitches for this crochet hat pattern will be work in the back loop only.
Make sure to work the hdc sts on the top of the hdc sts from the previous row and sl sts on the top of sl sts of the previous row.
Row 2: Chain 1, sl st blo in the first st, then work one half double crochet stitch blo in the next. Continue working 1 sl st blo, followed by 1 hdc blo in the remaining stitches to the end of the row. Turn. The last stitch of the row will be an hdc. (12 hdc, 12 sl sts)
Row 3: ch1, hdc st blo in the first st, then work one slip stitch blo in the next. Continue working 1 hdc st blo, followed by 1 sl st blo in the remaining stitches to the end of the row. Turn. The last stitch of the row will be an sl st. (12 hdc, 12sl sts) ).
Repeat rows 2 and 3 until you have a total of 40 rows.
Joining the Hat
To join the panel together to form a hat you will lay it down flat. Join the two short ends together. Attach the yarn needle to the yarn tail. Weave up the side of the hat to join the two short ends of the panel together to form a tube.
Once you reach the top you will use the yarn needle and weave along the top of the hat in and out pulling in every few stitches to tighten up the top of the hat until you reach the beginning.
Then weave in the yarn end back and forth through the top of the hat to secure. Finishing with the yarn tail on the inside of the hat.
Finishing: Weave in all remaining ends of the hat with the yarn needle! You are done with your new crochet hat!
Hat Pattern for Women’ Size
To Start: Ch 26.
Row 1: In the third chain from hook work one hdc stitch, and into the next stitch one slip stitch. Continue the to the end of the chains row working 1hdc, 1sl st . The last stitch of the row will be a sl st. (13 hdc, 13 sl sts)
Starting row 2 all the stitches for this crochet hat pattern will be work in the back loop only.
Make sure to work the hdc sts on the top of the hdc sts from the previous row and sl sts on the top of sl sts of the previous row.
Row 2: Chain 1, sl st blo in the first st, then work one half double crochet stitch blo in the next. Continue working 1 sl st blo, followed by 1 hdc blo in the remaining stitches to the end of the row. Turn. The last stitch of the row will be an hdc. (13 hdc, 13sl sts)
Row 3: ch1, hdc st blo in the first st, then work one slip stitch blo in the next. Continue working 1 hdc st blo, followed by 1 sl st blo in the remaining stitches to the end of the row. Turn. The last stitch of the row will be an sl st. (8 hdc, 8sl sts) ).
Repeat rows 2 and 3 until you have a total of 42 rows.
Joining the Hat
To join the panel together to form a hat you will lay it down flat. Join the two short ends together. Attach the yarn needle to the yarn tail. Weave up the side of the hat to join the two short ends of the panel together to form a tube.
Once you reach the top you will use the yarn needle and weave along the top of the hat in and out pulling in every few stitches to tighten up the top of the hat until you reach the beginning.
Then weave in the yarn end back and forth through the top of the hat to secure. Finishing with the yarn tail on the inside of the hat.
Finishing: Weave in all remaining ends of the hat with the yarn needle! You are done with your new crochet hat!
CLICK HERE TO GET THE PDF VERSION: ETSY AND RAVERLY
Hat Pattern for Men’s Size
To Start: Ch 28.
Row 1: In the third chain from hook work one hdc stitch, and into the next stitch one slip stitch. Continue the to the end of the chains row working 1hdc, 1sl st . The last stitch of the row will be a sl st. (13 hdc, 13 sl sts)
Starting row 2 all the stitches for this crochet hat pattern will be work in the back loop only.
Make sure to work the hdc sts on the top of the hdc sts from the previous row and sl sts on the top of sl sts of the previous row.
Row 2: Chain 1, sl st blo in the first st, then work one half double crochet stitch blo in the next. Continue working 1 sl st blo, followed by 1 hdc blo in the remaining stitches to the end of the row. Turn. The last stitch of the row will be an hdc. (13 hdc, 13 sl sts)
Row 3: ch1, hdc st blo in the first st, then work one slip stitch blo in the next. Continue working 1 hdc st blo, followed by 1 sl st blo in the remaining stitches to the end of the row. Turn. The last stitch of the row will be an sl st. (13 hdc, 13 sl sts) ).
Repeat rows 2 and 3 until you have a total of 44 rows.
Joining the Hat
To join the panel together to form a hat you will lay it down flat. Join the two short ends together. Attach the yarn needle to the yarn tail. Weave up the side of the hat to join the two short ends of the panel together to form a tube.
Once you reach the top you will use the yarn needle and weave along the top of the hat in and out pulling in every few stitches to tighten up the top of the hat until you reach the beginning.
Then weave in the yarn end back and forth through the top of the hat to secure. Finishing with the yarn tail on the inside of the hat.
Finishing: Weave in all remaining ends of the hat with the yarn needle! You are done with your new crochet hat!
You might also enjoy a browse on the main category pages for FREE CROCHET PATTERNS FOR HATS.
What’s Next?
Pin this post: Save this tutorial to your >>> Pinterest <<< boards so that you can come back to it later.
Leave a comment: We love to hear your feedback. Tell me in the comments below!
Share on Facebook: When you make this project, share it on social media and tag me.
Have questions? Join the Facebook Group! We created this group for you to share pictures, ask questions, and help each other out.

I’m Making the buttercream hat and it says to chain 26 and start in the 3rd chain from the hook. Then it says you would end up with 13 hdc and 13 slip stitches. If your starting in the 3rd chain from the hook to begin, how can you end up with 26 stitches at the end? What am I missing?
LikeLike
Thank you for taking the time to write. I fixed the error. There should be 28 chains.
LikeLike